Yes it was baked for around 2 hours after painting and letting it flash off.
The badge appears as if it was an original Scott Bonnar manufactured product from its day, it's that good.
Probably going to apply the decals to the Chain case today as the paint on that is about a week old now as I wasn't quite happy with the original finish and decided to fully resurface it and thus it was only redone last Sunday afternoon. Even with the baking process used this paint still takes some time to completely go hard right down to the base material.
Cheers, BB.
I live a 24 Hour lifestyle, but every now and again I seem to fall asleep, well at least that's what my wife tells me.
The badge appears as if it was an original Scott Bonnar manufactured product from its day, it's that good.
Cheers, BB.
It looks like a rare NOS part just unwrapped from the wax paper for the first time in 45 years. If you were less scrupulous you could sell it as such on fleabay.
Ahh, if only victa had kept producing the thumblatch catcher series, they would be in better shape today!
Well I've decided as I'm going this far with this resto that the rear roller just can't go back in being just cleaned up on the outside, so I decided to pull it apart and yon and behold inside the roller assembly I found a mouse nest.
So from that it was a full strip down and rejuvenation. Even though it had lots of rust on it, it still came apart rather easily.
Anyway here is a photo of one half after painting and also the paint used which was pretty much a perfect match to the original paint colour used on the cast iron assembly. The locking collars are originally finished in the same colour as the reels were poainted from day one, that being Chevrolet Orange. Those haven't been done as yet as I'm waiting to get those back from the plating shop with them being re-zinc plated and also the bearing carriers.
Anyway the photo below shows one of the roller halves along side with the paint used. Even though this is cheap paint from Bunnings it's pretty much a perfect match for what was originally done during production of our much loved mowers. Also this paint is touch dry within 10 minutes which is a bit of a plus. One thing to take into consideration and that is that all the top sides of the ridges will have their paint rubbed off in no time when traversing over hard surfaces. These were only ever painted so as to keep corrosion at bay between production and the eventual sale of the mower. After that it was the purchasers problem I guess.
I live a 24 Hour lifestyle, but every now and again I seem to fall asleep, well at least that's what my wife tells me.
Come this far may as well pull that roller apart and get all the crap out, I painted mine inside as well to try and make it last longer. The paint on mine is holding up pretty good as it only rolls on the grass thanks to the trolley I made for it, I brushed the paint on my roller as I used the $10.00 metal paint from Aldi. As the paint wears I will just spin the roller around by hand and brush it back on.
Please note that the sole plate is only installed so that I can level the rear roller, then it will be removed and have the dummy installed so that the larger Verti-Cutting reel can fit inside the given space. The original sole plate would be in the way of the reel if left in.
Still awaiting the package from Cam in Queensland containing the new cork linings and roller end caps. It's nearly been 2 weeks via Australia Post which is really poor I might add. Sadly no one to date has come up with replacement brass bushes so that the original die cast front roller end caps can be utilised again. At this stage it's basically swap over to Series II plastic ends or change to something totally custom made.
I live a 24 Hour lifestyle, but every now and again I seem to fall asleep, well at least that's what my wife tells me.
Starting to look the business now, you would never now it was that piece of rust pile before you started. Any idea how much lighter your wallet is so far? I never went as far as to re plating all the nuts and bolts or replacing them with a bolt kit, so far your putting us to shame, guessing you have a new Briggs or Honda engine lined up for this.
Yes you are correct it will have a new Briggs slated on to it as I already have it. In actual fact it's the one that seized up on me and I ended up with it back when I forwarded it to Briggs for a replacement. (Earlier thread on this topic).
Anyway, I ended up re-birthing that particular Briggs and it now runs perfectly so effectively it's a new engine for free, so as far as costs are concerned the most expensive thing will be the Chrome Plating of the handle bar assembly which is setting me back around $130, all the zinc plating has been for free as I'm actually doing that myself in a friends shop along side of other work that's being run through at the same time. BTW all the bolts that have been used and selected in this project are all period correct to the chassis as there were minor differences along the the time line of 45's.
The main costs will be a few new parts, like front roller end caps, bearings at trade price and a few cans of Grey paint for the rear roller, remembering that the Hammered Deep Green was free from "Ultra Color". Most other stuff I've obtained I've either already had on hand or sourced from the Boneyard. Must admit when I was buying all those 45's, I never paid any more than $50 for a machine in any condition. Only now is it paying dividends in droves when one considers the price of parts and pulling them from totally shickered chassis' feels so right to me. In the end the maggotted frames can go to scrap as they owe my diddly squat and have paid for themselves many times over.
MF, As far as the paint coming out of spray cans is concerned, if one knows how to paint correctly then there should be no tell tale signs from what the paint came out of. In saying that these cans did give lots of grief along the way but how one overcomes those issues is the secret between a good tradesman and a very bad one I'd say.
Cheers, BB.
I live a 24 Hour lifestyle, but every now and again I seem to fall asleep, well at least that's what my wife tells me.
Cork linings along with the end caps finally arrived from Queensland yesterday after spending 2 and a half weeks in the postal system, so this will probably have me finish the machine off this weekend and that's providing I can obtain the handle bar assembly late today from "A Class Metal Finishers".
With any luck I should have some more photos to post up soon.
Cheers, BB.
I live a 24 Hour lifestyle, but every now and again I seem to fall asleep, well at least that's what my wife tells me.
Well the bars were finished yesterday and a few final bits and bobs had to be zinc plated so I went down and did those also during the course of the day.
So hopefully I now have everything and as such it should be finished today ready for presentation.
We'll see how it goes..............stay tuned.
Cheers, BB.
I live a 24 Hour lifestyle, but every now and again I seem to fall asleep, well at least that's what my wife tells me.
I think you might find the delay with Aust Post is due to the severe bushfires. These fires are on an unbelievable scale in NSW right from the Qld boarder down to Sydney. It's very worrying times for a lot of people especially around us as the mega fire burning north west of Sydney is over 350,000 ha and he been reported unstoppable unless we get rain which is not due to late Jan early Feb.
Aust Post has got a notice on their website about the delays due to highway and road closures.
I guess I forgot about that as I thought it would've gone via Air but when it showed up it was in a "Flat Rate" satchel which would've meant by road and not air I guess.
As far as finishing the machine is concerned I've had a set back, forgetting that I'm going to require chain link extenders as it's being run as a Verti-Cutter and not a cylinder reel. The VC is set down much further away than a normal cylinder and thus requires a slightly longer chain.
These seem to be a bit hard to come by here in SA so I'll wait for a friend to get back on Tuesday and get a couple from him as he's got them on hand and that's much easier for me.
Meanwhile I've removed the original brass height adjuster, glazed and polished it as the original cast finish was really poor, but not forgetting these were all originally painted in the same colour as the chassis so quality of casting wasn't that important.
One thing you'll notice if you look at the before photo that's in the next post and that is this poor old adjuster knob has certainly copped it's fair share of harsh abuse, it's even had a pair of stillsons on it at some stage of it's life. So the challenge was there
Anyway it's now done and ready to be refitted after 2 hours on the wheel.
Wow, sometimes I wonder why we do these things to ourselves ?
Cheers, BB.
I live a 24 Hour lifestyle, but every now and again I seem to fall asleep, well at least that's what my wife tells me.
I'm going to clear coat the adjuster so that it stays bright and doesn't continually tarnish like raw brass will do automatically. I did the same to my house numbers that are on my letterbox and this time they have stayed highly polished for well over a year now and remembering that they sit outside all day long copping the elements, while the mower will stay inside in the lounge room ...............just kidding, .......in the garage out of harms way.
I live a 24 Hour lifestyle, but every now and again I seem to fall asleep, well at least that's what my wife tells me.
I thought the photo in the previous post of the knob dident quiet look up to your standard, I actually thought you painted it with a gold leaf paint, second picture looks alot more to your standard however that's a damn long time to polish a knob. You must of spent alot of time sanding out all the imperfections before polishing on the wheel. I polished my aluminium 12ft tinnie a few years ago with a sissal, closed sewn cloth then a buffing mop after I sanded the whole inside and outside, worst thing I ever did, I burnt out one grinder and it took a few weeks to do 3 passes with a black, brown then white bar which turned the boat into a mirror finish that eventually oxidised with the salt water after a few years, thought it would look good which it did and repelled the water like off a ducks back but it was like having a tanning shade as the suns reflection would cook you in 10mins and it was so bright. Stupid things you do.
What clear coat do you use, as some clears I have used in the past tend to peel and flake off. I once used a clear sealer spray that artist use on oil painting canvas on a bare steel horse shoe that my wife gave me15 years ago and still to this day has not a spot of rust and is just as it was when she got it made and stamped from the blacksmiths.
Will have to wait a few more days to see the finished result.
It was put on just as a trial fit while I was putting the front end stuff in. There was no intention for it to stay like that. In actual fact I only had that photo of the whole assembled unit at that point in time and didn't really expect anyone to notice the rough looking adjuster. Now in saying that I spend a couple of hours on it wasn't just the wheel work but as you suggest the filing and sanding by hand that took up most of the time. I have also done the brass thrust pad as well so that the two would match, just remembering that both these items were originally finished in body matched colour which I've always felt looked a tad off. Anyway the clear I've used is an industrial grade of clear used for lacquering brass plaques like what Doctors have mounted on the outside wall of their surgeries. It was given to me years ago, try 20 years ago and has still held up in the sealed can that's been opened up many times over the years.
All I'm going to do is sticker up the chain case tomorrow and apply the brass badge on to the handle bar shield and that's about it for now until I get the two half links for the two chains on Tuesday. Only then can I say it'll be finished.
Anyway here's as she stands right now,
Cheers, BB.
PS. Oh and yes that's a piece of sheet rubber supporting the drive shaft on the clutch fork until the engine finds it's way on to the engine deck and lifting the whole clutch / drive shaft assembly. Oh and how I hate fitting engines on to freshly painted surfaces..... grrrr !!
I live a 24 Hour lifestyle, but every now and again I seem to fall asleep, well at least that's what my wife tells me.
Yep certainly starting to think that to after the wife said to me yesterday, "and you're doing all this for a gardening tool ?"
Starting to check my sanity.
But in saying all that, the reason why I decided to do this to the worse looking POS in the boneyard was to show others that you don't have pay the extortion figure of $700 to find a really good one as a base for ending up with a superb one.
No one now would paid any more than $100 for it in the state that it was when I picked it up, mind you I paid around $10 for it if my memory serves me correctly around 5 years ago and even then I thought I paid too much for it. Who would've known that it would've gotten a second life when it was then destined for the scrap heap.
Would love to find it's original owner if they were still alive, but again if I recall correctly I picked this one up out at Tanunda in the Barossa Valley as part of a bigger lot of items back then. Not sure if it was this one or the one sitting next to it in the boneyard, but after having around 40 of these things over the past 10 years makes it a tad hard to remember each and every single one of them and their detailed history.
There are even a few twin railers out there that were only bought for their parts content and the chassis were destined to go to meet their maker, but now you just wouldn't even entertain that thought.
Oh well, how times have changed
I'm still waiting for this oversized / rated bubble to burst when I'll be reverted back to being a dinosaur with one of those old roller thingy mowers that Grand dad used to have.
For now I can't do much more as I'm awaiting to get hold of a couple of half link extenders for the two chains, Primary and Intermediate chains and as such I'll go and play with a Honda powered Victa that I bought on Friday which is in pretty good nick but has the blasted choke not functioning as they usually do on a GCV-160.
Cheers for now, BB.
I live a 24 Hour lifestyle, but every now and again I seem to fall asleep, well at least that's what my wife tells me.
I cried when I first used mine, I was so carefully when I tightened up all the bolts and even though I keep it clean the last thing you want to do after mowing the lawn is spending an hour detailing it to look new again, I did it a few times but when your doing the lawn a few times a week, you give up and appreciated the result the machine gives you for the money and effort you spent. Like I have said in previous posts it's a labour of love and it's the poor man's vintage car restoration which people can't afford to do anymore or are time and space poor, I personally see it as a hobby similar to when I was a kid building model planes and car kits that sat on a shelf and had no purpose but collect dust. I wish I had space for storage as I would love to do a few machines a year and keep them as displayed items, these old machines take you back to a time that don't exist anymore which sometimes make you wish they had never changed.
Totally get that and to make matters even worse it's going to be a Verti-Cutter and not a regular mower, thus it'll make tons more mess.
I'm seriously toying with the idea of changing the cutter sprocket to the Electric 45 variant which is smaller than the petrol issued unit. This way I won't require such a long chain and it will spin the cutter much faster which will be better in the opperation of the machine. The only draw back is that I'll have to slip the landroll clutch as it will want to travel forward much quicker and that something we really won't want on this type of format.
In actual fact a Groomer / Verti-Cutter will require far slower movement so as not to load the machine up as these 45's were never designed to be put under that type of strain, thus the slower one travels the less load is place on to the reel. I guess clutch corks are pretty cheap in the grander scheme of things and it doesn't take long to reline one. The other thing to take into consideration is that this machine will only be used probably 4 to 5 times per season opposed to the cutting machine that gets used every 2 days or so.
All in all I'm well versed in knowing that this machine will infact be a used machine and not an ornament sitting gathering dust in the shed.
After this machine is completed I'm going to tear down the 20 inch Series 1 mower at the end of this years cutting season and do much the same to it as has been done to this 17 inch Series 1 machine that's featured in this thread. The plus side will be that the 20 inch won't require no where near the amount of work and sourcing of bits and pieces as it's in superb working order and will be solely a cosmetic upgrade.
Hell I'm the original user of a 45 in this street and have introduced cylinder cut mowers including restorations on 3 neighbours machines in my street and as such my machines are not keeping up appearances so I guess I'm letting the side down from where I see it.
As they always say Mechanics drive the biggest Poo heaps don't they ?
Cheers, BB.
I live a 24 Hour lifestyle, but every now and again I seem to fall asleep, well at least that's what my wife tells me.
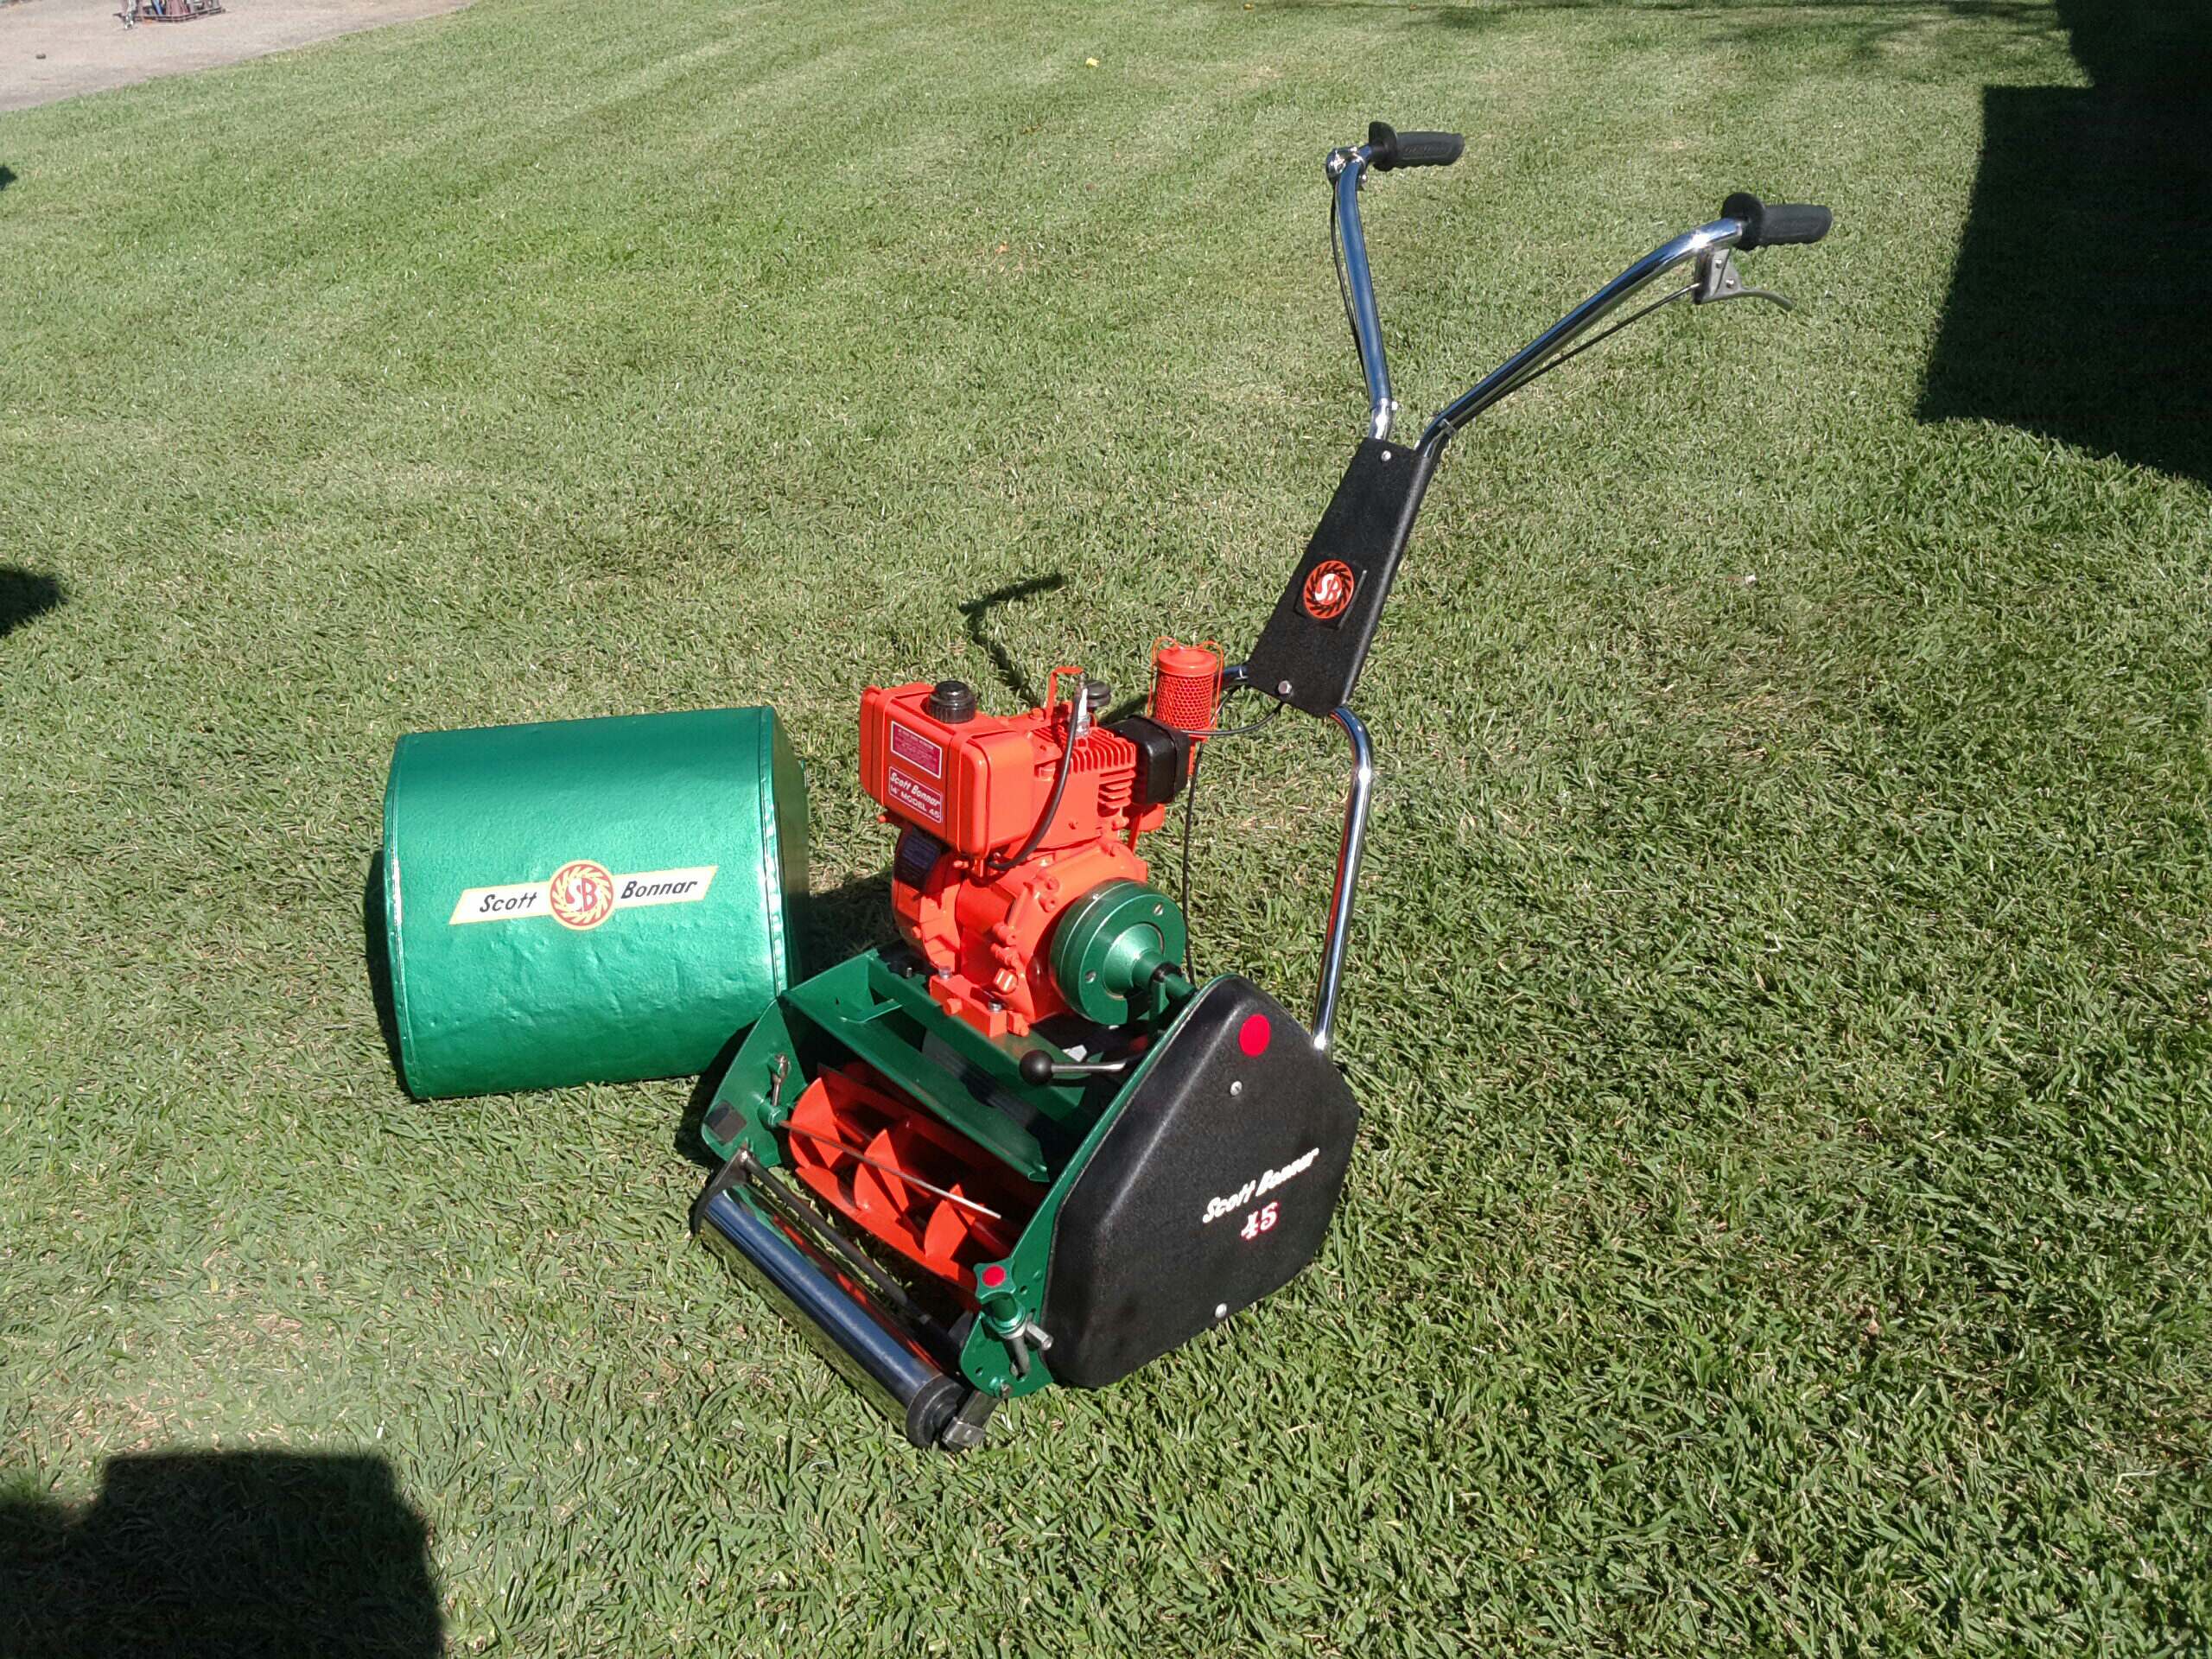
Basically I've finished the machine off tonight apart from one major detail....................the "Scott Bonnar 45 decals" on chain case are still to be applied, but apart from that all it needs now is to have all the workings lubed and then probably a few very minor adjustments and then she's ready to go to work.
I will take a whole series of final photos for the record to put up on this thread to pretty much finalise it as we all hate unfinished threads or better still a story without and ending.
So for now here's few more to tease everyone I guess.
I live a 24 Hour lifestyle, but every now and again I seem to fall asleep, well at least that's what my wife tells me.
and with a few final little adaptations made using thin nylon washers on a few fasteners so that it won't remove the paint for now.
Items like the Chain Case securing screws, Grass Deflector thumb screws, Reel Bearing carrier front nuts that are forever needing some sort of adjustment. Using plastic washers will prevent paint damage. Also you'll notice the thin rubber edge strip that I've fitted around the perimeterc of the Chain Case so as to prevent paint rubbing via the Chain Case that has rather sharp edges.
Well below is a photo taken straight after attaching the Chain Case after decal fitment.
I am going to do a final photo shoot with this mower and also a full list of credits of various folks that have helped with services or supplies along the way. I strongly feel that the people that have inspired me and helped make this project happen all along the way deserve the credit that should be given.
anyway here's a Sneak Peak from the "Scotty's Birthing Suite"...............................
I live a 24 Hour lifestyle, but every now and again I seem to fall asleep, well at least that's what my wife tells me.
Yes I couldn't agree more ! Chrome is the only way to go in my opinion, but that's pretty rich coming from an Electroplater isn't it ?
If I was still in the trade there would be quite a few more parts that would receive the Midas touch but it's just so cost prohibitive nowadays and as such why so many are now only painting their bars. Sorry but it's just not for me.
Cheers, BB.
I live a 24 Hour lifestyle, but every now and again I seem to fall asleep, well at least that's what my wife tells me.
Awesome restoration, that paint is pretty good for a spray can. If only thay could stay like that when you use them. Is that rubber grip on the clutch drive leaver off a model 40? Or did some 45's come with them. You now just need to spruce up your daily drive to keep up with the rest of the street.
Firstly thanks for the kind words and yes the 20 inch Series One machine will be done over the winter when it's not required.
At this stage it's a fully functional survivor and I'm not ashamed to use it like it is as it purrs like a kitten.
As far as the clutch grip is concerned it's from a Model 45, but I can't say which exclusive variant it's from otherwise everyone will want to find that version and they'd be none left to be had. Ha Ha Ha !............................................Ok the electric version. This was done as a safety precaution so as to avoid an electric shock should something go wrong with the power cable etc and turn the metal of the machine Live.
That's the only real part that's worth salvaging from those mowers that fetched no more than $50 tops for so many years. Now you'll always find a sucker that thinks he's secured a bargain at $200, only to get sick of draggin' a heavy 240 extension cord around behind one's self. Then they oddly get resold soon afterwards again and again.
One thing about Electrics is that many of them have superb handle bars and transmission parts on them as the people that bought those types originally kept them indoors well out of the weather due to them being an electric appliance opposed to a smelly petrol machine relegated to being left outdoors. Many of the electrics also have good catchers without any rust due to this indoors thing happening.
So there you go..........another secret let out of the bag, don't tell anyone please ?
Cheers, BB.
I live a 24 Hour lifestyle, but every now and again I seem to fall asleep, well at least that's what my wife tells me.