From how I've always understood it the counterweights are to compensate the weight of all the trans components being on one side and nothing to do with the engine.
Cheers, BB.
I live a 24 Hour lifestyle, but every now and again I seem to fall asleep, well at least that's what my wife tells me.
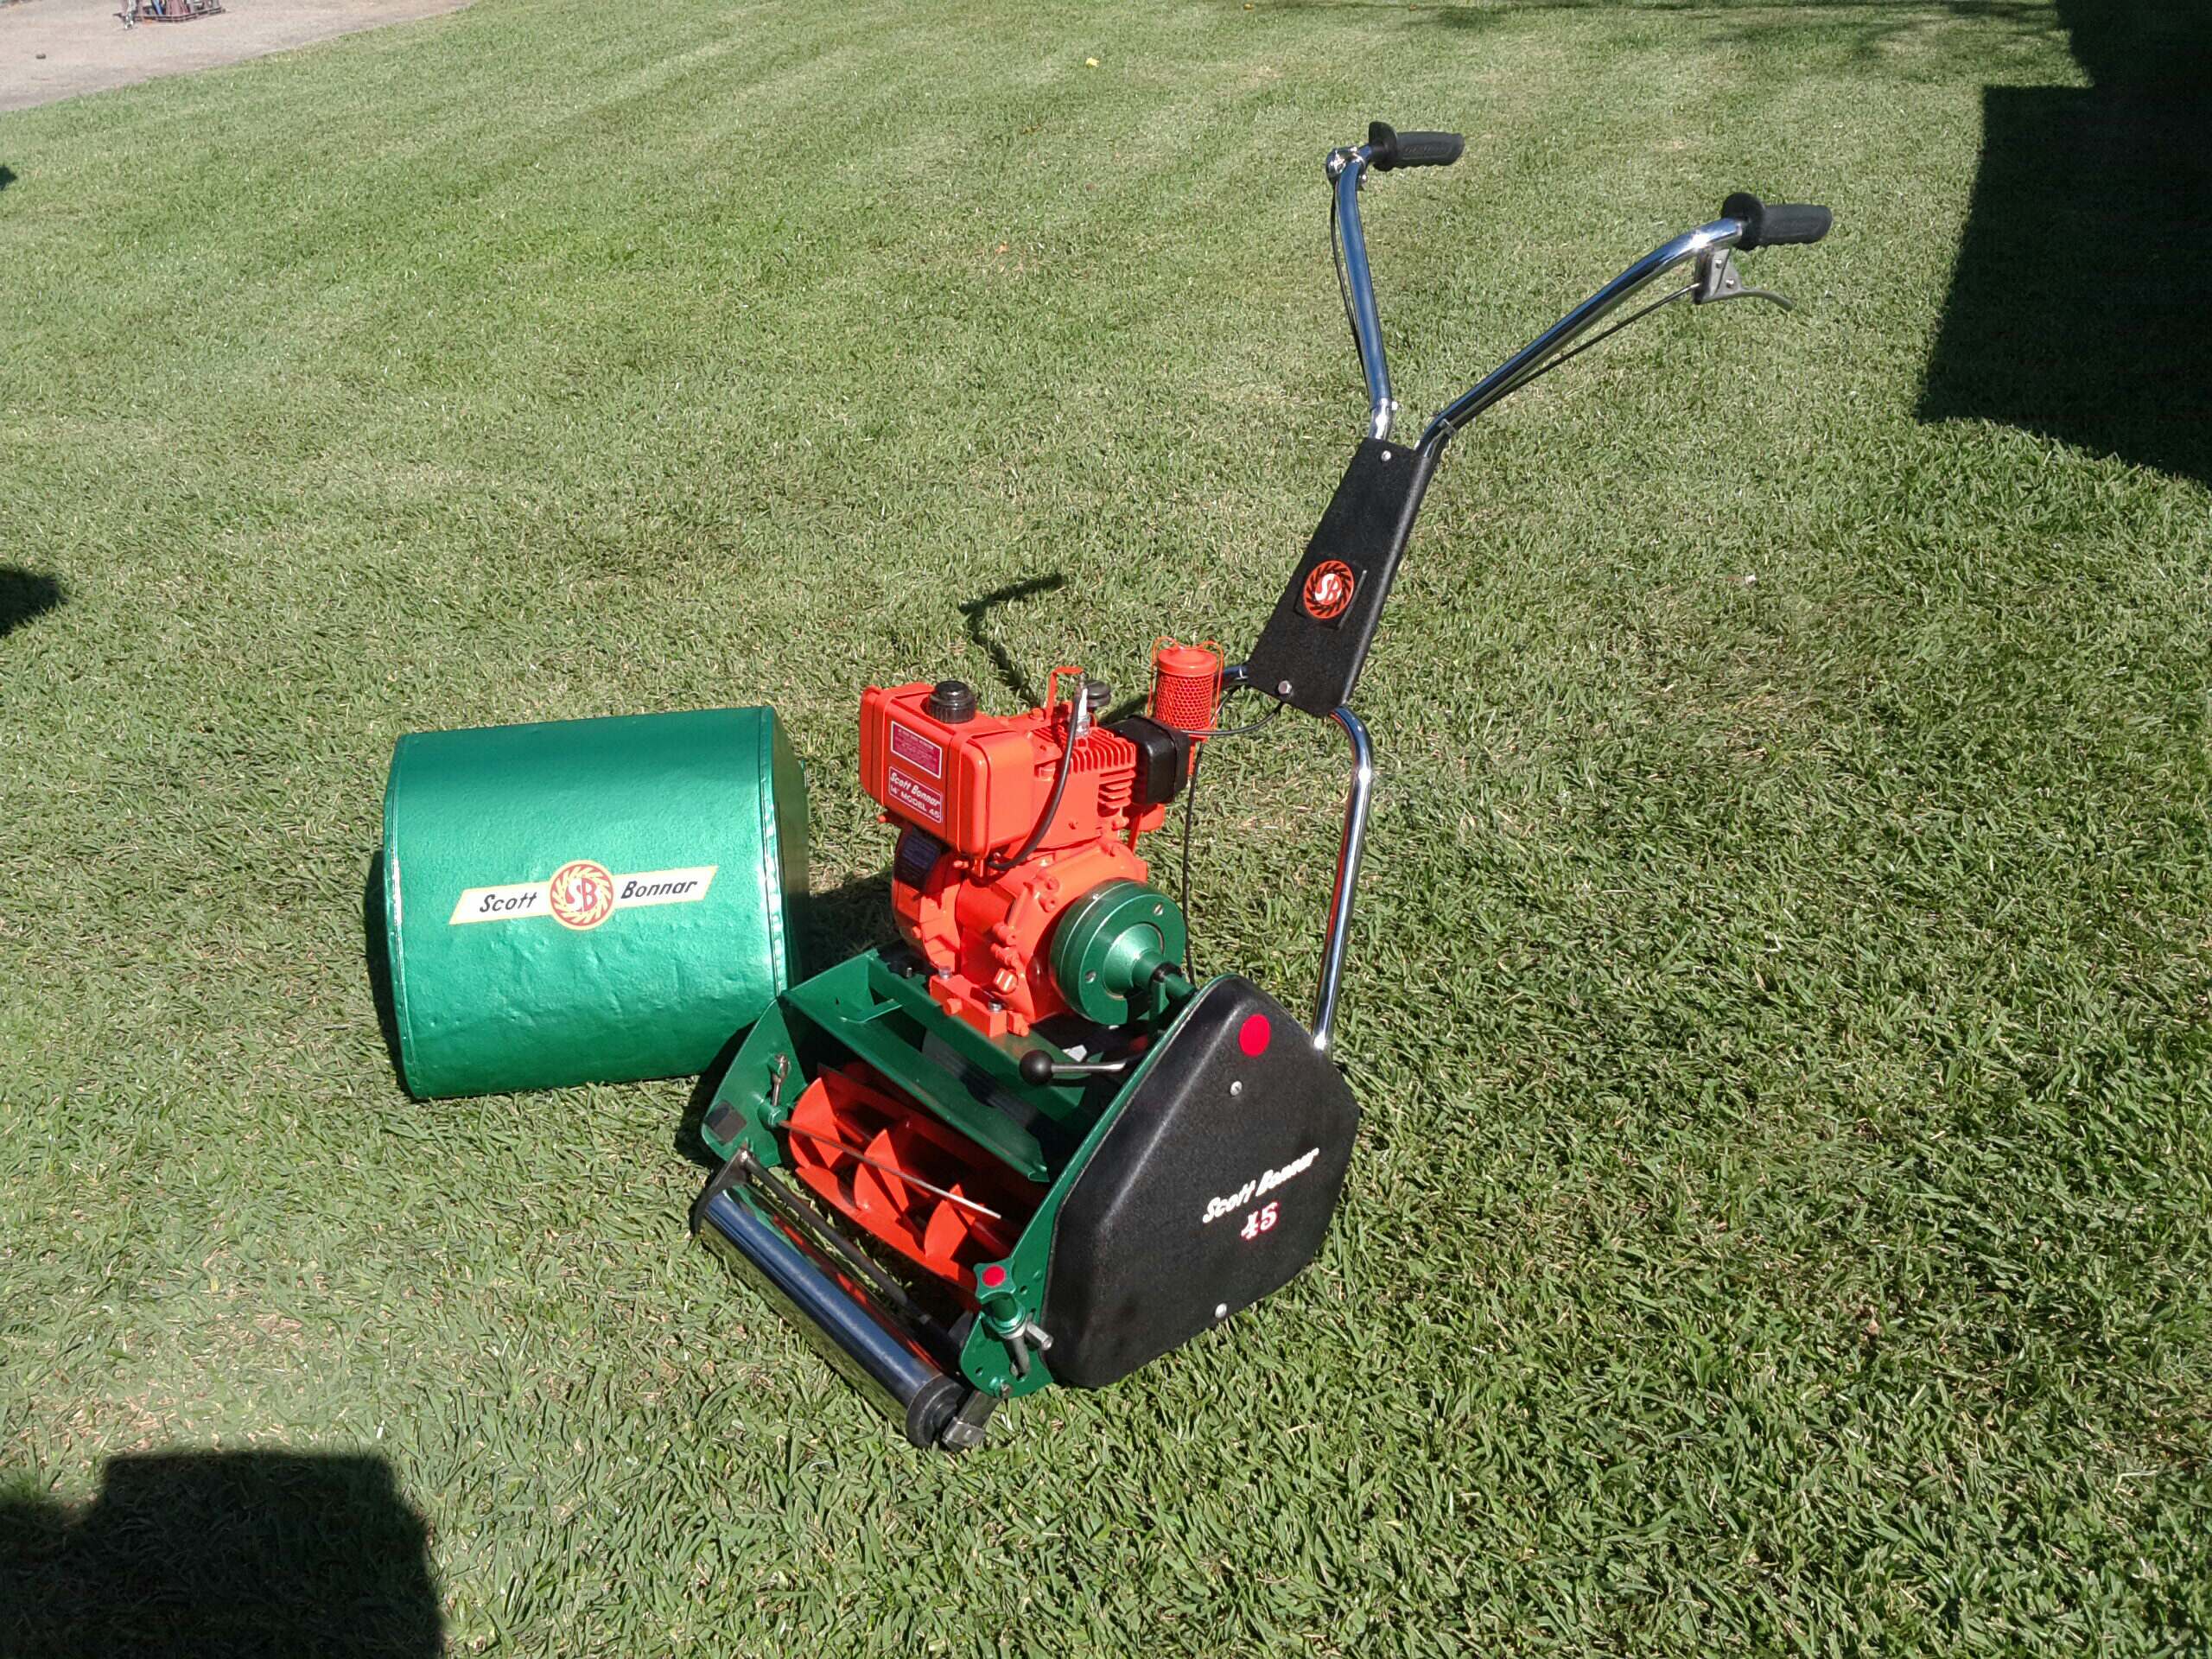
Ok here is the newest update and the suprise I mentioned before. I know it's not everyone's cup of tea but I have come this far with keeping it original so why not. Still haven't seen a restoration with the original black wrinkle colour scheme so hoping to be the first, and inspire (or frighten) others who own a mid model SB.
My Dad bought me my first new reel mower - a 14" model 45 with black chaincase and handle nameplate. I was a teenager.
I found this black finish very nice and a brilliant contrast to 'Kirby orange'.
I guess folks do not reproduce it because no one has offered advice as to how to reproduce it!
For me, it was not 'hammertone', but more of the crazed finish I would see on old typewriters.
Yours is the first credible attempt at this - and it has brought back old memories. That finish must have taken a lot of thought before you found a 'wrinkle' finish - in a can!
Thanks CyberJack, I always had in the back of my mind to replicate the wrinkle finish. As you said no one has attempted it so I was winging it and to be honest the can in the picture was my second can and I had to strip back the first attempt as the finish was not how I Invisioned it to look nor did it match the original paint on the back of the chain case. I followed the directions on the spray can and the results were great if you were painting a valve cover on an engine but not a chain case for a SB. The first results I got turned out to look more charcoal with a rough texture like sandpaper or a grinding stone with a Matt metallic rock look. The way I over came this to get a more smooth black satin finish was to do lighter coats with a short mist spray and a flick of the wrist rather than a heavy sweep (as instructed on the can). I only did 2 light cross hatch passes after waiting 5minutes between coats then allowed the paint to almost dry but still be wet and smooth. The secret is then to heat the finish so it wrinkles but a heat gun or my baking oven is to hot for this finish look so a hair dryer that's not to hot is the key and to make sure you let the paint craze rather than crinkle so its not to rough and the paint has that satin smooth look (remember the wetter the coat the rougher the crinkles so let it dry a bit). It's not easy to get the finish I wanted, I made it up as I went along as I said i had to buy another can and re-strip the first attempt. It's also important not to spray on a hot day as the paint will crinkle while you watch it with the heat of the sun ,best to do it in the shade either early in the morning or afternoon/night (better still during winter) as the paint will stay smooth and dry out slowly untill your ready to heat it to the finish you want.
Below is the first attempt that looks like and feels like a grinding disc that was baked in the oven as instructed from the can label, the second pic is my attempt that's more of a smother black that has a leather/vinyl craze look.
I must admit that this black chain case look is also growing on me rather rapidly, but I guess that's because it's all looking super fresh and rather contrasty opposed to how most of the examples out there in use or rescued units now look.
Everything I've seen on original mowers has a horrible appearance after 43 odd years as these were made back in late 1976.
As every component is a different colour on your rebuilt just makes this one look ever so much more striking in its appearance.
I'm glad there's a difference in the shades of the engine and reel because truthfully that's why everyone paints the reel red and not Chevy Orange. Contrasts are something that the human eye really likes.
Cheers, BB.
I live a 24 Hour lifestyle, but every now and again I seem to fall asleep, well at least that's what my wife tells me.
I agree with you there BB about original ones looking gastly as they are mostly faded and rusted up. The good thing about the wrinkle paint is that it covers up all the pitted steel that was really badly rusted on the handle bar plate. As good as Hammertone paint is to obscure imperfections on uneven surfaces, my plate looked like it had chicken pox scars when it was de-rusted. I did consider filling the pits with filler but the wrinkle paint went straight over it and you wouldn't even know. I have seen some resto's where the pitting comes through the hammer gloss finish. The paint finish looks alot better in person than it shows up in photos and I'm glad I ventured into unchartered water's as I now love the look and texture, it should also pop once the white SB decals and red/white 45 go on the black chain case. The brass decal should also pop on the handle bar plate.
That reel is also more red than it shows up in the photos compared to the engine, however if you saw the reel on its own with out the engine you would say it's orange.
You are spot on regarding how all the black chain case examples appear nowadays.
It's strange how they all rusted up so much and the only good part left on them was the surface inside the case. This tells me that whatever black paint they used in Holland street was some really cheap and nasty non resistant stuff.
This colour scheme lasted for the small part of a year before the release of Scott Bonnar's all new "Apple Green" colour being released across the full range of mowers.
In saying all of the above this will be the first time I have ever seen an attempt to faithfully reproduce this limited release colour scheme as all the mowers that sported this look have always been returned to the former all over Alpine Green appearance in the restoration process. I do feel that most restorers of the Model 45 never did like the Green and Wrinkle Black look, but in saying that this is only because of how bad the existing examples looked at the time prior to restoration and also how different it made the 45 look from the original Series 1 appearance which most folk are trying to replicate.
Cheers, BB.
I live a 24 Hour lifestyle, but every now and again I seem to fall asleep, well at least that's what my wife tells me.
I personally love it B S. Can't wait to see the finished product!
Did these limited run machines also include the catchers in the black? As I have come across a number of 45's in the marketplace over the years (in a non restored state) with black catchers.
Black catchers were "GENUINE" replacement spare part catchers from Scott Bonnar / Rover. The catchers on the wrinkle black machines were all finished in Alpine Green.
This was also the era of the first logo change going from the script written "Scott Bonnar" to the first Pentagon decal which was originally in Red and White but soon after when the black chain case finished was altered to Black and White.
Personally I wished they stayed with the Red and White, but being a North Adelaide / Sydney Swans supporter has absolutely nothing to do with it.
Cheers, BB.
Last edited by Bonnar_Bloke; 15/02/1908:06 PM.
I live a 24 Hour lifestyle, but every now and again I seem to fall asleep, well at least that's what my wife tells me.
Hi GTX, BB is correct my catcher is green and my chain case logo has the script Scott Bonnar with the red/white 45 underneath. I would be guessing mines a late 74' or early 75' model as it has the double brass id plates, I have seen some models similar to mine with the black chain case that have the brass top plate and aluminium bottom plate. I wonder if the wrinkle paint rusted through as there was no primer underneath, suposably hammer paint doesn't require to be primed if applied to bare steel. I hit mine with the engine enamel primer before the wrinkle finish, but as BB said funny how the inside stayed good after 45 years.
Can anyone recommend a reputable place anywhere from Sydney to Newcastle who does a good job at sharpening the reel and bed knife? I'm at that stage where I can't do anymore until the blade and reel goes in, and handle bars get chromed. All there is to do is the last of the chains when reel goes in, grass deflector and engine then adjust the cables. I'm like a kid waiting for Christmas.
Ok I got a couple of places in Sydney to grind the reel so hoping to get that done this week or early next, but I dident note down which way the end bearing washers go on when I stripped the reel down. Does the outer curve face the bearing and inner curve cup face the reel? Or other way around.
My 304 stainless steel roller arrived today and I can say that I'm more than pleased with the outcome.
I took a stab in the dark with the measurements described online and what do you know exact size and only set me back $29.00+ free shipping (600mm long).
The best part was I custom made it myself and didn't have to buy a reproduction online for $150.00 that takes away the original vintage look, I might order some new end caps but for now I will use the old ones until I pay for all the expensive stuff ahead of me.
I also took the handlebars down yesterday for re-chroming so they should be back in about a week's time, starting to look shiny now.
Guessing no one's been able to find a pipe the same size as the original in SS as I searched everywhere and came up empty. Stumbled across an intercooler pipe for turbo performance cars, which you could probably find from a high performance vehicle store or just order it on E-bay as I did. Just make sure you order the SS 1.5mm and not the ally 2.0mm Size to buy is 2.75" 1.5mm wall intercooler straight mandrel pipe SS. The guy at the chrome plating shop quoted me $60.00 to chrome the original rusty roller yesterday, glad I took the gamble on the SS pipe.
I've just bought one for myself. My only issue is cutting it off absolutely square as my cut off saw which is identical to BS's Makita seems to always cut with a slight deflection in it no matter how gently I allow the disc to cut. What annoys me even worse tis that this Makita is nearly brand new. I've been told that it was always a bit hit and miss with these saws as to whether they cut straight or with a slight lean to them.
Cheers, BB.
I live a 24 Hour lifestyle, but every now and again I seem to fall asleep, well at least that's what my wife tells me.
BB, what you can do to get the cut straight is to not clamp it up tight, just so you can rotate it, hold down on it cut in about a third of the way and rotate it slowly. Just be careful and take it slowly. You can also clamp it, cut in a third, unclamp it rotate, cut and repeat. You can also, if the cut is off square, lock the blade down and with the saw running push the tube up against the blade and rotate slowly and you will be able to see once it has squared up. Be aware that this will shorten the length so if you do this make sure the original cut gives you enough length to grind back
Mine does the same at the end slightly tappers off, but I then square it 90 degrees on my linisher and sand it flat. I also gave it a few extra mm for squaring it off Although the cut off saw isent accurate it's the easiest and cleanest cut I could get doing it at home as stainless is damn hard. Beats cutting it with a hack saw.
What you can maybe try BB with an off cut to see if it makes a difference is take the folding guard off, I know it's not safe but I notice that when the guard hits the work piece it tends to push the saw handle to one side. Maybe with out the guard the blade will run it's true coarse and not have the pressure of the guard steering it off coarse. I may give it a try next time I use it to see if it makes any difference, NormK idea will work to just use a brick or something solid with a flat surface as an end stop behind the open pipe end so you can push back against it as a jig then rotate the pipe around with the saw in the down position.
I removed that guard quite a few years ago as it's nothing more than a PITA and always gets in your way. Pretty much like I thought, I'm not the only one experiencing this issue of un-square cutting.
As Norm suggested and I've done in the past and that's take a few different bites at it and then use the side of the blade as a disc sander. I've always gotten there in the end I guess but just wondered if there was just something that was uniquely wrong with mine of if it was just me.
Cheers, BB.
I live a 24 Hour lifestyle, but every now and again I seem to fall asleep, well at least that's what my wife tells me.
BBthe frame only has to be half a degree out of square and over the diameter of the pipe it can end up a mm or two out of square. You also get heat distortion that makes the blade warp slightly as well
Decided to get stuck into the catcher as everything is done I'm now just waiting for the handlebars to come back from the electro plater.
Holes in the catcher filled in quiet well, I wasn't game enough to try welding it as I haven't welded anything that thin before and I'm sure I would of made the holes bigger if I tried. Also gave some of the dings a bit of a bash, its not perfect still has hail damage look at the nose but it's in the correct shape. Still have to paint the inside of the catcher as I had a bad batch of paint and have to take it back and get it replaced.
My best advise would be to keep an eye out for an Electric Model 45 as many of those are found to be still in really good shape and their catchers are generally near perfect. (also they sell dirt cheap at around $50) I see them consistently and that's how I got my perfect 14 inch catcher for my original 14 inch Series 1 machine..............................that I now never use LOL due to using nothing less than a 20 inch mower nowadays.
I totally understand how Jack felt when he pole axed his catcher as they are never the same afterwards. Sadly it's the nature of the beast the way most reel mowers are designed and that was part of the reasoning behind the concept of the ill-fated Diplomat machine with the rear mounted catcher that one could get up closer to trees etc. without bending them up.
Cheers, BB.
I live a 24 Hour lifestyle, but every now and again I seem to fall asleep, well at least that's what my wife tells me.
I thought about putting more work into the catcher but figured the same thing, will just keep an eye out for another catcher later on if one pops up. I also figured the same thing that it's basically a bumper bar and most likely a tree or clothes line will jump out in front of me first time I use it. The design should of used a solid steel frame around the side folded edges and across the front point of the nose for re-inforcment considering the weight of the mower behind it.
For record I used selleys knead it (steel) to patch all the holes, this stuff is easy to use works like play doh so you can work it into the holes and shape it but dries rock hard with in 3-5mins and can then be sanded. I have used the aqua version to patch small holes under the water line of my boat and it's still holding up. Cheap fix for $20.00
I really feel that the Model 45 was the beginning of a major cut back in steel usage to lighten up the machine as it was never intended to be a greens mower like the Supercut was with all it's cast iron side plates, thus why many folks that get a Supercut and think this is going to set their world on fire soon find that it's just way too heavy and cumbersome to manoeuvre around a domestic garden and also the drive system was basically an in or out system, thus why the hair trigger drive on the 45 was such a hit with the domestic market .............and still is to this day.
Cheers, BB.
I live a 24 Hour lifestyle, but every now and again I seem to fall asleep, well at least that's what my wife tells me.