I have made three as the axle on the height adjuster arm was in very good condition.
Made up a groove cutting tool for the circlip retaining groove
I have the axle protruding a bit to make the welding a little easier, I could have threaded the back side and used a nylock nut but I figured these axles will last a very long time so that was just not warranted. Welding was how they were fixed originally, I also made them an interference fit so they won't be going anywhere as well as there being a shoulder on the axle where it goes through the bracket.
Hi Mowerfreak, This was done by grinding the weld down that secured the axle to the bracket and then applying heat to the bracket and hammering the axle through the bracket. I made up a jig to hold the bracket secure while belting it with my heavy copper hammer, a press would be nice when I have room,
The new axle has a shoulder on it, meaning the the hole is a smaller size than the axle so I turned down the rod until I have a fraction bigger than the hole. Then I heat up the bracket and hammer in the new axle. The bracket expands slightly and the axle is hammered in, when the bracket cools it will grip the axle very tightly.
Finally a new weld is made securing the axle to the bracket.
Jack you might find this interesting, I now know that I have the correct engine.
Hi Paul I feel you are assisting everyone in the KX-A. This is new territory. Clearly, the guiding factor with engines is the crankshaft length. Some makers offered no options; others offered a couple or a bit more. The limiting factor in this was skirt height of the base. As you said, it was designed for a 4-stroke.
I guess Paul's great observation somewhat explains the cast and extra- high adapter plate ... and the 'shaved' cylinder head.
I wonder if that was an SC or Villier's modification. And that catcher decal hasn't been recorded here before.
The more I learn of the KX-A, the more impressed I become. This has been a pretty much forgotten lawnmower.
Many thanks, Paul. -------------------------- Jack
I feel the shaved fins was a Villiers factory modification as the fins are very clean with no burring at all. I feel they may have been cast like this, my other two Torquemajors have full fins.
Excellent work Paul! I had to laugh at myself when you said you made a groove cutting tool for the circlip. My "groove cutting tool" was me holding a hacksaw, cutting carefully as possible around the edge. I think I went through a few band-aids in the process! :-)
Hi John, thanks for the sample of the decal. I had a few problems today, old tank was rusted out so I had another one that I cleaned up and under coated
Fitted up the matching metal bracket which entailed swapping over the the top engine case, the replacement tank is a 4 stud retaking unit. The old tank was 3 stud and a top alloy case.
Went to fit the coil plate and yes it does for but the timing is 180 degrees out, on the alloy case the coil faces the front. On the metal plate the coil faces the rear
They are not interchangeable, the key way in the crankshaft is in a different spot. So now I am looking for another tank with the 3 stud pattern :-(
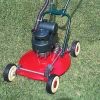
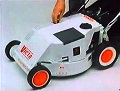
A bit of an update, finally found the correct wheels for this model plus a new set of wheel caps. I was fortunate to have found a new old stock fuel tank and starter which look great, I only need to fit the Torquemajor fuel tank decal and it will be finished.
Fantastic! Metallic blue and solid orange look better than green and orange IMHO. Are Torquemajor decals generally available? I'd like one for the front of my Supaswift Galaxy.
Thanks for your comments, I think green was on the tin base mowers. The catchers only came in the one colour and that was green. The metallic blue is correct for this model, decals are available from John at Rustic Spares.


![[Linked Image]](https://www.outdoorking-forum.com.au/forum/uploads/usergals/2017/07/full-3250-35015-003.jpg)


