Hi, new to the forum and new to Kirby Tecumseh I have decided to take on the rebuild path to the original Scott Bonnar 45 engine rather than replacing it with something else to keep it all original. The engine seems to be all there and serviceable but details and parts are a bit sketchy, I have found a parts diagram on this forum but it's a Scott Bonnar diagram which seems to have SB part# or Kirby part #. The only parts available online are from the parent company Tecumseh US which seem to have different model engine numbers and part# as well as slightly different parts. As I have never worked on a Kirby Tecumseh before it's all trial and error so guessing between US diagrams with Aussie ones is getting a little frustrating.
So my main question is can anyone confirm replacement part numbers for main serviceable parts as there are many people restoring these engines here with great success but there's no reference to the part numbers they ordered to make life easier and confirm comparability.
I'm assuming U.S Tecumseh H25 is the equivalent Kirby H4-4A engine with a different carburettor, filter, exhaust, correct me if I'm wrong. So my next question is the aftermarket carby kit available online for the Tecumseh H25, it comes with a needle seat, spring and a bowl gasket. The needle in mine doesn't have a spring and the needle doesn't have a raised notch for the spring to slot in, there is also no rubber seat in my carby should it have one? Am I missing parts or is it a different design
Main parts I would like to replace and confirm U.S part numbers are. Piston ring set std Pto oil seal Carby kit set Gasket kit set
A good place to find parts is MFG Supply in the States. Rings, carby kits and gasket kits. I have used them regularly and H25/30 parts should be listed ok. Should get all parts less the PTO seal which is a 28540 part number from memory. This can be sourced from a mower shop who has an account with GA Spares as you can't buy directly from them. My carb just had a brass needle and no rubber seal. Regards, Mr Jones.
The confusion is basically this, you won't find anything under the model numbers of HK as the K stands for Kirby which was only here in Australia and made under license from Tecumseh in the USA.
Cheers, BB.
I live a 24 Hour lifestyle, but every now and again I seem to fall asleep, well at least that's what my wife tells me.
Thanks Mr. Jones for some clarification with the needle and seat and after my research over the last few days I worked out that the PTO oil seal was the same part number you quoted 28540. I have attached a Tecumseh parts guide for any one else interested in parts as not all H25, H30 engines use the same parts as there are different series of H25, H30. My local mower shop had a Tecumseh HK30 oil seal and it wasn't the same size as mine and according to a parts diagrame I found online there were 4 different oil seal part numbers for the H30 engine (28540 was one of them and the parts guide attached confirmed it with the measurements).
So for anyone wanting to rebuild a Kirby H4-4A these are the part numbers I'm using Rings std # 27565 Gasket set # 33233 PTO oil seal # 28540 Carby kit # ?
Also would anyone have photos of inside the muffler mines missing the baffle, just want to see how it's supposed to be so I can re-build a new baffle.
Bon_Scott, if you intend to remove the side cover from the crankcase, be aware that it's necessary to remove the oil seal first, as there's a bearing retainer circlip behind it! This prevents cover removal, if it's not removed first.
The shop manual method is to drill the face of the seal in two places on opposite sides, then screw a couple of short self-tapping pan head screws into the holes. Then use a pair of long nose pliers under the screwheads to pry the seal out - or a long flat blade screwdriver and spacer/fulcrum piece will work too.
Cheers, Gadge
"ODK Mods can explain it to you, but they can't understand it for you..."
"Crazy can be medicated, ignorance can be educated - but there is no cure for stupid..."
It's already off and engine disassembled, definately is a crap design but my oil seal dident quiet survive my first attempt. I would attempt it better if I had to do it again but you learn from your mistakes. You would also think this would be a more common part considering it has to be distroyed every time it comes off. I will try and source the oil seal this week and start preparing the engine for painting and hopefully can start the re-build process.
Quick update guys with the Kirby, got the block prepared and painted, just need to install the guts once the paint fully cures. All that's left to do is the tank and recoil shroud and decals. The colour I used was Chevrolet Orange DE1620 which looks pretty close to the original colour (in some photos it looks more red and others it looks orange) I also baked the engine for a nice hard durable finish, and no I dident use the kitchen oven I got a dedicated oven I use outside for painting only.
I stumbled across oven baking by accident researching paints on another forum and someone suggested using the home oven. There was alot of different reactions to people using your everyday kitchen oven due to chemicals and food mixing aswell as the fumes so I found a free giveaway working oven on Gumtree and used my dedicated 15A PowerPoint I have installed in the fusebox for the caravan and it works fine. Considering you don't crank the oven up full ball and run the griller at the same time it doesn't draw anywhere near full current. I figured that engine enamel paint is better than normal automotive paint and the Dupli Color brand seemed more recommended online then VHT and everyone was baking there engine parts with success. I had a choice of Hemi Orange, Rocket Red & Chevrolet Orange-Red, the guy at the auto store put all the colours side by side and I compared the colours with the fuel tank I hadent stripped down yet and Chevrolet Orange was the best match (don't confuse it with Chevrolet Orange-Red). Anyways I let the paint dry outside for 1-2 hours then stuck it in the oven for 1 hour at 95C-100C, the results are amazing and the finish is flawless. I gave it 2 light coats of primer and 3 coats of paint (2 light coats and one wet coat). All coats were done with in 1 hour as instructed on the can and re-coats applied after 10 minutes. I was pleased with the results as this was my first attempt with baking paint and I had no problems, just remember to remove anything plastic or rubber that may melt I left the oil sump plugs in and they were fine. Engine is complete just waiting for decals to arrive, some paint did chip on the bolts when I put it all together so you may have to wait longer for the paint to cure but I just touched them up by spraying the paint in the lid and using a paint brush and you can't even notice it.
Can anyone confirm if the reel blade is the same colour as the engine? Guessing Kirby had their own paint Color and Scott Bonnar had their own paint as well as Briggs being a different Color aswell, The reel on mine looks more red than orange, I don't have to use high temp engine paint on the reel, what's everyone's thoughts on the Chevrolet Orange for the reel?
You are correct that the reels were originally more of an "Orangey" colour opposed to Red but most people prefer the red and thus why it's used more I guess. The orange just looks a tad dated on the reel, while the red looks a tad sharper today.
Yes you are correct regarding the engine manufacturers using their own colours and supplying a finished product to each individual product manufacturer to simply fit straight on.
Briggs used a somewhat different colour to Kirby. The Kirby shade is a tad deeper with a bit more of a red under tone while Briggs used a brighter orange similar to Chevy Orange.
Cheers, BB.
I live a 24 Hour lifestyle, but every now and again I seem to fall asleep, well at least that's what my wife tells me.
Thanks for that info I might clean the reel up a bit and get some of the dirt off it and see if the original paint comes through a bit better to get an idea on colour and then decide to go same as the engine or redish. I know this is not anything to do with the engine section i will start a new thread for the base restoration in the correct thread when I start but do most people paint the reel before getting it sharpened or do you get it sent off first then paint? Will send through final pics of engine with decals once they arrive. Also for reference I filled the sump with Castrol GTX 20W-50 and it took 500ml to over flow.
Thanks for the complement you will be hearing and seeing more of me as I go on to the next steps with the Scotty. Are you sure it's sae30 oil? My service sticker says use Castrol XL 20W-50 oil.
Yep I should've known that this would come back and bite me on the bum.
Most of the industry will only use SAE-30 on most of these stationary type of engines, but yes you can use what you've put in I guess.
Actually GTX was always considered the most garbage oil made. It had huge amounts of marketing put behind it and sold by the pallet load here in Australia where the oil market was huge, but in saying that a "Better Class of Mechanic" would never use GTX with all it's friction modifiers.
I've actually still got an old 4 litre container with some old GTX here and only use it as crap spot oiling in an oil can for hinges or anything that needs some slippery stuff on it that I won't cry over it's wastage.
I now use Synthetic 30 and no more mineral oil at all in anything that I rebuild or service. Synthetics are just a far better standard of oil and that's the way most manufacturers are heading towards.
Cheers, BB.
I live a 24 Hour lifestyle, but every now and again I seem to fall asleep, well at least that's what my wife tells me.
Ok thanks loving all the info I get here, at the moment it's in the sump keeping everything nice and oily so it doesn't rust up inside. I only bought the GTX because Repco was clearing out the small bottles cheap when I went down to get a new spark plug and it happened to be Castrol 20W-50 as stated on the service sticker so I figured it would be o.k. It was cheap enough to pour back into the bottle and use it for something else, it still may be a long way down the track before I mount the engine back on and start it up so I will look into it when it's ready to go. Should of taken note of those old Castrol GTX2 adds in the 80's "Oils ain't oils"
G'day ModBB and Bon_Scott I feel there is a lot emotive puffery in understanding oils.
When I worked for a major oil maker - if you know what I men - I came to realize that marketing was a smoke screen to oil reality. Same oils were re-branded to reflect 'market placement' and ... profit.
The best guide for oil grade use was:- The mower manufacturer's specification at the time (NOT brand); The oil maker's claimed specification at the time.
When multi-grade oils hit the market I feel it was natural that AUS mower makers would specify them - given the vast differences in climate across this broad nation.
I'm sure - given the collaboration between mower makers and oil companies - that recommendations followed profit, not differences in oil actually required to do the job.
GTX was a great oil - but no different to any other oil claiming the same specification. As Modd BB suggested, advertising hype and puffery just disguised the reality.
Glo Mod Gadge is best qualified to answer this, because of his direct experience in this industry.
Interesting topic ----------------------------- Jack
G'day Tyler This is certainly not off topic. I do remember that one.
The whole history of petrol and oil marketing was one of how to separate yourself from the opposition.
Valvoline's 'chemaloy' was as superficial as Schweppes' 'schweppervescence' - and I am always cautious of all claimed 'secret ingredients'. The only thing in common is the secret ingredient BS.
If a parody could be created about oil advertising, then it shows the reach of advertising into the psyche of the general public of the day.
Yep, I have a good memory of that - if you know what I mean. In fact, I still use the 'V' oil to get into my ever shrinking clothes.
Folks, compare
As said, follow the maker's recommended oil specification, not the maker's recommended brand.
If you know what I mean. ---------------------------------------- Jack
Thanks CyberJack for that info and the flashback to the past love those FF sketches. I'm glad there's lots of interest and I hope I'm helping others out as I know there were a few threads that got me on track when I was doing my research before starting, I still look back at these pages from time to time to make sure I'm staying on track. Like I said at the beginning of my post lots of people are sharing their builds and photos but some small details are missing which may be obvious to others but for someone like me who is a novice with these engines and SB reel mowers every detail is valuable and I love learning as I go. I'm sure by the time I finish this build I can do another with my eyes closed. So be prepared for a lot more questions as I go along, definately getting my money's worth from this subscription.
And oil companies want you to trust them, I trust them like I trust energy providers and politicians, in fact I would trust a used car salesman more than any of them.
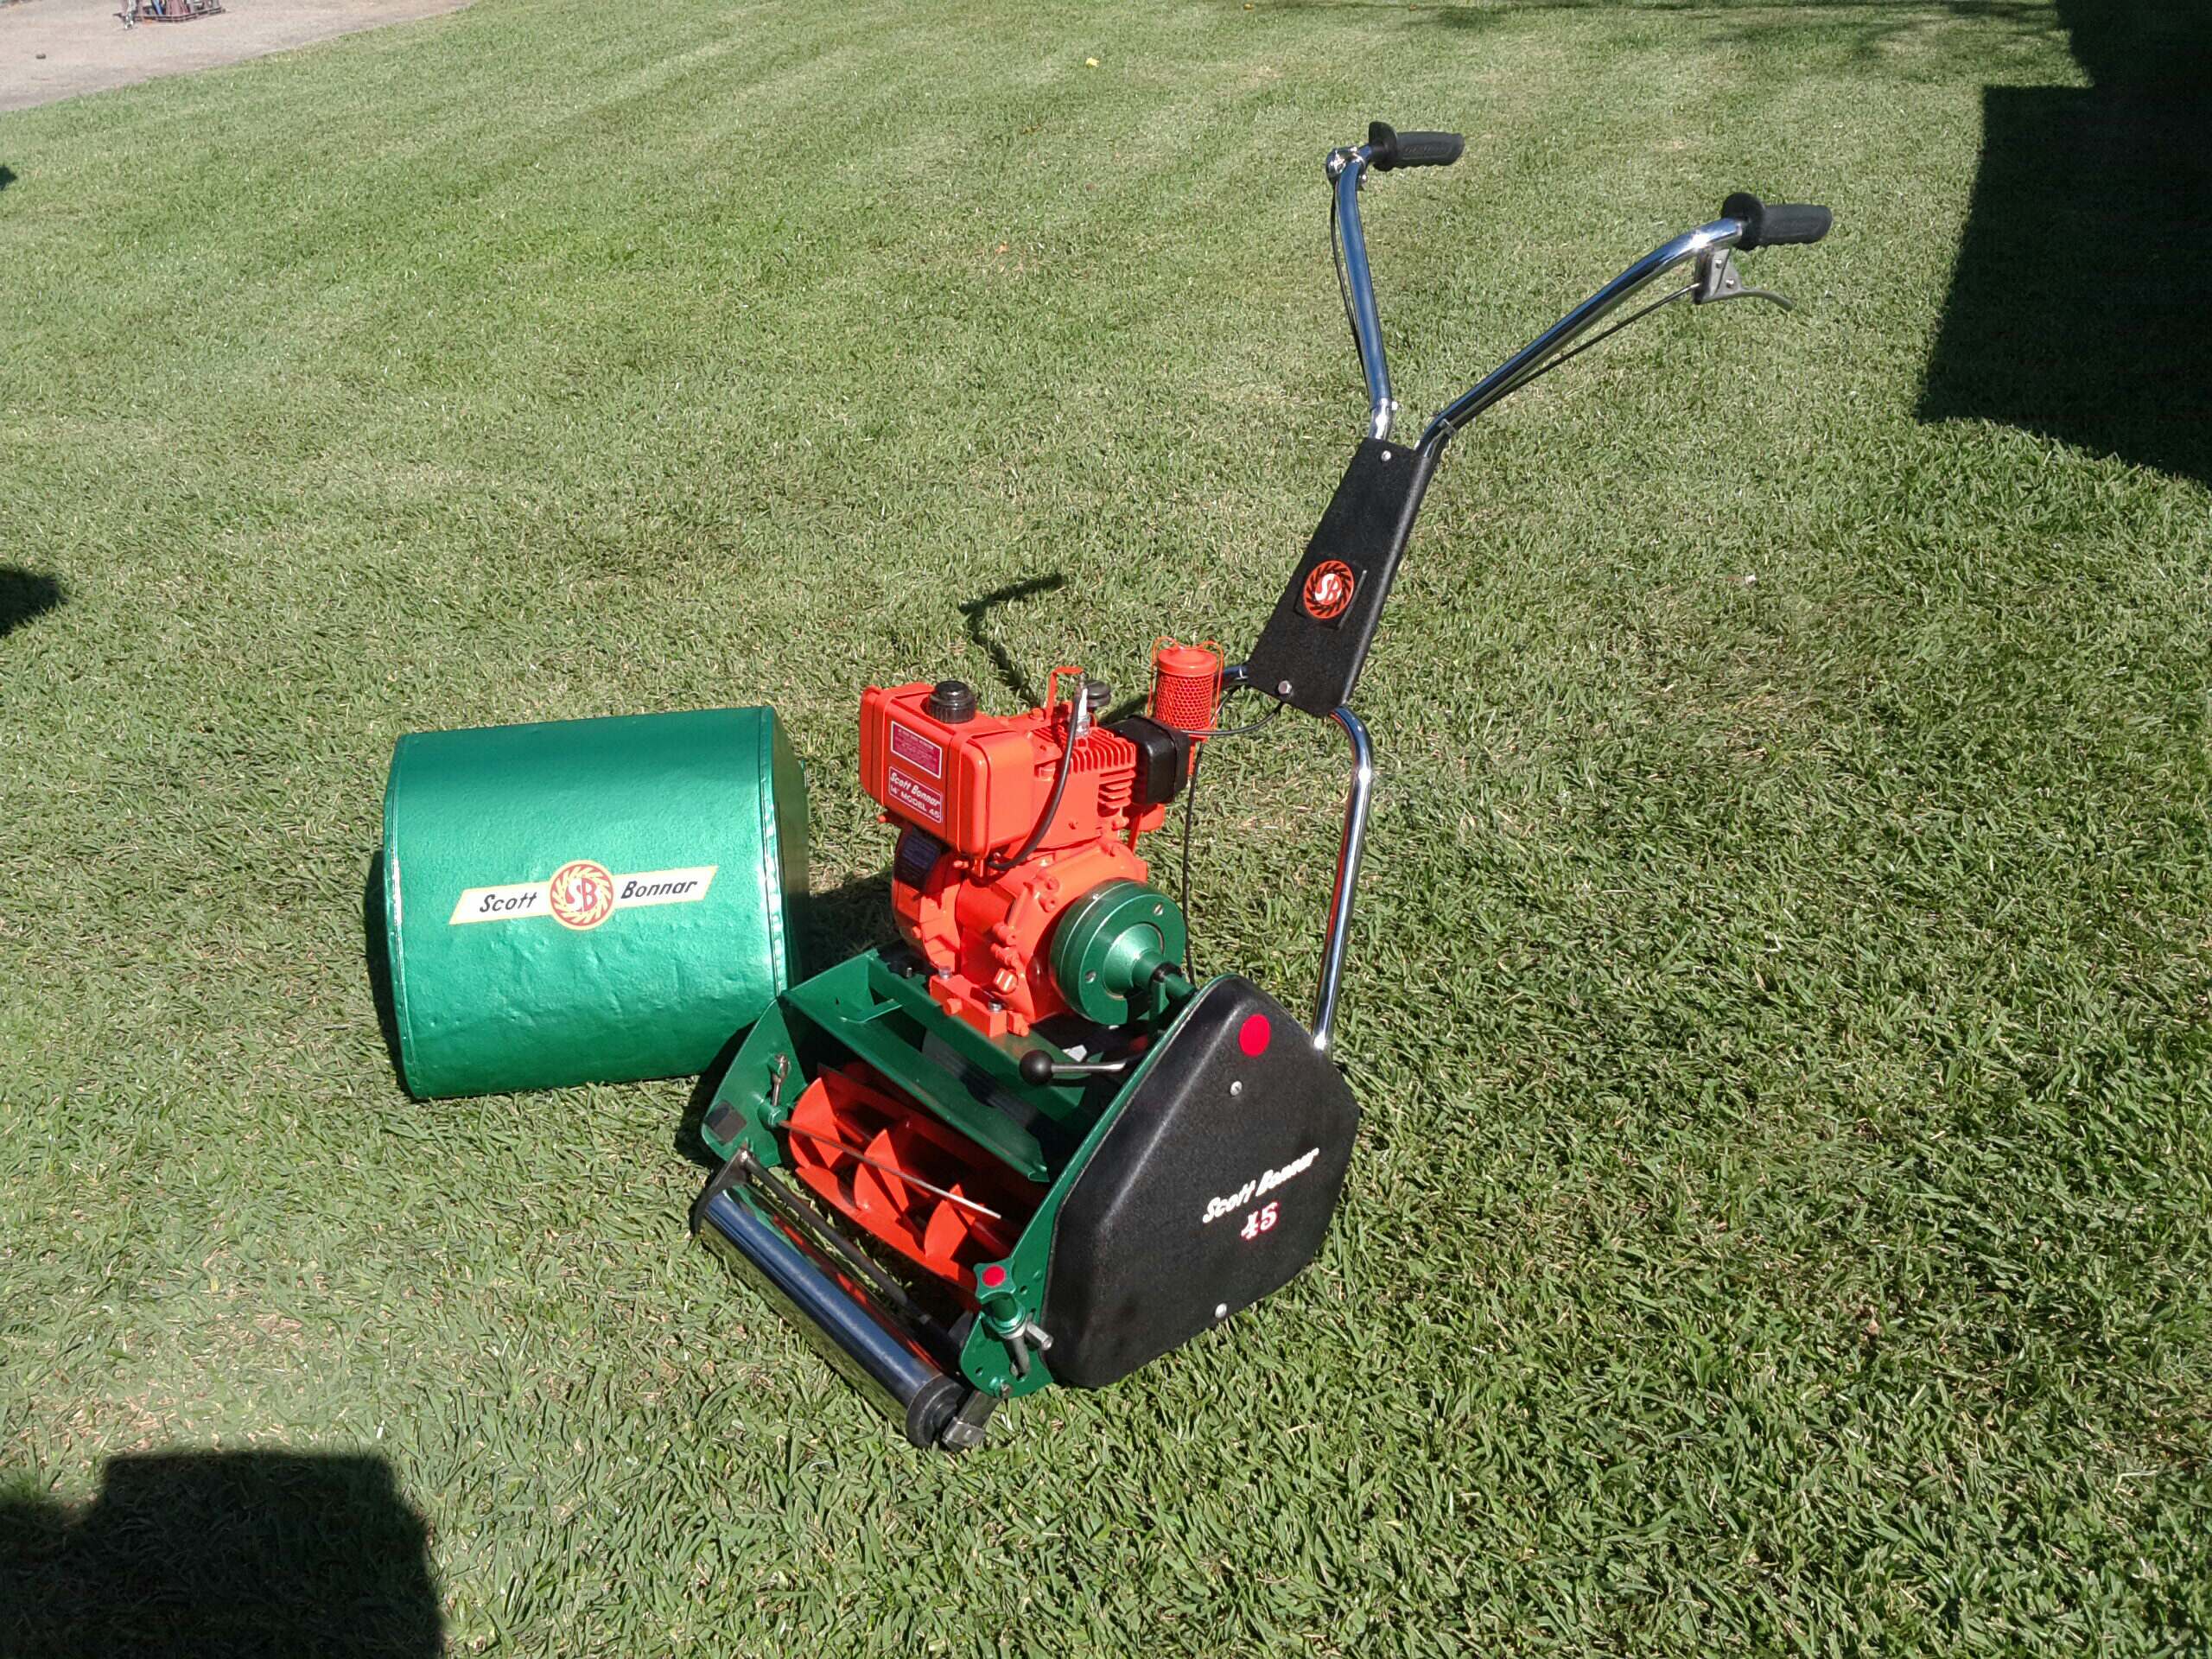
Here it is as promised complete with decals. Last thing I need to do is make a kill switch as mine was missing, is anyone able to measure theirs and supply dimensions so I can replicate one. Also keen if anyone could post a pic of the baffle inside the muffler mine must of rusted away to nothing.
Yeah it's in a z shape that you push against the spark plug, I will just bend something up. Would just be quicker and easier if I had dimensions so I could just bend it up off the motor and bolt it on rather than fiddling around. Would also be nice to make it the same as the original, don't want to ruin it with a dicky piece of steel
Thanks, it really is something I dident expect to look as good as it did for my first Kirby. I exceeded my expectations and I'm so proud, I just hope the rest of the Scotty turns out thef same. I hade so much fun building this engine, glad I decided not to replace it with a Briggs, this engine looks like a beast and their built like a tank plus I love the air filter and the curves.
As many on this forum probably already know, I'm a big one on originality and nothing tickles me more than an item that's been restored to as close as can be to the original unit, thus I'm sure we are going to see something really great here. I must admit I've always liked the look of the larger tank on the Kirby when fitted to a 17 or 20 inch machine, but in saying that it would certainly look overkill on a 14 due to the smaller size machine that it would be sitting on. So in saying that your 14 inch machine will be perfect looking in all proportions.
So,.........Lets call it Marilyn with all the curves in the right places.
Cheers, BB.
I live a 24 Hour lifestyle, but every now and again I seem to fall asleep, well at least that's what my wife tells me.
That's the plan, I think the challenge with these things is the detail and trying to get it spot on as close to original as possible. I have been known to be a perfectionist and if I just wanted to get it going really quick I could of chucked the 2hp Briggs on painted it black and painted the base deck red and turned it into a Rover. Funny you mention the tank, my original was rusted out inside and the filler spout was rusted away to buggery I managed to find a replacement on E-bay that was mint inside for a decent price. Had it been the larger full size tank I probably still would of bought it as I was a little worried I wouldn't be able to source one. I definately agree with it looking out of proportion these Kirby's are a chunky engine and even this little 2hp looks like a 3 sitting on the smaller 14". I still love the looks of the Kirby over the Briggs, you see Briggs everywhere but when you see that Kirby it's like seeing an EH Holden instead of a VW Beetle.
I got that kill switch done, and I'm more than pleased with it. I found under one of the head bolts the old snapped kill switch and worked out it's 12mm wide so I found an old offcut from some guttering I had in the shed and cut 12mm off the end. I bent it to the height of the spark plug and rounded off the ends using the old snapped metal as a templet and it springs back perfect. I sanded back the ends that need to make contact to ground with the spark plug and the head bolt as it was colourbond taped them up and painted the rest.
Last thing left is the baffle inside the muffler, the materials arrived today to make it so I will post that when I get that done. Hoping my idea works as I have no idea how the original even looks, just going off the SB parts diagram uploaded to this site and some images on Google from car exhaust.
I quickly whipped this up this afternoon, any thoughts? I have nothing to work on except this manual attached. It had a small portion of thin metal plate tac welded inside the outer cup of the muffler but it was so rusted there was literally nothing left. I imagine it to be 2 seperate chambers so the gases are trapped in the first chamber then goes through the screens to muffle the sound then exit the screen via the second chamber. The baffle I made is all stainless and seems to fit well, will this work?
Parts 68 & 69 are what I have constructed this idea from, would still love to see a complete one to know how it goes.
Hi Bon_Scott, Mod BB and members I hope you sort this - to help others.
There is sure a BIG difference between a 'Hush-Tone' baffled muffler and one where the baffle has rusted away.
Quote
left. I imagine it to be 2 separate chambers so the gases are trapped in the first chamber then goes through the screens to muffle the sound then exit the screen via the second chamber
I wish I understood muffler theory. What you say is how I imagine it. That's a great job on that inner first baffle.
Thanks I'm happy with the outcome, if I knew what the original looked like I could replicate it. That diagrams the only indication of how it would of been assembled. I found a tea strainer online for $2.00 and took the stainless mesh off, then cut a hollow tube to length drilled out 2 stainless washers the same diameter as the tube then hammered the mesh over the washers. It then slides on the bolt thread as in the picture.
I nice soft puring engine would be the icing on the cake rather than one that's pulsating your ear drums
Yes the Kirby is certainly a bit of a Bambi' Friend. "Thumper" and their muffler was never much chop if I may say so.
One main thing to consider though is increasing the amount of restriction will always have adverse effects on engine performance and the more free flowing exhaust it has will give more power.
I guess you'll find out once you have it in situ and driving the mower.
Cheers, BB.
I live a 24 Hour lifestyle, but every now and again I seem to fall asleep, well at least that's what my wife tells me.
That was my only concern was the amount of flow, it's a fine profile mesh but it has plenty of holes, alot of baffles I have seen have bigger holes but more spaced apart and there usually on bigger engines. Like you said it's trial and error, I will test it with and with out the baffle as it's easy to remove and see the difference. Who know it might work great (fingers crossed).
it doesn't take long for soot from an engine to clog up perforated holes inside baffles etc. thus why many engines fail to start with a clogged spark arrestor over time.
cheers, BB
I live a 24 Hour lifestyle, but every now and again I seem to fall asleep, well at least that's what my wife tells me.
Hi all, New to the lawn mower restorations I am currently working on a kirby HK30 that has no spark what I have done so far is changed the spark plug and set gap, inspected the ignition module for wire damage and cleaned the points. I went to reassemble the engine, flywheel ect and tried to start it but the pull cord won't budge this wasn't an issue before I did any work? Anyone have any ideas on what I have done wrong? I have pulled it apart several times now and refitted but no change. Seems like the flywheel won't spin the engine wouldn't of seized would it?
Thank you that's all I had to do was adjust the coil, unfortunately still lacking spark. Am I better off buying a new magneto section and ignition module instead of playing around with the current one?
Sorry can't help you there I have no idea what coils are available for the H4-4A, BB is probably the best one on that stuff, he should be along here later today
I guess one has to ask the question, was it running prior to strip down if not I suspect and concur with Norm that you have a cooked ignition coil.
Parts for Kirby engines are very thin on the ground and definitely not available as an over the counter part in Australia. If anything is out there it will either have to come from the USA (ouch) or a Chinese copy shipped from Asia. Ebay will probably be your best option I'd say.
Let us know how you go before making any purchases and I will best advise you on how to proceed.
Cheers, BB.
I live a 24 Hour lifestyle, but every now and again I seem to fall asleep, well at least that's what my wife tells me.
Teabag my one concern is did you set the coil gap correctly, the fact that the coil was touching the flywheel means you may not have got the gap right, this may be causing the lack of spark
I guess that's why I asked the question as to whether it worked prior to what's been played with. It would give us both a bit more insight. My guess is no it didn't function, but there's no harm in asking I always say. Sometimes the obvious is just staring us all in the face but we can't see the forest for the trees.
Cheers, BB.
I live a 24 Hour lifestyle, but every now and again I seem to fall asleep, well at least that's what my wife tells me.
I purchased the mower knowing it had no spark but thought I could clean it up and try and get it working. Still hope I can. This is why I had pulled the the engine apart at the start. What I have done so far is new spark plug, cleaned and set the points. I'm struggling on how to get the correct gap between the coil and the flywheel as once I put the flywheel on I can't access it. Is it all just trial and error? Next step is to test resistance on the coil probably should of done this from the start.
Setting the correct gap between the coil and flywheel is rather easy.
I simply use someones business card that I no longer require and place that between the two items while the coil is loose and tighten it up with the card re-creating the gap. once tightened up simply pull the card out and you're set to go.
As far as non working coil is concerned you might find it is just the High Tension lead going to the spark plug that's failed due to outdoor exposure etc etc.
Cheers, BB.
I live a 24 Hour lifestyle, but every now and again I seem to fall asleep, well at least that's what my wife tells me.
Hi Teebag, hope you sort this one out. No spark can be a frustrating thing when you don't know what's causing the problem, sometimes it can be starring at you in the face and it's the easiest fix. Alot of no spark issues I have had with other engines is a simple fix which involves checking the high voltage wire that connects to the spark plug, common issue is that the end of the connector that touches the spark plug disconnects from the wire that runs in the insulated black rubber insulated tube. Most of these connect by a sharp spike pushed through the rubber insulation and touches the solid copper wire inside (sometimes the spike misses the wire or needs to be re spiked to make contact). Check for connectivity from the end connector on the sparkplug side to the point on the magneto to see if it's got continuity. Also check that your coil is not shorted to ground which is what causes your engine to stop when you turn the engine off.
Hey Bon Scott, So I got around to tinkering a little more tonight. I started off by checking if I was getting any resistance reading and I wasn't getting anything what I did next is what you suggested and look more in depth with the contact of the prong, I tried my best to salvage the prong during removal but it broke I'm sure I can just replace it with a spark plug boot. I tested on bare wire and I got a reading which is a good start. As I'm a newby and not really mechanically minded what sort resistance reading should I get? I wasn't getting one off the coil itself as it's covered with plastic but I got a reading off the metal forks once I connected the coil on again. First reading was high 13000 and second was like 18000 does this sound right?
Changing the end prong shouldn't be an issue if it broke. Did you get a reading before the plug broke? Not sure of resistance values, maybe a quick google search can give you a guide, I remember finding a good video on YouTube a while ago that explained how to check resistance and how to charge and check a condenser with a multimeter. As far as I'm aware the only thing that can go wrong is a broken connection a short or dead condensor. also check to see if the points are dirty and need cleaning
Also one of these spark plug testers make life alot easier when checking for spark, you connect it inline with the sparkplug and the coil wire and you don't have to worry about the sparkplug moving off the engine when cranking. Plus it's easy to read when the globe lights up if you get spark.
Update, I got the old kirby started I ended up just replacing the spark prong with a boot and terminal and bang it started. Bon scott thanks for the advice it was staring me right in the face I have a new problem now the mower ran fine for five minutes until I turned it off and went to start it again and the pull cord snapped Lucky it was right at the knot so I managed to fix it. I attached the pull start and now old kirby won't start could I of set something up wrong with the pull start? I had trouble with assembling these few parts spring retainer, dog starter and retainer. Maybe I set this up wrong? Could this be the reason why it isn't starting?
Glad I could help you with the spark issue, 95% of my spark issues end up being the end connector not making contact with the wire. Some engines I have even reverted to soldering the end connector to the wire if it's not a tight connection. As for not starting again well that could be anything and eliminating one thing at a time is probably your best solution. First check your sparkplug and make sure it's not fouled up, if it ran for 5mins that's enough time for the sparkplug to be fouled up if it's running to rich or burning alot of oil. Other thing to eliminate is cleaning the carby, make sure all jets are unblocked and bowl float is not stuck. Also some engines won't start unless the fuel tank is at least half full, Kirby shouldn't have that problem as it's gravity fed and doesn't have a diaghprame but worth a shot. Try restarting with out the air filter if it's got one installed. Maybe check your new sparkplug boot you installed hasn't come lose again with vibration or movement.
This is a photo of my recoil starter I took for reference before striping it down so I knew how to re-assemble it once I cleaned it up. But as long as the rope cranks its not the pull recoil.
For anyone who was interested in the baffle, I got my hands on a complete Kirby muffler intact that's in very good condition. I managed to pick up a model 38 SB edger with a Kirby engine. My baffle design was very close so I'm going to replicate a new one exact to the original and swap the original into my restored engine. I can't believe I found a model 38 with a Kirby to match my model 45 Kirby. Can't wait to get stuck in to the next restoration once I finish the model 45. This engine starts first pull and looks beautiful for its age, I'm almost scared to touch it and wonder if I should leave it original and just wash it down. When I get back home from holidays I will take measurements of the baffle and draw it all out for reference for anyone else who wants to make one.
The Kirby's when running correctly are a fabulous engine, there's no doubt about that but it's the sourcing of carby components and that destructible crankshaft seal design which are the machines real downfall I've always said.
In saying all that, I have complete confidence in you pulling this one down and replicating what you've done with the other engine.
Cheers, BB.
I live a 24 Hour lifestyle, but every now and again I seem to fall asleep, well at least that's what my wife tells me.
Thanks CyberJack, I couldn't even find this design muffler anywhere. All the U.S versions had a different muffler so I think your right in saying it was a Kirby Aus design. It's a pretty straight forward design and easy for someone to reconstruct now knowing what it looks like, I hope it helps others out as I could of used this information months ago, guess I was lucky to find one complete.
I've been looking through this thread with great interest as I have a SB45 17" with the same engine. Nice job on your Kirby, it looks amazing! I'm about to embark on a similar project and will be happy if mine looks half as good when I'm done.
Anyway, the main reason for my post is that I'm struggling to determine how and where to get a carby rebuild kit for my HK25. I'd be incredibly grateful if you could steer me in the right direction.
The carby kits an interesting one as it depends how far you need to go to replace the gaskets. I think the main problem with the carby on these engines is that their kind of a mixed bread with the U.S parent company Tecumseh/Lauson and Kirby. Although the Kirby is the same as Tecumseh engines theres a slight difference with the air filters and the carb design, maybe CyberJack can give us a bit of a history lesson with the design difference of the U.S version and Aus Kirby if my thinking is correct. As far as I believe you can only get carby kits for Tecumseh/Lauson and not Kirby which means it's going to be a bit missed matched, I have found most of the gaskets are still ok to re use if your carefull the only things I replace is the float bowl gasket and clean the rest up. I still haven't been able to find a float needle the same, as the kits online are different with a spring and a rubber seat which these carby don't use. You can still get the fuel drain kit on the bell housing which I just make my own rubber gasket as it's just a small flat piece of rubber. For reference I order carby kit 631021 and only use the float bowl gasket and nut washer as the rest isn't compatable, some of the other gaskets might come with the Tecumseh engine gasket kit 33233 but I can't remember. The gaskets between the air filter and carb I managed to get from a local mower shop that's been around for 100 years and had buckets of Kirby NOS that I spent hours going through checking part numbers and found only a handfull of parts. If anyone knows of a different kit please share as I would also be interested to know what others order as this is how I do it and know that I had problems doing a complete carby kit as there was no reference. I'm currently doing my second Kirby rebuild as we speak, so if you follow my SB model 38 edger rebuild you can get some more reference as I'm more familiar with the second build as I was with the first. I just ordered these kits mentioned above to do the second rebuild.
The other main issue with the kirby is that the main butterfly shaft wears to the point of leaking air in and as such the engine will hunt up and down continuously and this is just not fixable as these shafts have long been discontinued.
The best you can do is buy a full replacement carburetor off the net and use that. This has been the most common fix to keep these old timers running reliably.
Cheers, BB.
I live a 24 Hour lifestyle, but every now and again I seem to fall asleep, well at least that's what my wife tells me.
Having read your comments I checked both the main butterfly & choke shafts and both are badly worn. Looks like I need to replace the carby completely.
Bonnar Bloke, would you happen to know where I could source one / what the part number would be? I'm struggling to determine what would be suitable.
I really want to get the mower running so I can check that if everything's working as it should before I strip it all down.
My preference is to preserve the originality of the mower as much as possible, but if I can't get the Kirby going I may just have to fit a new B&S as a last resort.
mandkn, what I would do as a temporary fix so you can determine what else might need doing is plug the holes in the carb body with JB Weld and then drill them so the shaft is a good fit. Sure it may not last but nothing much to loose and it could buy you time to see if something else will bob up.
So I took a punt and dropped into Adelaide Mower Centre yesterday.
My younger brother suggested I should try and find a mower shop that’s been around forever and this place was exactly that. The guy there was incredibly helpful and pulled a carby off of a Kirby engine he had out the back which was in much better condition that mine. I took it home and cleaned it up and the old banger standard on the second pull! Happy days. The only issue now is the fuel tap leaks and passes and the seal on the float bowl drain is knackered. No big deal, I can sort that out later.
The main objective was to get the engine going so I could check all the running gear on the mower, which thankfully seems to all be A1.