|
1 members (Dandare),
6,608
guests, and
1,562
robots. |
|
Key:
Admin,
Global Mod,
Mod
|
|
|
|
Joined: Jan 2013
Posts: 961 Likes: 20
Moderator
|
First thing we need to determine is the type of paint that was used to paint the deck. Was it done in an oven, has it fully cured?
If it's fully cured, yes, you can rub the runs out, but it depends where they are and if you can access them while using a sanding block, with possibly some 600 wet over the top.
If the deck is dry, which i'm sure it is, give the whole thing a wet rub with some 800 before you apply any clear or silver over the letters. The idea is you want to get the shine off the existing coat so any new coats can stick to it. Generally you apply clear while you're painting the color and you would put that on after the final coat of color flashes off. Yes, clear is available in pressure packs and it comes in enamel, eg like the "export" brand of paint at about $3 per can, or it also comes in acrylic in the "motorspray" or "septone" brand available from supercheap. Personally i prefer the enamel as it gives a much glossier finish, but requires more light coats with about a 5 minute flash time between coats, dependant on temperature and humidity.
|
|
|
|
|
Joined: Jun 2014
Posts: 29
Novice
|
thanks for the info mate. Some parts arrived this morning. ![[Linked Image from i663.photobucket.com]](http://i663.photobucket.com/albums/uu358/GTRwilson/Mobile%20Uploads/20140624_115230_zpseuedbaed.jpg)
|
|
|
|
|
Joined: Jun 2014
Posts: 29
Novice
|
|
|
|
|
|
|
Joined: Mar 2014
Posts: 99
Trainee
|
G'day unknownVicta, Going through the same thing as you mate, restoring an olddy, and a novice. Looks like you will be up for a re-bore, or better still source another barrel, as I was lucky enough to do. There should be plenty of good barrels around for the Powertorque. Plenty of experience on here though to give you (us) the right advice.
Last edited by Bushie; 27/06/14 01:08 AM. Reason: added a bit
|
|
|
|
|
Joined: Jun 2014
Posts: 29
Novice
|
I was hoping to just give it a quick hit with a cylinder hone on a drill. The cylinder walls dont look as bad as the piston. How do i know if its too far gone, to the point of needing an oversized piston? Im hoping its not that bad, as ive already bought a replacement standard piston/rings.
|
|
|
|
|
Joined: Jan 2013
Posts: 961 Likes: 20
Moderator
|
You can't get a replacement barrel for a powertorque engine, they are one with the block. As far as checking if it's too far gone, give it a light hone and then check the end gap in the rings. Here is an extract straight from the manual, it's pretty self explanatory: ![[Linked Image]](https://www.outdoorking-forum.com.au/forum/uploads/usergals/2014/06/full-6430-16972-v.png)
|
|
|
|
|
Joined: Jun 2014
Posts: 29
Novice
|
Ive sent out some inquiry emails about getting the cylinder bored out, first quote to come back was $110. Seems alot considering the cost to do everything else on the mower. How does this compare to other people who have had it done?
While im waiting to hear back from a couple i figured ill turn my attention back to the paint. Ive decided to just leave the couple of run marks. they arent major and no one is going to be up close enough to the base to even see them when its back together. I dont want to risk taking off too much paint and then its ruined. So im just going to paint the "Victa" silver and then throw some clear over it all. Bigted, you mentioned above that there are 2 types of clear available, enamel and acrylic. Can i use either, or is it dependent on what type of paint was used for the colour coat? Can they not be mixed? I was going to use the enamel based on your suggestion, how many coats of clear go on?
Also i want to repaint the wheels and plastic hub-cap type covers on them. Whats the process for painting plastic like this? Is there a specific primer and paint for plastic, or can i use the same cans of paint i bought to do the other metal parts?
Last edited by unknownVicta; 29/06/14 08:54 PM.
|
|
|
|
|
Joined: Jan 2013
Posts: 961 Likes: 20
Moderator
|
Enamel gives a much better shine and will more than likely give you no problems. 3-4 light coats should do it nicely but test it on an inconspicuous area first like in the well of the deck where it would normally be covered by the carby and the fuel tank.
As for the wheels/caps its probably easier and cheaper to get a decent set of 2nd hand ones. Plastic paints and primers are quite pricey and will ultimately scratch and flake.
I'll send you a PM and we'll try and organise a set of wheels for you.
|
|
|
|
|
Joined: Jun 2014
Posts: 29
Novice
|
|
|
|
|
|
|
Joined: Jun 2014
Posts: 29
Novice
|
im after help with the piston rings. Picked up the block as you can see in the pics all cleaned up and ready to go. He told me all i have to do is gap the rings. I was hoping if anything like that was needed he would do it while he had the parts there, but no such luck.
Can it be done with just a metal file etc? Or do i need to buy one of the $100 piston ring filing wheel tools? What should the ring gaps be? Im pretty sure i just sit the ring inside the top of the bore and measure the distance between the ring ends, is that right?
|
|
|
|
|
Joined: Jan 2013
Posts: 961 Likes: 20
Moderator
|
Welcome back, the ring gap can be done using a file without any problem. Refer to my earlier post in his thread where i pasted in an extract from the manual for your ring gap.
|
|
|
|
|
Joined: Jun 2014
Posts: 29
Novice
|
Ahhhh forgot you posted that, great. Does it matter where in the bore I have the ring when checking gaps as I've just had the bore cleaned up? I've been told in the lower end of the bore because the top can develop a small lip at tdc. Is this still an issue now though?
Also can I just push the ring in with the piston to square it up, is this good enough?
|
|
|
|
|
Joined: Jan 2013
Posts: 961 Likes: 20
Moderator
|
The lower ed of the bore should do it, and pushing it in with the piston to square it up is fine.
|
|
|
|
|
Joined: Mar 2014
Posts: 99
Trainee
|
Hi unknownVicta.
When I checked mine I carefully put a ring on the lower ring slot on the piston to push the other ring in square, measured and reversed the process.
How much did the rebore end up costing? Really looks impressive.
Keep us posted with pic's of your progress please.
|
|
|
|
|
Joined: Jun 2014
Posts: 29
Novice
|
cost $60 to clean up the bore, clean and paint the exterior. Pretty happy with that price.
|
|
|
|
|
Joined: Jun 2014
Posts: 29
Novice
|
Hi guys, This project stalled for a while due to moving house, and im finally getting it finished again. Only parts i havent bought yet are the 3 main bearing for the motor. Are these the ones i need? ![[Linked Image from i.imgur.com]](http://i.imgur.com/hOrWzcs.png) Also where the red and black wires run into the back of the carby, i noticed mine is missing this rubber gromet. Can this also be bought through this store? ![[Linked Image from i.imgur.com]](http://i.imgur.com/CIh78Ix.jpg)
|
|
|
|
|
Joined: Jun 2014
Posts: 29
Novice
|
Also where can i find a complete service manual, preferably online? I can find lots of little videos etc for repairing certain parts. But nothing to guide from start to finish of a complete motor rebuild. Just want to make sure i dont overlook anything.
|
|
|
|
|
Joined: Nov 2015
Posts: 69
Trainee
|
Sometimes when you pull lead out from back of carby,grommet sometimes stayed in carb ,or comes out on wire ,as seen in pick.anyway a new grommet can be purchased ,no prob. 
|
|
|
|
Forums144
Topics12,731
Posts106,685
Members17,980
| |
Most Online40,124
Apr 13th, 2026
|
|
|
|

![[Linked Image from i663.photobucket.com]](http://i663.photobucket.com/albums/uu358/GTRwilson/Mobile%20Uploads/20140626_124738_zpsmdub5trz.jpg)
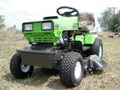
![[Linked Image from i663.photobucket.com]](http://i663.photobucket.com/albums/uu358/GTRwilson/Mobile%20Uploads/20140827_160254_zps9if9ocb5.jpg)
![[Linked Image from i663.photobucket.com]](http://i663.photobucket.com/albums/uu358/GTRwilson/Mobile%20Uploads/20140827_160357_zpscvwtk9wy.jpg)
![[Linked Image from i663.photobucket.com]](http://i663.photobucket.com/albums/uu358/GTRwilson/Mobile%20Uploads/20140827_160424_zpsrrnctsik.jpg)


