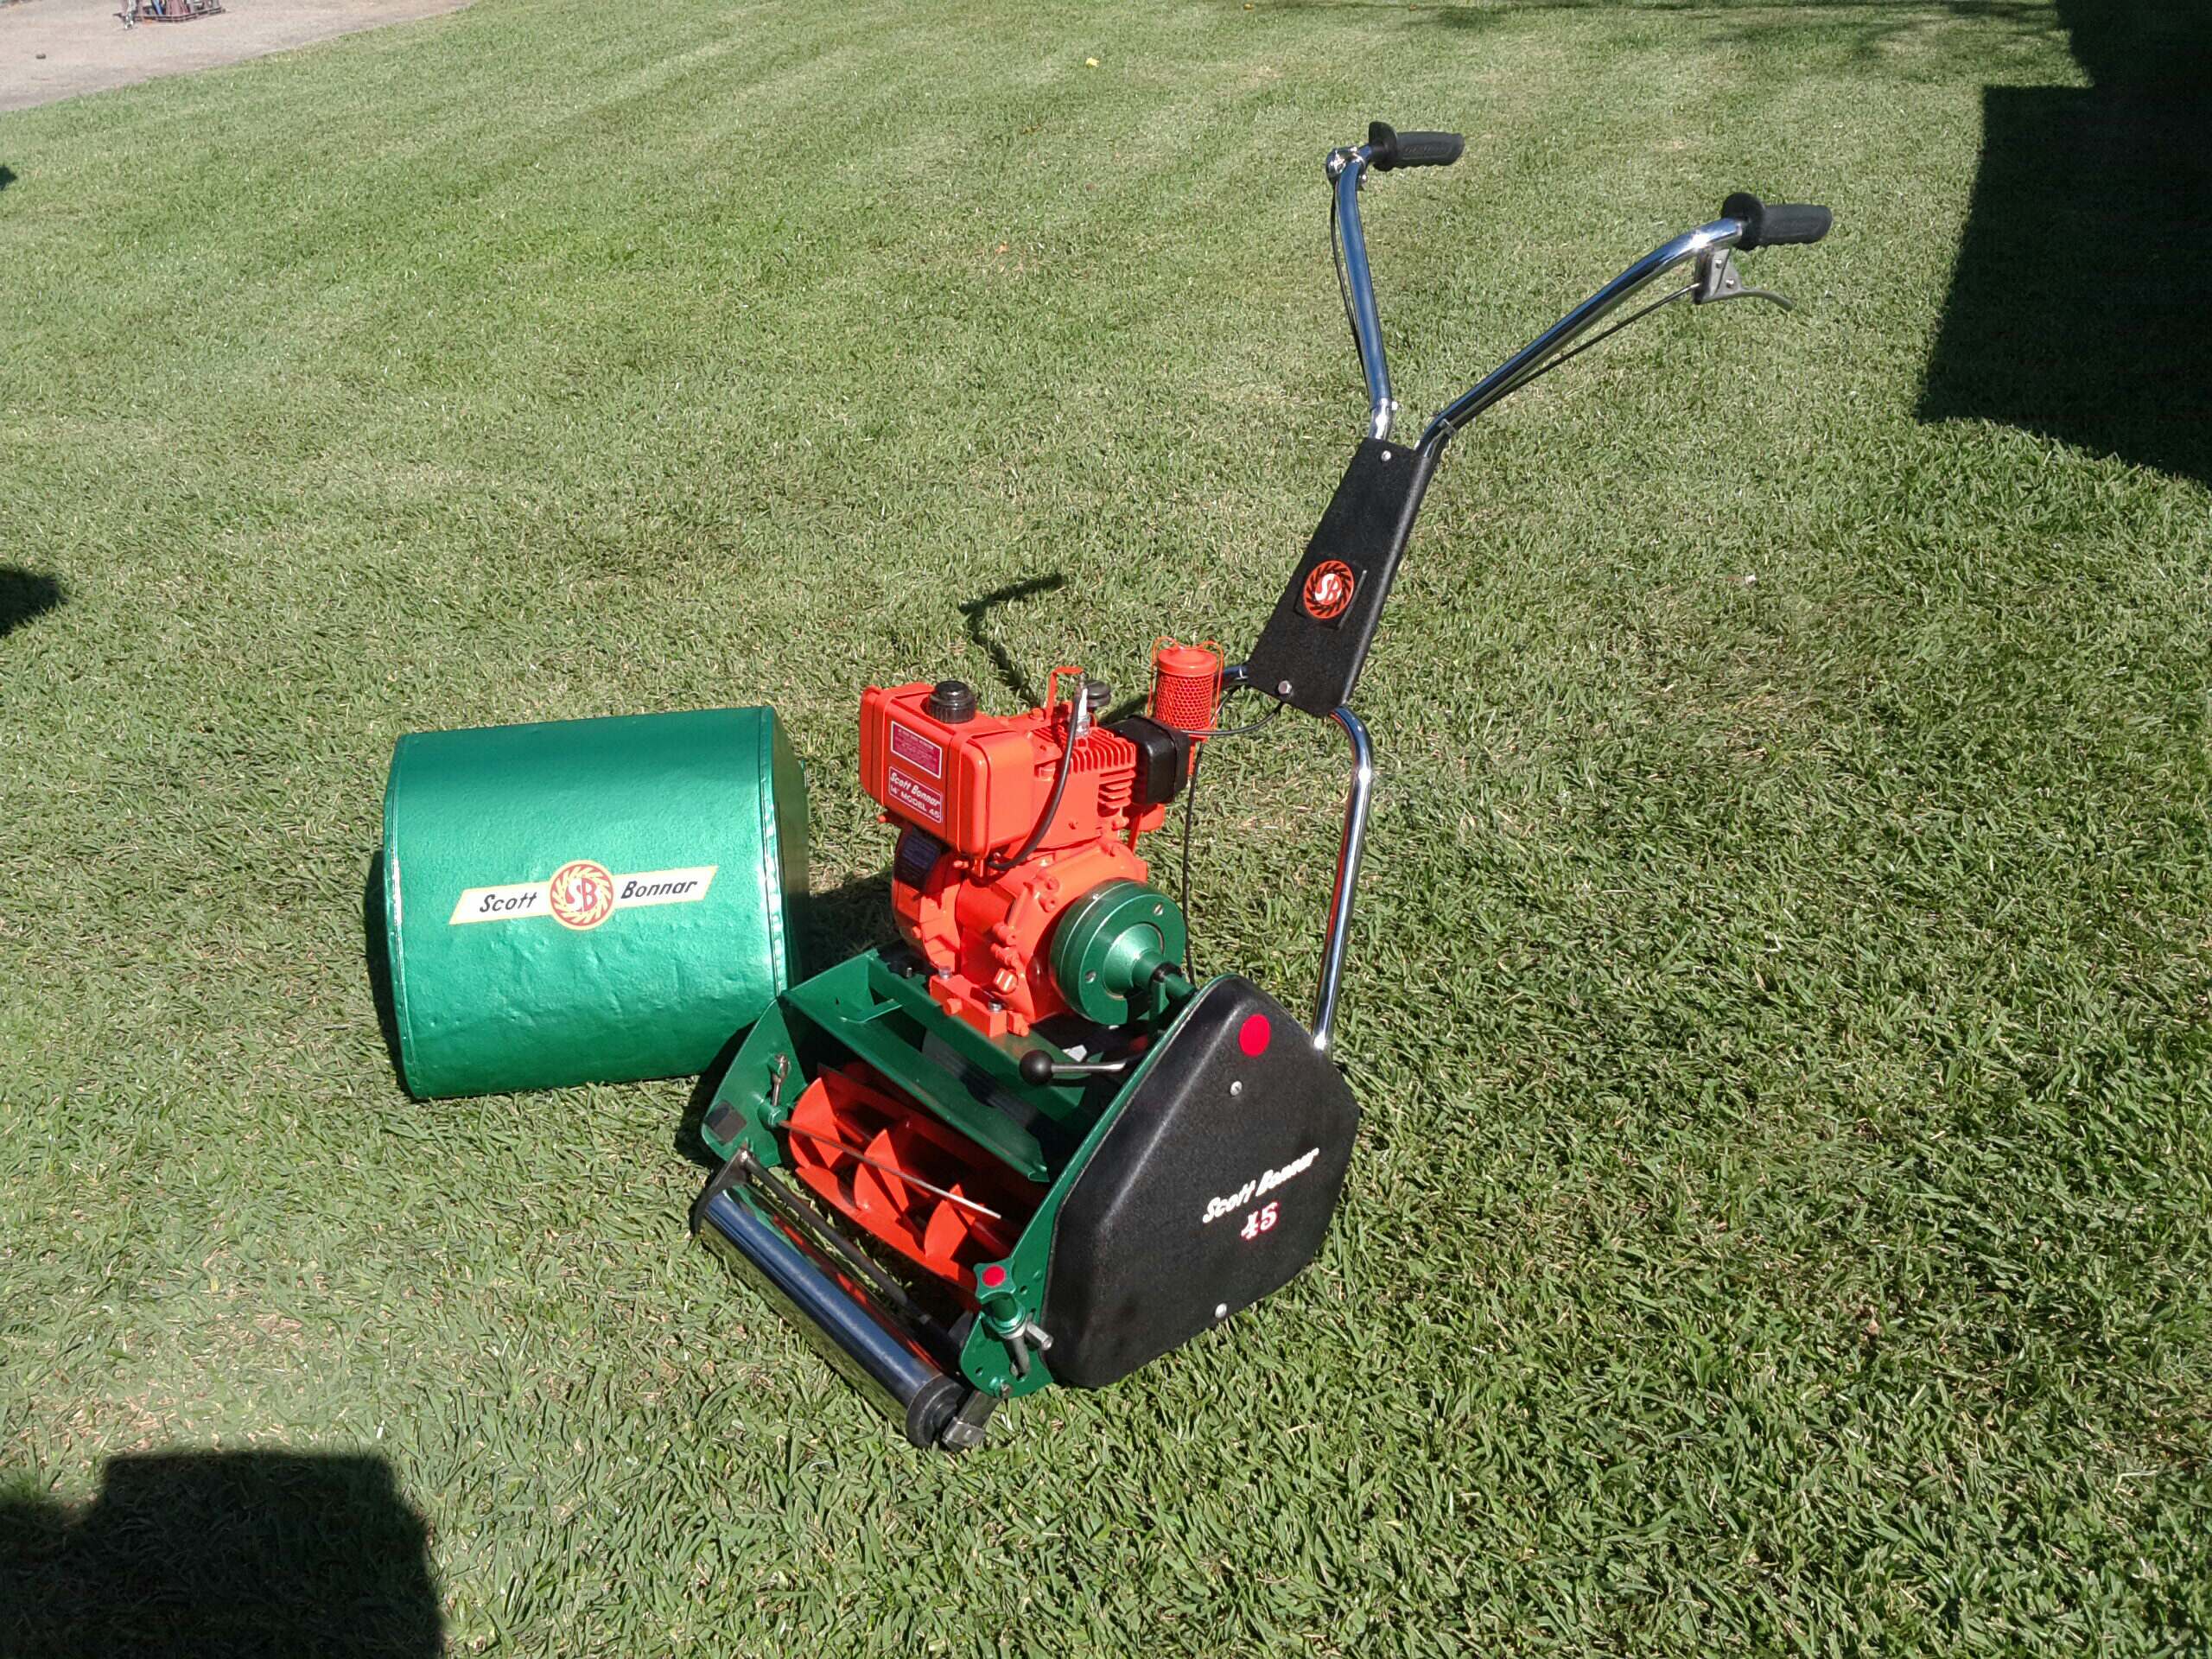
Hi again I'm back with the start of part 2 of my restoration. For those of you who want to see my engine rebuild search under the engine section for Kirby H4-4A. So far I have disassembled everything and assessed what I need and so far it looks pretty good, mechanicaly it looks great no cracks in the base, sprockets look fine, chains look brand new and reel seems ok. The only things that i will replace because it's disassembled are just the general wear and tear parts such as bearings and friction cork pads.
So after doing some research can I confirm bearing part numbers? Clutch pto self aligning bearing part# 1202 Front reel blade bearings part# RLS5.2RS Rear roller bearings (discontinued) Clutch cone bearing part# (TBA)? My drive sprocket bearings look new so I will reuse them but part numbers would be good to have for reference
I also haven't worked out yet the clutch and drive pad cork part numbers, if any one would be so kind enough to help me out which ones I need it would be a great help.
I also got the reel blade cleaned up ready for painting and was wondering if there is a general measurement of the blade width to indicate how much life is left in it.
I did a light test spray on the frame to check colour match, it's around the front reel section on the rusty patch.
So far this is the beginning of my preping there's alot of cleaning and rust removal to do so I will give you small updates as I make progress and no doubt ask a question or two.
Now the real fun begins Eh ? I think many prospective restorers are going to enjoy this one.
Well you've stripped it down good and proper and that's the best way to start with a restoration.
I'm sure you're pretty well versed with paint and rust stripping as you did such a stunning job with that Kirby engine.
Some close up photos of the drive gears ect. would be superb documentation for assessment purposes of the machine's overall condition in general.
As far as the rear Roller Bearing is concerned they are still available but damm expensive I might add. They are a trolley type bearing and thus are not close tolerance High speed bearings as we are used to seeing.
There has been a new development in replacing this bearing by having a standard bearing used inside an outer machined up sleeve so it retains the original dimensions as those measurements are not available in any generic bearing that's on public sale. Regardless this new replacement isn't cheap either.
Just for interest I've never found myself in a position to have to replace those bearings as they are hard wearing units that turn at very slow speed, thus they generally last forever. These New replacements are available from the seller "OPE Parts" on eBay. Cam is a very obliging chap that is always willing to help SB Restorers out.
As far as the pictured reel is concerned it looks like it's been Bead Blasted ??, This is probably the most time effective way of stripping any reel as I've spent up to 5 hours completely stripping a 20 inch 8 blade unit by hand using mechanical means. This isn't fun I might add.
For Now...........................
Cheers, BB.
I live a 24 Hour lifestyle, but every now and again I seem to fall asleep, well at least that's what my wife tells me.
I will take some photos of the gear sprockets and send them through later, as for those rear roller bearings I made the same conclusion that they seem good enough to clean up and reuse considering the effort and price to replace them and I agree they don't do anywhere as much work and speed as the other bearings so they should keep going. I even phoned Anthony Bearings in Melbourne who manufactured the original bearings 40 years ago and they said " we don't make them anymore" but he was very helpful and when I told them that everyone's looking for them and they said "we know"
The reel was stripped by hand but not bead blasted, I took as much off first with a wire brush which isent much then dipped it into Hydrochloric acid. It would be so much more quicker if I had a deep enough drum to do it in one hit but you use alot of acid plus that's alot of fumes thats not good for your health if you accidentally inhale it. Acid can take the reel down to what you see in 20mins but highly toxic and proper eyewear, gloves and gas masks need to be worn (not dust mask)I only like to use it in small portions. I also used electrolysis but that takes time and I don't believe is as good as the acid bath, however if you do this first it takes a good portion of rust off so then you can finish it off with the acid.
Whoa !! using acid as a dip process on mild steel that is in the scenario of a high speed reel is definitely not a good method as it creates Hydrogen Embrittlement of the steel. It is something I can't and won't endorse. BTW 15% Sulphuric solution is the better option for Pickling mild steel opposed to Hydrochloric, but the same rules apply regarding embrittlement.
My background was working with acids and plating and it's something that always sticks in my mind. I know that it sounds good and quick but with that comes a trade off. Unless you've got a heat treating oven that can be used to stress relieve the steel afterwards it's a definite no no for steel that's being used for blades.
Also using electrolysis has the same result. It must be heat treated afterwards. Panel work items no issue but blades and stress related parts are off limits in my book.
All those gears are probably still good to go for another round, but in saying that the cutter sprocket is certainly getting on a bit and at the same time I would also change the transfer shaft sprocket along with the primary drive chain.to keep it all running sweet, that's if you are keeping this one for yourself which I think you are.
Like I've mentioned they will all survive for now but my observations are merely a guide.
Cheers, BB.
I live a 24 Hour lifestyle, but every now and again I seem to fall asleep, well at least that's what my wife tells me.
Oh well to late, you learn from your mistakes. I will make sure I won't use it unless I need to for panel work. Thanks for the heads up on the gears, I will just use them for now to get me by and change them later on down the track. There not to hard to remove and it's got easy access. The $$$ are adding up and I still have to get the blades done bearings ordered, handle bars re- chromed and more paint (wife keeps telling me I thought this mower was $50.00)
This is the exact reason why so many Scotty's have ended up sitting somewhere in the back of a shed quietly rusting away. The cost for many of these parts is simply out of control. It's not hard to spend $500 in parts alone and then there's the labour involved which can easily blow out to another $500 on top. It would be much cheaper if we could buy all the parts required direct from "GA Spares". All these eBay sellers simply buy from GA's and then add 75% on top, some are adding over 100% and taking us for mugs. I'm still trying to work on getting a GA account.
So you can see how many folk decide that they can buy a new Victa for around $400 and "happy days" as they say. I know you can't compare the two but in many peoples eyes a lawnmower is simply that........a Lawnmower.
BTW..........Have you actually priced up the cost in Chrome Plating the handle bar assembly yet ? as this is the most out of control item as far as cost is concerned. Sadly the plating game has out priced itself and thus most shops have gone under with most plating now being done in where else ?? but China of course. That's why you see so many Scotty's having their bars painted in silver finish. I've heard of some shops charging up to $300 plus for the job and that's for a pretty average job I might add.
I guess this is why a fully correctly restored model 45 can be worth around $1500 give or take a few bucks here or there.
I always find it amazing when someone says to me that they're going to restore a Scotty and spend a couple of hundred dollars and then flip it and make a killing................................I don't think so, not any more they're not.
Cheers, BB.
I live a 24 Hour lifestyle, but every now and again I seem to fall asleep, well at least that's what my wife tells me.
I'm not trying not to keep tabs on price, but I'm sure I would be at least $200.00 on paint and I'm off tomorrow to get 5 more tins. Yes price is shocking and people wonder why we are buying overseas from China. My bearings for the front reel arrived today as well as the decals, the self aligning bearing I ordered from China for $3.00 as I was priced $25.00 from my local bearing shop. I don't like buying Chinese but that $20.00 I saved bought me the front two bearings from a bearing supplier in Sydney. I also got my clutch and friction drive pads on order to arrive next week. I'm trying to get what I can before Christmas so I can keep going over the break before everyone closes. I got a quote for chroming from a local guy and he said I would be looking at $120.00 to do the handle bars which I'm pleased about but he can't do it till February as he is booked up. The price included stripping the old rust and plating
I would never buy a new mower today no matter what, all my stuff is from the good old days I should post my machines in the collection section you would love what I have.
Can anyone confirm the colour for the rear roller? Mine seems to be a light grey or white on the sides, im off to get paint tomorrow so will stock up on that to if I can, also what's the best wearing paint for the roller.
The Rear Rollers on those early units were painted in a light grey as you've suggested.
Unfortunately regardless of whatever paint you use will see it worn off the high ridges of the surface instantly unless you can have the machine only roll on grass and have it on a platform to move it around on hard surfaces, but in saying that no one does that for very long until they discard that method and just put up with a scuffed roller.
Any enamel will do for the above mentioned job. They were never painted with any level of extreme surface finishing as they are simply cast iron and the paint was merely used to stop the rust developing on the roller thus retaining good presentation for some time. In saying that I strongly feel some Scotty's never received that treatment as I've seen quite a lot of evidence that discredits the painting of rollers theory.
Now as far as plating the handle bar assembly is concerned, $120 seems just way too cheap and as such one must ask the question, is this merely stripping the old chrome and simply re-plating ? and is there any polishing of the bare steel to take place prior plating ?
The process to obtain a superb result is as follows,
1 Strip the old chrome 2 De-rust the steel (Pickle Bath) 3 Polish the steel work (time consuming manual process) 4 Degrease and run through the cleaner bath 5 Copper plate 6 Nickel Plate 7 Chrome plate
I strongly feel that at the price quoted it will be just be done without any polishing work whatsoever.
I guess one must ask the question or a undesirable result may be the result.
Cheers, BB.
I live a 24 Hour lifestyle, but every now and again I seem to fall asleep, well at least that's what my wife tells me.
Thanks BB I will just use a grey kill rust enamel I have laying around and I figured it would scratch off eventually, definately no way I'm rolling out the red carpet for it.
In regards to the chroming I only made a phone call, I will make further inquires when I'm ready to re-chrome now that I have some info to go by. It seems like a decent old school business and their based in the heart of steel City in Newcastle (could be alot of competition and work available he was the first guy I rang and price seemed good). The online reviews are positive and the guy I spoke to on the phone was helpful, I will let you know next year if it's a good price or a quick job. There's no shortage of chrome platers between Sydney and Newcastle so I got plenty to choose from.
Honestly the east coast must be a tad different to Adelaide where we have around 4 plating shops out of around 25 left and a few of these only do zinc and not chrome anymore, thus competition............zero.
Cheers, BB.
I live a 24 Hour lifestyle, but every now and again I seem to fall asleep, well at least that's what my wife tells me.
Managed to get a base coat down this morning, we have had some rain and moisture in the air over the last few days and my hard work removing paint and rust has been pointless with some surface rust appearing. Also doesn't help I live on the water and the salt air speeds up the process. Anyways I used a red oxide primer I had and it looks good not to mention it should stop the surface rust from appearing until I do a top coat. Also my green is a tinge lighter than original paint so hopefully the red primer tones the topecoat down a bit.
A Bit of Rain ???? I reckon you've copped all of Australia's rainfall for the year all in one go.
I hope you haven't just sprayed over the appearance of rust with this paint as it will come back to bite you later on and I'd hate to see all your hard work go in vain.
You should go over it with deoxidine just prior to painting like panel shops use prior to the first coat of primer.
Cheers, BB.
I live a 24 Hour lifestyle, but every now and again I seem to fall asleep, well at least that's what my wife tells me.
Nah straight down to bare metal not a spot of rust on it, paint company said I didn't need a primer with my Hammertone as it supposedly goes straight onto bare metal but it doesn't hurt to be sure. I actually read somewhere also that Hammertone reacts better with bare metal to give you a better hammer effect. I'm not to fussed about the effect as the original paint looked really smooth with minimal pattern in it, I would prefer a shinier smooth coat with some effect plus my engine is so shiny It would look weird if the rest looked dull and rippled. I did a few test samples in the oven and it straightened the hammer effect to a really smooth shiny finish with minimal ripples but still leaves the colour effect. And as for aluminium parts, I'm going to hit them with an etch primer.
Some quick update photos, still plenty to do which might take a bit of time now that Christmas is only a week away. I'm at a good stage so a nice break and a bit of fishing would be good as all that cleaning and rust removal can get you unmotivated. Still got the grass deflector, catcher, rear roller, chain case cover and handlebar plate to clean up.
If I do get some time over the break to put some parts together should the bearings be oiled or greased?
Finally got back into doing some more work on the SB after the hectic holiday period. I'm deciding to put some parts together before I move along as I'm running out of space and painted restored parts are in the way getting knocked around. I'm looking at assembling the rear roller and was wondering how it should be lubricated? I'm guessing the end roller bearings should be greased as well as the roller shaft and out and inner roller bores of each roller. The other thing I'm not sure of is if the middle clog type mechanism between the two roller on the shaft needs to be greased where the 3 pins lock in on each side.
Also should the thrust bearing in the clutch be oiled or greased? Pretty sure the self aligning bearing on the clutch shaft sproket needs to be oiled.
The dog clutches in the centre of the rollers should only ever be lightly oiled and no grease used as they are required to fall naturally downwards as the roller turns and grease would prevent that happening.
Thrust bearing should only be lightly greased if you can manipulate grease into it as we don't want grease to be flicked outwards and eventually find its way to the clutch surfaces.
Self aligning bearing (that's if you are still using one of those) should be packed well with grease with no further oiling required. Many people now are simply using a sealed bearing as that is what Rover ended up doing and replaced the SA bearing with a solid standard unit. The smoother your engine runs the less you'll require a SA bearing, also the SA bearings are very highly priced opposed to a standard type unit.
Just touching on your photos that you've posted above, what colour have you used on the reel ?, is it "Chevrolet Orange" ? as it's nice to see one in what was pretty much the colour that SB used for their reels, but as we all know many restorers now prefer Signal Red as it looks a bit more modern I guess.
Anyway progress looks really good and I'm sure you'll have the nicest Model 45 in your neighbourhood, that's a certainty.
Cheers, BB.
I live a 24 Hour lifestyle, but every now and again I seem to fall asleep, well at least that's what my wife tells me.
Thanks BB I figured that grease would maybe make the dog clutch sticky and wouldn't move as freely as it should, I will dab a bit of oil on it when I put it together As for the self aligning I did order the same number bearing and will probably oil it as it's not sealed and has an oiling hole to keep it maintained, I also noticed oiling holes on the clutch cone/shaft.
I painted the reel Chevrolet orange-red, it's a little more red than the Chevrolet orange motor I painted and I think it looks very close to the old paint on the reel before I stripped it. It still looks orange but compared to the engine its more redish.
When finished it will be as close as possible to being original from the factory, there's a little more work I have done that hasn't been posted yet that i will post when assembled and complete which I haven't seen on this forum or anywhere else online. It's the icing on the cake.
It will probably be the only mower in my street that's not plastic and Australian made.
Oh and I thought you'd buy one of those new 18 volt plastic Victa's that they are flogging on the telly at the moment just to fit in with the rest of the street. Honestly who wants that rubbish ??? but that's the way the worlds going, Men who don't know how to use tools any more and are rapidly becoming more feminine every day and know more about Manscaping than repairing.
As far as the SA bearing is concerned I'd still initially pack it with HTB bearing grease and then as time progresses add some oil once a month or so. Anyway that's what I do with both my machines and any customer units that come to me on the odd occasion.
As far as the clutch cone that slides back and forth I always on disassembly and reassembly apply a very light smear of grease over the transfer shaft when ever the clutch assembly is removed. From there on I always apply oil in both holes and a few drops on the thrust pad as a course of routine maintenance. Too much and the stuff goes everywhere.
Cheers, BB.
I live a 24 Hour lifestyle, but every now and again I seem to fall asleep, well at least that's what my wife tells me.
I'm hoping to get the rear roller and engine mounted on in the next few days, so stay tuned. Still have to clean up the grass deflector and chain case cover, once their painted I just have to get the handle bars sent off for chroming and reel and bed knife sharpener. The rest is just fiddly stuff like cleaning up sprokets and chains and linning it all up. I will do the catcher last as it needs a bit of work with rust dents and a few holes, it's something I can do slowly as I feel unmotivated every time I look at it. So once the mower is restored and looking beautifull it might get me off my back side and finish it off completely.
There's a few 18v mowers poping up around my street as well as those cheap Bunnings no name Chinese plastic rubbish brands. Funny thing is people look at me funny when I got the Rover Super Four 53 out with the side cart catcher and I'm walking behind it one handed. Could also be the fact that the 5hp Briggs screams so loud at full throttle you can hear it two suburbs away.
I would do the rear roller and sole plate from start to finish before you install the engine. This way you'll find it easier to do the alignment as there'll be far less weight in the chassis to have to muck around with.
If you were here in Adelaide I'd come over and motivate you.
Cheers, BB.
Last edited by Bonnar_Bloke; 11/02/1908:06 PM.
I live a 24 Hour lifestyle, but every now and again I seem to fall asleep, well at least that's what my wife tells me.
BS, please don't run that B&S at full throttle, you could be seriously injured in the legs when the rod comes out the side. Just remember with a B&S the piston is designed to go in and out a certain number of times and every time it goes in and out is one less time it will
Just worked that out tonight BB, just finished installing the rear roller and its got some weight on it with out the motor. What's an average price to get a reel grounded and bed knife sharpened? Would love to get them done so I could install the sprockets, chains and adjust the roller level. So close but yet so far.
Curious with one aspect which some of the others may confirm; shouldn't the counterweighted rear roller half be on the transmission side to offset the engine weight?
Um good question. I looked at a diagram and it appeared to be on the engine side as to opposed the clutch side, if anyone else could confirm that would be great.
Done some lurking around - and from the various photos I've trawled through of 14 inch Model 45s, seems you've got it right B S. All of them are showing the counterweighted half on the non transmission/engine side. So surely it's unlikely the majority are set up incorrectly...
I've got an old 14" roller and chassis at home stashed away in the shed. All the photos I've got of it on my phone aren't exposing the bolts on the side of the roller, so I will check the orientation of it tonight and report back too.
If it is indeed the case, looks like I'll be pulling my own 14 apart for some minor surgery! That being said, I've gotten away with it installed incorrectly for a good six months as it's shown no signs of off balance in the cut results. But it's best done right.
BTW that's a real popping colour you've used on the chassis there B S, what paint did you go with?
Thanks for confirming, I was having a heart attack when you first said it was on wrong. To be honest I wasn't 100% sure when I put it together as I dident take any photos or record which side it came off when I first stripped it down. Most things I have been taking photos before pulling things apart for future reference but I dident realise there was a left and right roller and only one weight when I took them off as I cleaned and painted one roller at a time. I could only find a parts diagrams for a 20" SB that showed the weight on the right hand side viewing from behind the mower, so im guessing all 45 models are on the same side. So for anyone doing a full tear down document everything before you pull it apart.
I wonder how many people are now going to check which side they put their weight on after reading these post.
Apologies for misleading on that one B S! It got me thinking back to when I assembled mine, and I was in the same predicament - didn’t take photos of it all properly when stripping it down. I didn’t have the spare chassis and roller to compare it to at the time. And I had only previously restored 17s. So I made the assumption of the counterweight offsetting the engine weight. So, gladly seeing your nice example here sparked the memory, and solved the puzzle!