|
1 members (Bruce),
9,821
guests, and
1,463
robots. |
|
Key:
Admin,
Global Mod,
Mod
|
|
|
|
Joined: Mar 2015
Posts: 249
Apprentice level 3
|
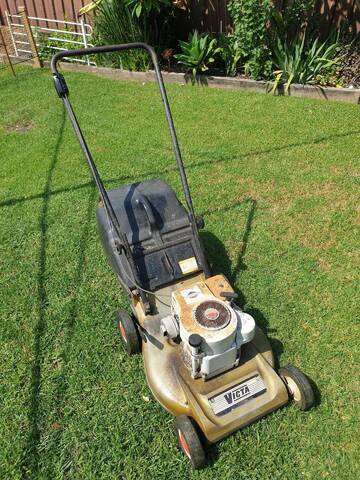
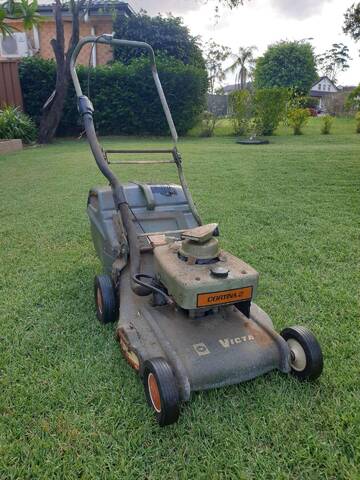
Hey guys, picked this up today, though not quite sure what VICTA it is.       Also, when I picked it up, he showed me it isn't seized.. pulled the cord and (no spark plug) woosh.. a bit of a geyser .. guess he left it out in the rain... Q: How do you go about dealing with a mower with water in cylinder? I guess I'll have to strip it right down? I pulled the cord a few more times when i got home to clear more out then turned it upside down to try get even more out.. but yeh, i dunno.. thoughts ?
|
|
|
|
|
Joined: Jan 2012
Posts: 1,842 Likes: 14
Moderator
|
Well, that's what I'd have to term a 'butchered bitsa', especially with the weird mods to the muffler.  It's basically a 1950's engine and blade disc, on a 1970's Utility chassis. If the engine still turns over, it may be salvageable - water in the cylinder is not necessarily a major problem; water in the crankcase usually is, due to the rolling element bearings in there. Best thing to do, is to strip the engine down pronto, and give the big end and main bearings a good shot of something like WD-40. I'm not an admirer of WD-40 as a lubricant, but it does do a good job of displacing water. The teardown will be a good exercise in getting to know these engines, anyway. You'll need Whitworth [BSW/BSF] spanners for the barrel, head and crankcase nuts though, and either a 13/16" or 1" AF ring spanner [or that size socket and an air rattle gun] for the blade disc nut. There's a bit of a trick to getting the crankshaft boss under the blade disc off - see THIS past thread.
Cheers,
Gadge
"ODK Mods can explain it to you, but they can't understand it for you..."
"Crazy can be medicated, ignorance can be educated - but there is no cure for stupid..."
|
|
|
|
|
Joined: Mar 2015
Posts: 249
Apprentice level 3
|
Well, that's what I'd have to term a 'butchered bitsa', especially with the weird mods to the muffler. It's basically a 1950's engine and blade disc, on a 1970's Utility chassis. Ahhhh Bugger  .. was hoping it was a complete original mower (though the red painted engine on orange base did make me a lil suspicious) .. any idea or pictures of what the original base is suppose to be for that particular engine ? As with the muffler .. is that not an original victa muffler ? If the engine still turns over, it may be salvageable - water in the cylinder is not necessarily a major problem; water in the crankcase usually is, due to the rolling element bearings in there. Best thing to do, is to strip the engine down pronto, and give the big end and main bearings a good shot of something like WD-40. I'm not an admirer of WD-40 as a lubricant, but it does do a good job of displacing water. Managed to get the cylinder head off and had a peak into the crank-case .. didn't see any water, seemed mostly dry... so hopefully when I get it completely dismantled I can have a better look. You'll need Whitworth [BSW/BSF] spanners for the barrel, head and crankcase nuts though, and either a 13/16" or 1" AF ring spanner [or that size socket and an air rattle gun] for the blade disc nut. Just my luck.. 90% of tools (sockets at least) I have are Metric lol and the imperial are 12 sided  .. managed to find a socket and spanner with correct size though.. everything came apart pretty easy.. nothing seized (except blade boss still stuck) There's a bit of a trick to getting the crankshaft boss under the blade disc off - see THIS past thread. i followed that link, but I'm not 100% sure Im doing it right. I layed the engine on its side with the boss/shaft sticking out the side. I stuck a club-hammer under the boss and gave it a few light taps with another metal hammer.. no budge.. not sure if this is a slip on type or threaded (if you can get threaded). im a little hesitant to hit harder in-case I damage the boss I've got a butane torch here.. dont think it'll be hot enough to heat the boss up though..
Last edited by Widget; 17/12/16 07:08 AM.
|
|
|
|
|
Joined: Feb 2006
Posts: 4,675 Likes: 165
SENIOR TECHNICIAN
|
I like bitsas. It's always fascinating seeing the ideas other people come up with that you would have never likely thought up on your own. As for WD-40, I gained new found respect when I used it on my completely seized height adjustment pivot points on an early 80s utility that had been sitting partially exposed to the weather for four years+. Didn't do anything st first, but to my surprise, it moved up and down freely when I tried it after a week has passed 
Ahh, if only victa had kept producing the thumblatch catcher series, they would be in better shape today!
|
|
|
|
|
Joined: Jan 2012
Posts: 1,842 Likes: 14
Moderator
|
i followed that link, but I'm not 100% sure Im doing it right. I layed the engine on its side with the boss/shaft sticking out the side. I stuck a club-hammer under the boss and gave it a few light taps with another metal hammer.. no budge.. not sure if this is a slip on type or threaded (if you can get threaded). im a little hesitant to hit harder in-case I damage the boss I've got a butane torch here.. dont think it'll be hot enough to heat the boss up though.. It's a straight un-keyed taper fit - matching 15� tapers on the shaft and in the bore of the boss. Don't be afraid to give it a really good smack - it's solid steel, so it isn't easily damaged. Pullers don't work on these, and I doubt heat would help much.
Cheers,
Gadge
"ODK Mods can explain it to you, but they can't understand it for you..."
"Crazy can be medicated, ignorance can be educated - but there is no cure for stupid..."
|
|
|
|
|
Joined: Jun 2011
Posts: 4,291 Likes: 4
Master Technician
|
What I do to get the boss off is lay it on a hard metal surface (I use my vice) put the nut back on the (Just in case I miss) and then pound it with a hammer.Try not to hit the bottom of the crankcase as it will damage it. .. any idea or pictures of what the original base is suppose to be for that particular engine ? As for that post up the engine number as that will give me a better idea as to what it's off,and I should be able to work out what it's off. .. is that not an original victa muffler ? It is but it has been very very modified. That base should have had a series 70 engine with a box muffler that fit's in the rectangular slot in the base.
Here for a good time,not a long time.
|
|
|
|
|
Joined: Nov 2013
Posts: 6,938 Likes: 322
Forum Historian
|
What I do to get the boss off is lay it on a hard metal surface (I use my vice) put the nut back on the (Just in case I miss) and then pound it with a hammer. I would think most experienced members would use that technique. I would like to make this observation from personal experience. Being part of a large engineering shop as a young lad made me observe the techniques used by tradies. We avoided the laying of the Victa bosses on fixed hard surfaces. Instead, we used the BIG hammer / small hammer approach. Gadge has said pullers are not a good solution here, and this must be related to what I experienced. By using a BIG hammer as support, and using a smaller hammer (regular size) as the hitter, I noticed tapers would be 'released' in about two strikes. The 'shock' was transferred through both hammers. When hitting against a fixed object, like a vice, I noticed this would take longer! I think this means the shock (wave) 'broke the taper' more readily, and the BIG hammer / small hammer method supplied this more effectively. I understand most folk will have a vice and an engineering hammer. Most will not have what we had - a large selection of equipment. It's just an observation. All very stubborn boss.---------------------------------- Jack
|
|
|
|
|
Joined: Jul 2016
Posts: 129 Likes: 2
Apprentice level 2
|
hi widget that's another nice machine your picked up makes me laugh though as most mowers that have been re engined usually end up with a newer later model engine not the other way around 1970s mower with 1950s motor  
|
|
|
|
|
Joined: Mar 2015
Posts: 249
Apprentice level 3
|
|
|
|
|
|
|
Joined: Jun 2011
Posts: 4,291 Likes: 4
Master Technician
|
Sorry Jack I disagree I've never had any problems with my method and I know of a lot of others use the same and don't have any problems either.As I said you just have to watch that you have a nut to protect the thread as missing can happen.
Here for a good time,not a long time.
|
|
|
|
|
Joined: Nov 2013
Posts: 6,938 Likes: 322
Forum Historian
|
Hello Blumby
If it works for you, that' great mate.
I've used both and I reported what works best for me.
My discussion was about the most effective method.
I hope you appreciate my simple point - a solid but not rigid
large hammer seemed to cause a greater shock to break the taper.
Perhaps there is a scientific explanation for that.
It could be similar to how tower bell strikers work.
The bell is solidly mounted but not rigid. They pivot.
The Sound produced is a shock wave.
------------------------
Jack
|
|
|
|
|
Joined: Mar 2015
Posts: 249
Apprentice level 3
|
Update: Got the crankshaft separate from the rest of the engine body, cleaned the parts if some diesel and used a drill+wire wheel to carefully clean the flywheel.. but couldnt reach sections of it.. tips (besides sand blasting)?   Same with the inside of the crankshaft.. cleaned around it, but cant reach into the middle of the crankshaft.. tips ?    Will also need to replace the bearings and seals One thing I noticed, there's only 1x gasket on it.. between the crankcase and cylinder head .. is there not suppose to be a gasket between the crankcase halves ? More pics:   As for that post up the engine number as that will give me a better idea as to what it's off,and I should be able to work out what it's off. Looks like a IB AA 1745 
Last edited by Widget; 19/12/16 04:25 AM.
|
|
|
|
|
Joined: Jun 2011
Posts: 4,291 Likes: 4
Master Technician
|
Awesome good to see your having fun.Wish I had time right now,but I'll get that sorted.Anyway did you want to post the engine number so I can help you work out what it's off?
Here for a good time,not a long time.
|
|
|
|
|
Joined: Mar 2015
Posts: 249
Apprentice level 3
|
Awesome good to see your having fun.Wish I had time right now,but I'll get that sorted.Anyway did you want to post the engine number so I can help you work out what it's off? Fun when things work out.. not so fun when they break lol.. still bummed about the slight bend in the crankshaft.. will have to apply some heat and try bend back about a millimeter. With the engine number, I edited post above with a pic.. looks like it reads IB AA 1745
Last edited by Widget; 19/12/16 04:27 AM.
|
|
|
|
|
Joined: Jun 2011
Posts: 4,291 Likes: 4
Master Technician
|
OK well due to the engine number I'd say (unless it's been pieced together from more than one engine) that it is from a model 8 standard.As it has the muffler on the side it does and the engines back then did contain letters in the numbers.The later series of the model 5 did,but they didn't have the exhaust port that would take that muffler. The Sheerline did to but the muffler and carby where on the opposite sides to yours and they had a different style head.So that only leaves the model 8 as by the model 12 the engine numbers didn't contain any letters. So since your doing all this fine work it might pay to find a model 8 base.They shouldn't be hard to find as they used that same base on quite a few models. A model 8 looks like this. 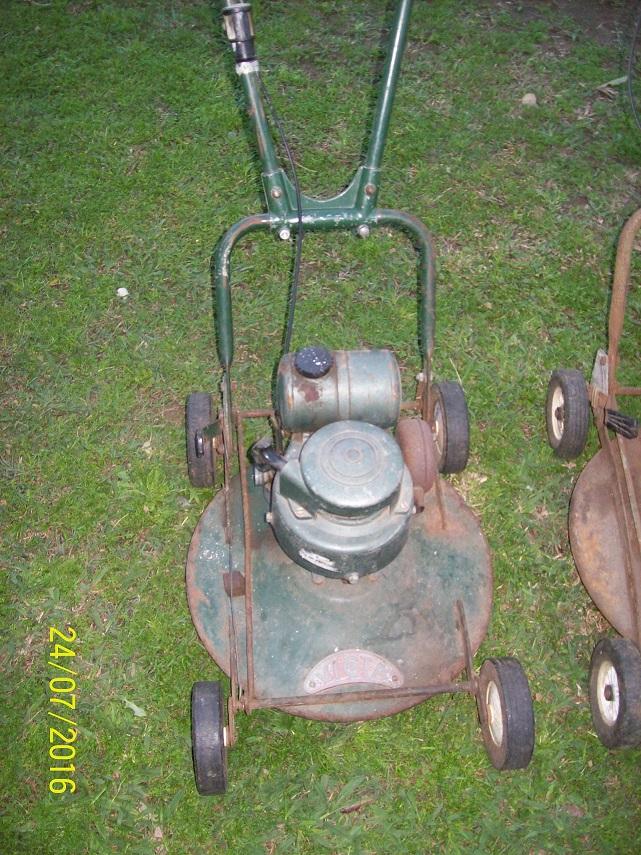 is there not suppose to be a gasket between the crankcase halves ? No there was no gasket between the two halves.I guess they were such a awesome fit they didn't need it.I usually put some gasket paste between them just to make sure,but it may not need it there,but I'd suggest to anyway you don't really want to have to pull it apart if it had a small air leak from it. still bummed about the slight bend in the crankshaft.. will have to apply some heat and try bend back about a millimeter. Wow if the crankshaft is bent I suggest getting another one,as if it's not spot on it could cause all sorts of problems.Some things like extra vibration,damage to seals & bearings and other things like that.Could do quite a bit of damage to itself.
Here for a good time,not a long time.
|
|
|
|
|
Joined: Mar 2015
Posts: 249
Apprentice level 3
|
Thanks heaps Blumbly, much appreciated.. now to find a model 8 base...  No there was no gasket between the two halves.I guess they were such a awesome fit they didn't need it.I usually put some gasket paste between them just to make sure,but it may not need it there,but I'd suggest to anyway you don't really want to have to pull it apart if it had a small air leak from it. oh, true.. might grab some silicon gasket maker just in-case Wow if the crankshaft is bent I suggest getting another one,as if it's not spot on it could cause all sorts of problems.Some things like extra vibration,damage to seals & bearings and other things like that.Could do quite a bit of damage to itself. Will deffinitely be on the lookout for one.. though Im gonna give it a shot to see if i can correct it.. just in-case, are these crankshaft used in all the older 2stroke victas ? or is each different ? On another note, the bearings look exposed (no rubber seals on them) .. when I replace them, do I need to get the same deep groove radial bearings? Does the oil in the 2 stroke lubricate them or will sealed bearings be ok ? There's this kit on ebay, not for another 8days.. its a bit pricy, but not sure what ill be looking at in terms of cost.. http://www.ebay.com.au/itm/172448022590?_trksid=p2060353.m1438.l2649&ssPageName=STRK%3AMEBIDX%3AIT
|
|
|
|
|
Joined: Feb 2006
Posts: 4,675 Likes: 165
SENIOR TECHNICIAN
|
Regarding the visibly bent threaded section in the picture, why not try and wrap layers of rubber or cloth around it and mount it into a vice and gingerly bend it back using forward and backward movements? That's what I would do.
Ahh, if only victa had kept producing the thumblatch catcher series, they would be in better shape today!
|
|
|
|
|
Joined: Mar 2015
Posts: 249
Apprentice level 3
|
Regarding the visibly bent threaded section in the picture, why not try and wrap layers of rubber or cloth around it and mount it into a vice and gingerly bend it back using forward and backward movements? That's what I would do. Thanks Mowerfreak, I might give that a shot .. should I try heating the bent section 1st? Ive only got butane, not sure if that'll help, but heat would soften the steel, yes ? Thanks again
|
|
|
|
|
Joined: Feb 2006
Posts: 4,675 Likes: 165
SENIOR TECHNICIAN
|
You should have ample leverage at the top of the crank shaft to reverse the bend. I would periodically check it by somehow spinning the crank and observing the thread to see if it is concentric again, to your judgement.
Be careful!!
Ahh, if only victa had kept producing the thumblatch catcher series, they would be in better shape today!
|
|
|
|
|
Joined: Jan 2016
Posts: 8,216 Likes: 235
SENIOR TECHNICIAN
|
Not a particularly difficult job if you have a press, lathe and dial indicator. Pity you are so far away Widget
|
|
|
|
|
Joined: Jan 2012
Posts: 1,842 Likes: 14
Moderator
|
oh, true.. might grab some silicon gasket maker just in-case Don't use general purpose silicones here. There are a couple of types available, made for sealing motorcycle cases, that would work, but a solvent-based non-hardening 'gasket cement' is what Victa always recommended. Permatex #3 'gasket sealant', which comes in a bottle with a brush top, has always worked well for me. Any automotive parts shop will have that. To absolutely ensure that the joint seals properly, you could lap the sealing surfaces. This just requires a sheet of 600 grit wet and dry abrasive paper and a really flat surface [e.g. sheet glass]. Wet the paper [with water is fine], place it on the glass, and move the crankcase half in small circles until the sealing surface is uniformly bright metal. Rinse off with clean water, dry, and it's done. Will deffinitely be on the lookout for one.. though Im gonna give it a shot to see if i can correct it.. just in-case, are these crankshaft used in all the older 2stroke victas ? or is each different ? If the bend is only at the start of the threaded section, as it appears to be, it's quite feasible to straighten it. The best way is with a press, a set of vee blocks, and a dial indicator and base. On another note, the bearings look exposed (no rubber seals on them) .. when I replace them, do I need to get the same deep groove radial bearings? Does the oil in the 2 stroke lubricate them or will sealed bearings be ok ? Yes, open bearings are required, so that the oil in the 2-stroke mix lubricates them. The correct types aren't that exy anyway; 20mm x2 HERE and 17mm x1 HEREThe big concern here, with the amount of rust on those old bearings, is the condition of the conrod big end rollers. Does the conrod rotate freely and smoothly, or does it feel a bit 'graunchy'? There's this kit on ebay, not for another 8days.. its a bit pricy, but not sure what ill be looking at in terms of cost..
http://www.ebay.com.au/itm/172448022590?_trksid=p2060353.m1438.l2649&ssPageName=STRK%3AMEBIDX%3AIT That kit is actually quite cheap!
Cheers,
Gadge
"ODK Mods can explain it to you, but they can't understand it for you..."
"Crazy can be medicated, ignorance can be educated - but there is no cure for stupid..."
|
|
|
|
|
Joined: Jun 2011
Posts: 4,291 Likes: 4
Master Technician
|
Yes as Gadge said not silicon.I use one called form a gasket by permatex it's just a paste.Looks a bit like this.Got it from Super-cheap Auto. 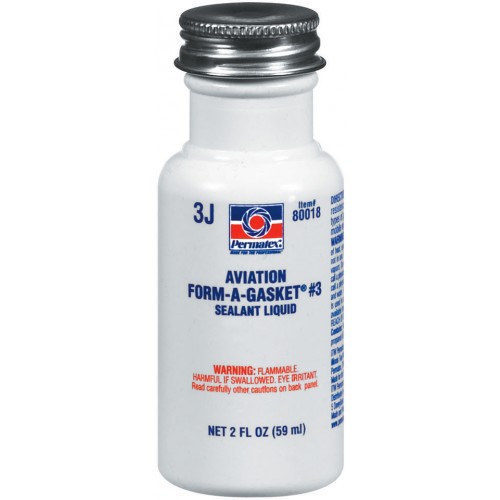 As far as your bearing and seal kit is.If you went to a bearing shop it would be close to that price anyway.I don't really know as it has been a while since I bought a set. just in-case, are these crankshaft used in all the older 2stroke victas ? or is each different ? Depending on year it was made these are common cranks so if you need to find one they are easy to find.That's another reason why I'd get another one.There is still plenty to find. Here's a parts list of it. 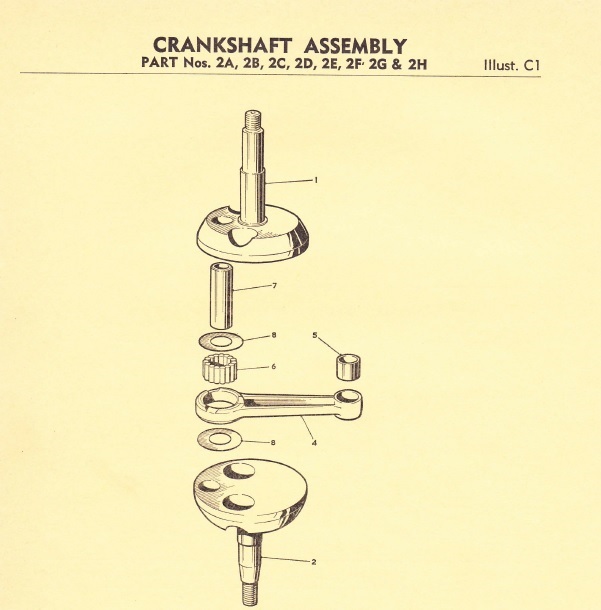 Does the oil in the 2 stroke lubricate them or will sealed bearings be ok ? Yes the oil does the lubricating so if you buy new bearings and they are sealed then remove the plastic seal parts so the oil can get in.
Here for a good time,not a long time.
|
|
|
|
|
Joined: Jan 2012
Posts: 1,842 Likes: 14
Moderator
|
Yes the oil does the lubricating so if you buy new bearings and they are sealed then remove the plastic seal parts so the oil can get in. And wash the grease out with kero or petrol, dry, and re-lube with 2-stroke oil.
Cheers,
Gadge
"ODK Mods can explain it to you, but they can't understand it for you..."
"Crazy can be medicated, ignorance can be educated - but there is no cure for stupid..."
|
|
|
|
|
Joined: Mar 2015
Posts: 249
Apprentice level 3
|
Not a particularly difficult job if you have a press, lathe and dial indicator. Pity you are so far away Widget no press, lathe or dial indicator .. pity you are too far away lol .. thanks anyway Don't use general purpose silicones here. There are a couple of types available, made for sealing motorcycle cases, that would work, but a solvent-based non-hardening 'gasket cement' is what Victa always recommended. Permatex #3 'gasket sealant', which comes in a bottle with a brush top, has always worked well for me. Any automotive parts shop will have that. Yes as Gadge said not silicon.I use one called form a gasket by permatex it's just a paste.Looks a bit like this.Got it from Super-cheap Auto. Oh excellent.. ill head down to SCA and grab some  To absolutely ensure that the joint seals properly, you could lap the sealing surfaces. This just requires a sheet of 600 grit wet and dry abrasive paper and a really flat surface [e.g. sheet glass]. Wet the paper [with water is fine], place it on the glass, and move the crankcase half in small circles until the sealing surface is uniformly bright metal. Rinse off with clean water, dry, and it's done. Thanks heaps for the tip, will have to give that a shot. Is that to roughen the surfaces so the gasket will bind better, or is it to clean the surfaces so they're clean of crud and allow for flatten even join? If the bend is only at the start of the threaded section, as it appears to be, it's quite feasible to straighten it. The best way is with a press, a set of vee blocks, and a dial indicator and base. Yeh Im pretty sure it's at the threaded section.. unfortunately I dont have many tools mentioned .. only option would be to place it in a vice and try yank on it. Yes, open bearings are required, so that the oil in the 2-stroke mix lubricates them. The correct types aren't that exy anyway; 20mm x2 HERE and 17mm x1 HEREThe big concern here, with the amount of rust on those old bearings, is the condition of the conrod big end rollers. Does the conrod rotate freely and smoothly, or does it feel a bit 'graunchy'? .... That kit is actually quite cheap! Oh fantastic, ill have to see how many I need.. i think its only 2x of each bearing ? + the 2x oil seals. "conrod big end rollers" that bar the piston attaches to ? I had a look, seems to spin freely and smooth ... ill double check... I did notice it's not attached like ones you would find on a 4stroke .. can they be removed? Looking at the pic Blumby posted, it looks like they can separate but maybe they were made as non-replaceable part during assembly ? Depending on year it was made these are common cranks so if you need to find one they are easy to find.That's another reason why I'd get another one.There is still plenty to find. Here's a parts list of it. Oh excellent, ill have to keep an eye out for one or an old un-savable engine to salvage. Thanks heaps for the info guys, really appreciate all the tips and suggestions
Last edited by Widget; 23/12/16 10:37 AM.
|
|
|
|
|
Joined: Jan 2012
Posts: 1,842 Likes: 14
Moderator
|
To absolutely ensure that the joint seals properly, you could lap the sealing surfaces. This just requires a sheet of 600 grit wet and dry abrasive paper and a really flat surface [e.g. sheet glass]. Wet the paper [with water is fine], place it on the glass, and move the crankcase half in small circles until the sealing surface is uniformly bright metal. Rinse off with clean water, dry, and it's done. Thanks heaps for the tip, will have to give that a shot. Is that to roughen the surfaces so the gasket will bind better, or is it to clean the surfaces so they're clean of crud and allow for flatten even join? No, it's to get both surfaces really flat - distortion sometimes occurs near the bolt bosses over time, and this procedure corrects that problem. If the bend is only at the start of the threaded section, as it appears to be, it's quite feasible to straighten it. The best way is with a press, a set of vee blocks, and a dial indicator and base. Yeh Im pretty sure it's at the threaded section.. unfortunately I dont have many tools mentioned .. only option would be to place it in a vice and try yank on it. Yes, open bearings are required, so that the oil in the 2-stroke mix lubricates them. The correct types aren't that exy anyway; 20mm x2 HERE and 17mm x1 HEREThe big concern here, with the amount of rust on those old bearings, is the condition of the conrod big end rollers. Does the conrod rotate freely and smoothly, or does it feel a bit 'graunchy'? .... That kit is actually quite cheap! Oh fantastic, ill have to see how many I need.. i think its only 2x of each bearing ? + the 2x oil seals. "conrod big end rollers" that bar the piston attaches to ? I had a look, seems to spin freely and smooth ... ill double check... I did notice it's not attached like ones you would find on a 4stroke .. can they be removed? Looking at the pic Blumby posted, it looks like they can separate but maybe they were made as non-replaceable part during assembly ? 2 x 20mm bearings, 1 x 17mm is the requirement. Righto; the correct technical term for that bar is the 'connecting rod', or conrod for short. Victa full crankshaft engines use a pressed-up crankshaft assembly, as do two-stroke [and a few four-stroke] motorbikes. Blumbly's parts list shows the component parts of the assembly. It is possible to dismantle and rebuild these, but this requires a serious workshop press and several special tools, so it's seldom done with Victa crankshafts, these days. Easier and cheaper to just find another crankshaft, if the one you have isn't serviceable for any reason.
Cheers,
Gadge
"ODK Mods can explain it to you, but they can't understand it for you..."
"Crazy can be medicated, ignorance can be educated - but there is no cure for stupid..."
|
|
|
|
M |
T |
W |
T |
F |
S |
S |
|
|
|
|
|
|
|
1
|
|
2
|
3
|
4
|
5
|
6
|
7
|
8
|
|
9
|
10
|
11
|
12
|
13
|
14
|
15
|
|
16
|
17
|
18
|
19
|
20
|
21
|
22
|
|
23
|
24
|
25
|
26
|
27
|
28
|
29
|
|
30
|
|
|
|
|
|
|
|
|
Forums144
Topics12,773
Posts106,871
Members18,214
| |
Most Online40,124
Apr 13th, 2026
|
|
|
|