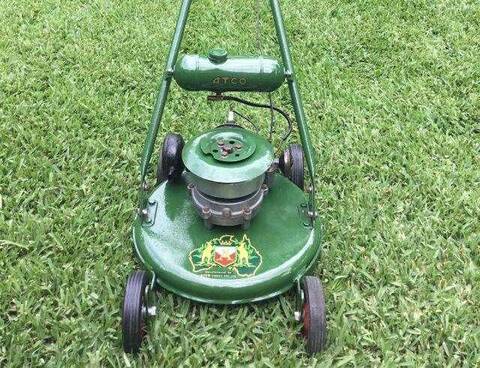
I am wanting to replace the rope pulley on my Standard with a recoil starter that I have, it's the proper vintage. I thought it was just a matter of removing the existing flywheel nut and fitting the starter cone but the nut in the cone doesn't have a thread all the way through.
Is there a shorter nut that goes on first and then the cone ? Thanks
There are two cone types, one has the nut as part of the cone (cast in) and the thread should go right through. It just screws down over the Tri washer and flyweel.
The second type, which I'm assuming you have, is a cone with a bare hole.
You will need to get the correct nut with a sleeve/shaft. As you screw the nut down, the shaft fits neatly in the cone hole and locks down with the help of a large flat, and curved spring washer.
Possibly your nut is jammed in the hole of the cone and is hindering fitment? An image will tell me if that's the case.
Thanks, I will have another look at them tonight and post up some pics. The standard was partly seized, it had a ring of surface rust at the top of the bore. Just enough to stop it from going over TDC, I have fitted new rings and honed the bore. Thought I would add the starter at the same time. I had to file the 020" ring gap a bit to fit them, even though they were at minimum clearance. Will hopefully run it tomorrow and see how things are.
I checked my starter cups. The early one with fixed nut is threaded on the lower and blank half way up,So that seems normal. It should just screw straight on with the tri cover washer underneath, and be tensioned up. They do not run an aditional washer that im aware of.
Engine sounds ok. A hone as you said should clear the lip and smooth it out. Piston to bore clearance is .008 thou from memory, but they will still run over that. If the bore is round still and you had to take the rings down a smidge, then that should be a nice fit, and I doubt youd encounter any issues.
Im sure you know, but pins to EX side and dont run a lower ring expander if the rings are as tight as you say. Should be a good little runner.
You checked crank was true yes? They are notorious for slipping halves and elongating/trashing the bore.
That's the early cup with the half thread, and definately the correct type for your model.
It will screw straight on once cleaned. Make sure you have your tri cup washer fitted first (The washer that covers the 3 Flywheel puller holes) as this is your tension washer. Then rattle it up.
Yes maybe the thread is crossed or dirty.
Correct tap size is 1/2" BSF 16 or if you don't have a tap, then thread file, or if you have a dummy shaft or crap crank with good thread,put a little Valve grinding paste on the threads and slowly run it over back and forth as you go down, just like a tap.
Good luck, should be no Worries unless your threads are stripped.
If it turns to crap, I have a few if you need:)
As for the crank, the simplest test is to put the rope starter pulley on the engine and turn it...If it wobbles and dips/rises then we know its probably out. Occasionaly the pulley can be out to, but generally its the crank, if the bottom shaft is wobbling too.
Both shafts out of alignment is a slipped crank, A single shaft out of alignment, especially the bottom is usually a bent shaft.
Out of alignment shafts make it really hard to start with a recoil starter.
That's a quick easy way of checking the crank, thanks for the tip.
This might sound a bit dim but I just took the fuel tap off to clean the strainer etc and there was no washer between the brass tap and tank. Both surfaces are spotless and the tap was in the right position ? Should there be a washer ?
In regards to the tap...Wow, that's crazy, usually even with a washer they leak, it should be pouring out!
Naaaa I'm just stiring, couldnt resist. Lols
There are no Dim Questions mate, just Dimwits! Ask any question,and ye shall receive! Lols
The tap simply has a tapered thread, (1/4 BSPT from memory) and does not require a washer.
I would still use thread tape or a thread sealer if you are restoring it. You can't pull the tap out when its on the cowl,so you need to undo all your good work if it leaks. Also some paint doesn't like fuel.
I will be stripping down now to repaint so it's all good. Just wanted to sort the mechanicals out first. First is this one that I rebuilt the bottom end on also got a hone, rings were good. It had a clean up years ago and then got parked in a shed. Fuel tank rusted clear through
This Standard was seized and got new rings and I fitted the recoil starter
Coool....The 4 seems the better runner:) That was new rings right?
They are a funny engine the 2nd generation, they are supposed to be smoother than the Rotomo, but I can get most of my Rotos to sit almost still, where as a fair few of my previous specials shake like crazy at low speed, no matter what you do to them. They also have a very small throttle margin, maybe only 3 stages, where a Roto has a more subtle and smooth increase of more stages.
I thought my head was gonna rattle off from the first one, lols.
Great job on both engines mate, and you've done well to get them running fairly clean too, and keep the costs down:)
Thanks, yes the 4 has the new rings, the special was running a bit rough and then it started to die out on me ? I opened the throttle wide but it just got worse ? I found the choke had vibrated around to the closed position.
Another early serial. Correct range and Original second gen stamping, Note the lower option code digit is of the later style, so its had a lower case at some point.
Its good to see a few low numbers, as I said previous between 130,000 and 150, there doesn't seem to be very many left, especially in the 130s
Both your 3 and 4 would have been made in the earlier months of 57.
The first model to get the leaf guard was the Auto. It was Std on Auto and option on special. Actually the First Special promo'd by Mervin had no leaf guard.
Disregard the Terminology. It has been said the lower digit is the option code, but its never been confirmed. I have tried to decifer its correct meaning for ages, but nothing adds up. Its about the only mystery left in regards to these models.
As an example a code of 3 would be 3.6hp engine steel base,rope start....code 4 Would be 3.6 engine,alloy base, 4 holes for Safety guards,edger slot, height adjust.....Something like this.
It refers to mower styles, NOT optioned extras like starter, leaf gaurd, safety toe ring.
But the codes don't always make sense, for eg, an Automatic can have codes of 0 1 2 and 4...So things dont add up.
Anyway its just another piece to the puzzle.
As for options, Recoil starter, Leaf guard, Toe ring. Safety side skirts for Model 4 std.
As you can see, its not much. With yours being a 4, you can have the groove cover with bolts, cigar tap, spanner, safety skirts(good luck) Recoil starter and leaf guard.
On purchase, you also got fuel tank and funnel, with the spanner being fitted to the mower.
I did a bit more today, replacing fuel taps and tidying up. The 4 was seized in the top end so I sorted that first to get it running, it was pretty noisy. I had the cowl off fitting the cigar fuel tap and so flipped it on its side to check underneath, the blade holder was buggered. Cracked open in two places and all bent up, the muffler plate was half gone and the exhaust insert was laying in the bottom. I had focused on the top half of the mower first leaving the dirty bit for later. I had all the spares on hand so fitted them up, even with another muffler plate fitted up and the exhaust put right it is still noisy and how do you stop fuel coming out of the vent hole in the cap ??
Did you replace the exhaust plate gasket, and does the exhaust mate well at both the engine and the base? The plate gasket acts as a noise dampener as well as a seal. The exhaust flange is usually bent and needs to be linished on a slight angle, so the inner is higher than the outer giving it a good seal. Also the base gasket normally needs 2 as there is always a gap. I often shim them then put the gasket. I have even sleeved the base so the exhaust sits tight and true. If all is sealed, then they are fairly quiet runners.
The fuel tank has a plastic cup that sits inside the cap, and acts ax a secondary barrier to stop the fuel escaping. You can make something up or use some cork, and put the breather hole in it offest to the cap hole, and it will stop most or slow it down, as their will still be an air gap between the cork and cap centre to hold the excess. Also using a half tank will help.
Thanks, I was a bit slack and didn't fit a gasket. Wanted to see if it did make a difference and I see it does. I did see that the exhausts that I have are all bent up at the flange so I will file them back flat.



![[Linked Image from i313.photobucket.com]](http://s313.photobucket.com/user/prc2008/media/20150305_161431_zpskqblrn3b.jpg.html)
![[Linked Image from i313.photobucket.com]](http://s313.photobucket.com/user/prc2008/media/20150305_161425_zpsbqmwbieq.jpg.html)
![[Linked Image from i313.photobucket.com]](http://s313.photobucket.com/user/prc2008/media/20150306_142552_zpst8p9d7qa.jpg.html)
![[Linked Image from i313.photobucket.com]](http://s313.photobucket.com/user/prc2008/media/20150306_142558_zpsvxhhugxd.jpg.html)
![[Linked Image from i313.photobucket.com]](http://s313.photobucket.com/user/prc2008/media/20150306_142511_zpsaavsxsam.jpg.html)
![[Linked Image from i313.photobucket.com]](http://s313.photobucket.com/user/prc2008/media/20150306_142459_zpso8rpiunp.jpg.html)
![[Linked Image from i313.photobucket.com]](http://s313.photobucket.com/user/prc2008/media/20150306_142450_zpsag6decmo.jpg.html)
![[Linked Image]](https://www.outdoorking-forum.com.au/forum/uploads/usergals/2015/03/full-5599-20663-20150305_105513.jpg)
![[Linked Image]](https://www.outdoorking-forum.com.au/forum/uploads/usergals/2015/03/full-8880-20664-image.jpg)