|
0 members (),
4,089
guests, and
1,633
robots. |
|
Key:
Admin,
Global Mod,
Mod
|
|
|
|
Joined: Dec 2012
Posts: 20
Novice
|
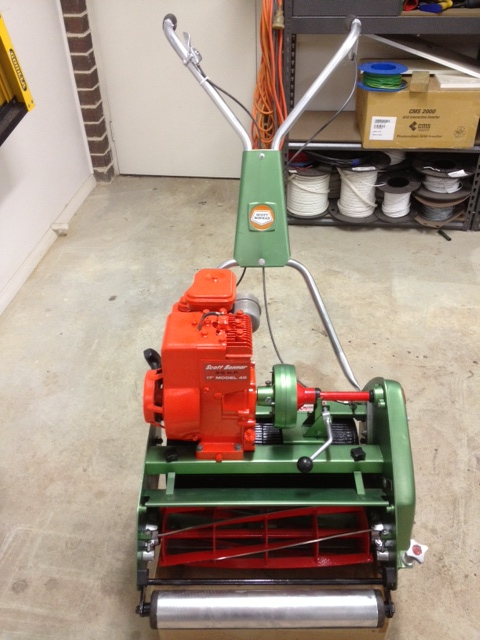
Hi all, I have recently purchased an old Scott Bonnar 45 and are looking to restore it slowly. Does anyone know the names of the 2 colours that are used, or there new replacements and where they can be purchased from? Thanks ![[Linked Image]](https://www.outdoorking-forum.com.au/forum/uploads/usergals/2012/12/full-6351-9048-mover_side_1.jpg)
|
|
|
|
|
Joined: Jul 2005
Posts: 6,362 Likes: 11
Administrator - Master Technician
|
Hi Dunks 03, and a warm welcome to the forum, its great to have another Scotty 45 owner on board. Re: the green hammertone on your Scotty, the formula for this and its name, have unfortunately, been lost over time (Scott Bonnar was taken over by Rover in 1980). However, if you remove and clean inside the chain-case cover on your machine; take it to an automotive paint supplier, the may be able to colour match it for you and also supply the "International Orange" which is the colour of your Briggs and Stratton engine. For stickers and 'shield' decals, please send a PM to willingworker (Grant) just scroll down to contact details and click on 'Send a PM' .....see HEREPlease don't forget to take some before and after pics as you go along, as it will make a good archive.  For a similar restoration, see the thread...Click HERE Once again Dunks,  to OutdoorKing. 
Please do not PM me asking for support. Please post your questions in the appropriate forums, as the replies it may receive may help all members, not just the individual member. Kindest Regards, Darryl 
|
|
|
|
|
Joined: Dec 2012
Posts: 20
Novice
|
Thanks Deejay, I just about have it all striped down now but I am having trouble taking the main drum/roller cog off. I cant stop the roller from spinning as I try loosen the nut. Any tips? Also I've taken so photos of the gears if someone can tell me if they are all still in serviceable condition. Thank you ![[Linked Image]](https://www.outdoorking-forum.com.au/forum/uploads/usergals/2012/12/full-6351-9077-cutter.png) ![[Linked Image]](https://www.outdoorking-forum.com.au/forum/uploads/usergals/2012/12/full-6351-9078-main.png) ![[Linked Image]](https://www.outdoorking-forum.com.au/forum/uploads/usergals/2012/12/full-6351-9079-drum.png)
|
|
|
|
|
Joined: Jul 2005
Posts: 6,362 Likes: 11
Administrator - Master Technician
|
Hi Dunks, all the sprockets look in good condition for its age, plenty of time left in those......Just keep them well greased, with a good quality grease. Re; removal of the rear roller sprocket, I have not removed one myself...I haven't needed to.....However, browsing the Scott Bonnar threads in "Repairs and Maintenance" will help you find an answer. Here's one....Click HERE Hoping this helps....
Please do not PM me asking for support. Please post your questions in the appropriate forums, as the replies it may receive may help all members, not just the individual member. Kindest Regards, Darryl
|
|
|
|
|
|
Joe Carroll
Unregistered
|
Your best chance might be there to use a strap around the roller (if such a tool is available?) like a bigger version of a strap type oil filter wrench, to hold it stopped while trying to turn it.
Proper tools aside now...
My way of undoing it would be to use a bar on the socket and hit it with a rubber mallet to shock it to come undone.
|
|
|
|
|
Joined: Dec 2012
Posts: 20
Novice
|
Thanks guys
The only thing is if I get it off I'm worried that when I put it back together I might struggle to tighten said nut.
|
|
|
|
|
Joined: Jul 2005
Posts: 6,362 Likes: 11
Administrator - Master Technician
|
As I have said in a similar thread, it is a good idea to crack all the bolts and nuts before removing the chains. This then makes an easy job of it.
Please do not PM me asking for support. Please post your questions in the appropriate forums, as the replies it may receive may help all members, not just the individual member. Kindest Regards, Darryl
|
|
|
|
|
Joined: Dec 2012
Posts: 20
Novice
|
Ha, hindsight is a wonderful thing.
That would have made it heaps easier.
I wasn't sure how far I was going to go disassembling.
But it has all come apart really easy so far.
I've watched a few of your videos and they helped heaps.
Much anticipated.
|
|
|
|
|
Joined: Jul 2005
Posts: 6,362 Likes: 11
Administrator - Master Technician
|
Well Dunks, it looks like a complete strip-down now....which is a good thing; it allows you to inspect all the components, especially the bearings. My recommendation here, of course, is to replace any bearing that you feel may be approaching the end of its service life....Its better than having to strip down again at a later time, just to replace a pesky bearing. Don't forget, progress pics as you go along, please!
Please do not PM me asking for support. Please post your questions in the appropriate forums, as the replies it may receive may help all members, not just the individual member. Kindest Regards, Darryl
|
|
|
|
|
Joined: Dec 2012
Posts: 20
Novice
|
Yeah turned into a complete strip down,
I nearly have a new mower now.
I'd already replace the right cutter bearing housing as it was broken when I purchased it, and did the bearings at the same time.
But on closer inspection I've found the clutch had been reamed out like yours in your video deejay. So I've ordered that along with the clutch bearing, then when I took off my self aligning bearing housing off I found my bearing nearly fell apart in my hands.
As far as I could tell the only bearings left were the drum bearing and I think they are still ok. They still spun smooth, so i just packed em with grease and put them back in.
Its all painted up like new now, just waiting for my blades to get back from the sharpener, my new clutch and bearings and my decals in the mail.
I've taken loads of photos to upload when i'm done.
The only decal i'm not sure of deejay is the one that goes on the front of the catcher.
Its the model 450520 which I think is the same as yours, do you have a uploaded photo of your catcher?
Thanks
Matt
|
|
|
|
|
Joined: Jul 2005
Posts: 6,362 Likes: 11
Administrator - Master Technician
|
Hi Dunks, all is coming along well mate, as you said she will be just like a bought one when finished. Here is a pic of my catcher decal.... ![[Linked Image]](https://www.outdoorking-forum.com.au/forum/uploads/usergals/2012/12/full-1147-9112-didee_2010_014.jpg) Looking forward to your pics....
Please do not PM me asking for support. Please post your questions in the appropriate forums, as the replies it may receive may help all members, not just the individual member. Kindest Regards, Darryl
|
|
|
|
|
Joined: Dec 2012
Posts: 20
Novice
|
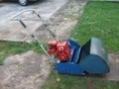
Here are the photo's This is that I started with ![[Linked Image]](https://www.outdoorking-forum.com.au/forum/uploads/usergals/2012/12/full-6351-9175-start.png) ![[Linked Image]](https://www.outdoorking-forum.com.au/forum/uploads/usergals/2012/12/full-6351-9176-serial_plate.png) ![[Linked Image]](https://www.outdoorking-forum.com.au/forum/uploads/usergals/2012/12/full-6351-9177-no_motor.png) There's no going back now! ![[Linked Image]](https://www.outdoorking-forum.com.au/forum/uploads/usergals/2012/12/full-6351-9178-theres_no_going_back_now.png) Sanded and wire brush wheeled everything back to bare metal ![[Linked Image]](https://www.outdoorking-forum.com.au/forum/uploads/usergals/2012/12/full-6351-9179-bare.png) Then primed everything ![[Linked Image]](https://www.outdoorking-forum.com.au/forum/uploads/usergals/2012/12/full-6351-9180-primed.png) I couldn't get a paint match so I just went with one I thought was similar, although its not hammer tone. I couldn't get that in an aerosol can. ![[Linked Image]](https://www.outdoorking-forum.com.au/forum/uploads/usergals/2012/12/full-6351-9181-new_paint.png) I removed all the motor covers, the filter and gave it a big de-grease, then removed the carbie and flushed it with carbie cleaner, replaced the oil and the spark plug. ![[Linked Image]](https://www.outdoorking-forum.com.au/forum/uploads/usergals/2012/12/full-6351-9182-motor.png) ![[Linked Image]](https://www.outdoorking-forum.com.au/forum/uploads/usergals/2012/12/full-6351-9183-fuel.png) The engine is painted with a engine enamel chevy orange, was a pretty close match I thought ![[Linked Image]](https://www.outdoorking-forum.com.au/forum/uploads/usergals/2012/12/full-6351-9184-new_motor.png) Starting to come together ![[Linked Image]](https://www.outdoorking-forum.com.au/forum/uploads/usergals/2012/12/full-6351-9185-new_frame.png) I de-greased all my chains and sprockets as they were very dirty and full of grass Then re-greased them all upon re-installing ![[Linked Image]](https://www.outdoorking-forum.com.au/forum/uploads/usergals/2012/12/full-6351-9186-chain_case.png) I had the reel and bed knife sharpened, after several phone call around various business' i found a place that, 1 knew what i was talking about and, 2 knew what to do. I couldn't get a hold of a greens keeper at a bowls club ![[Linked Image]](https://www.outdoorking-forum.com.au/forum/uploads/usergals/2012/12/full-6351-9187-reel.png) All Done!! ![[Linked Image]](https://www.outdoorking-forum.com.au/forum/uploads/usergals/2012/12/full-6351-9188-finished.png) ![[Linked Image]](https://www.outdoorking-forum.com.au/forum/uploads/usergals/2012/12/full-6351-9189-side.png) Was actually very enjoyable restoring her, it has cost me a bit to get it here tho, i'm into it about $750 - 800 as it is. After replacing cutter housing, cutter bearings, self aligning bearing, clutch and bearing, spark pug, sharpening and paints. And at this stage I haven't fired her back up, just giving the paint another day to cure. FINGERS CROSSED
|
|
|
|
|
Joined: Jan 2012
Posts: 1,391 Likes: 4
De-registered
|
Stunning Resoration Dunks...As for cost...Go Buy A New One with quality like these!.I think your way in front and have a very impressive piece for show and use.Cant put a price on Satisfaction Either!Congratulations,One Of the best restos Ive seen on a reel....Only One Problem..Its Not A Rotomo....Lols
Last edited by Bluegmhtmonaro; 21/12/12 03:41 PM.
|
|
|
|
|
Joined: Jul 2005
Posts: 6,362 Likes: 11
Administrator - Master Technician
|
Please do not PM me asking for support. Please post your questions in the appropriate forums, as the replies it may receive may help all members, not just the individual member. Kindest Regards, Darryl
|
|
|
|
|
Joined: Aug 2012
Posts: 16
Novice
|
whats the paint you used called? looks sweet.
|
|
|
|
|
Joined: Nov 2009
Posts: 134
Apprentice level 2
|
did you paint the handlebars?
|
|
|
|
|
Joined: Dec 2012
Posts: 20
Novice
|
Thanks Bluegmhtmonaro and Deejay, I'm stoked with the way it turned out.
Fired it up today and it purrs like a kitten. No more vibrating and the engine runs a lot smoother too. I just had to adjust the cutting reel a touch more.
conquest96 not sure what the paint colour is called, I picked it off one of the paint shops chart and they put it in aerosol cans for me, I used 2 cans of it.
tezza98_tnharris yes I painted the handle bars with a chrome paint, sanded all the rust off with 600 sand paper first.
i wasn't sure how to go about getting them re chromed, they turned out well just not sure what the longevity will be.
|
|
|
|
|
Joined: Feb 2012
Posts: 13
Novice
|
Dunks, noticed your location was Melbourne. I've been to two or three local mower shops down here in Geelong and they are quoting in the region of $200-$250 for a reel sharpen. Seems an astronomical amount to charge to me. How much were you charged if you dont mind??
|
|
|
|
|
Joined: Jul 2005
Posts: 6,362 Likes: 11
Administrator - Master Technician
|
Hi Scoffey86, it all depends on what is involved....if you take your machine to a mower shop and ask to have it sharpened, they have to remove the cylinder reel and soleplate (complete with the bedknife still attached) and send it to the engineering workshop (freight) and re-install and adjust the clearances on its return. They can charge up to $80.00 an hour for labour alone. If you remove the reel and soleplate yourself and take them to the engineer....you can save heaps. The engineer I use charges me $70-$80 for the reel and bedknife.
Please do not PM me asking for support. Please post your questions in the appropriate forums, as the replies it may receive may help all members, not just the individual member. Kindest Regards, Darryl
|
|
|
|
|
Joined: Mar 2012
Posts: 414
Professional Tinkerer
|
Wow Dunks! I don't usually post in threads regarding reel mowers, But I Just had to congratulate you on an awesome resto! So  Mate  That Machine looks brand new! I'm sure she cuts the lawns smooth as glass...um...Grass. Kori
|
|
|
|
|
Joined: Feb 2013
Posts: 48
Novice
|
Hi Gents, does anyone know where i can get the scott bonnar make/model tag you rivet to the frame? My original is a sticker(or a sticker even).
thanks E man.
|
|
|
|
|
Joined: Dec 2012
Posts: 20
Novice
|
Hey scoffey,
Sorry for the very slow response, I only payed about 55$, I dissembled it my self to save costs and just gave the bed knife and the reel. I basically just googled 'sharpeners' and rang around till I found someone that knew what I was talking about. The one I used was in coburg, but I had a quote of 200-250 from a mob in hoppers I think.
Thanks K-balm, shes still purring along well, still enjoyable mowing my lawn
|
|
|
|
|
Joined: Jul 2005
Posts: 6,362 Likes: 11
Administrator - Master Technician
|
Hi guys we have gone 'off topic' By the way scoffey, have a read of my post HERE
Please do not PM me asking for support. Please post your questions in the appropriate forums, as the replies it may receive may help all members, not just the individual member. Kindest Regards, Darryl
|
|
|
|
|
Joined: Dec 2010
Posts: 14
Novice
|
ripping job pal
where did you source your new front roller from??
|
|
|
|
|
Joined: Jul 2005
Posts: 6,362 Likes: 11
Administrator - Master Technician
|
Hi oldmatty, you can source the front roller end-caps HERE and I will send you a PM regarding the front roller tube. As this thread is "off topic" I will now close it.
Please do not PM me asking for support. Please post your questions in the appropriate forums, as the replies it may receive may help all members, not just the individual member. Kindest Regards, Darryl
|
|
|
|
M |
T |
W |
T |
F |
S |
S |
|
|
|
1
|
2
|
3
|
4
|
5
|
|
6
|
7
|
8
|
9
|
10
|
11
|
12
|
|
13
|
14
|
15
|
16
|
17
|
18
|
19
|
|
20
|
21
|
22
|
23
|
24
|
25
|
26
|
|
27
|
28
|
29
|
30
|
31
|
|
|
|
|
Forums144
Topics12,743
Posts106,755
Members18,045
| |
Most Online40,124
Apr 13th, 2026
|
|
|
|