|
2 members (Mypwta, MattDavy),
2,092
guests, and
1,796
robots. |
|
Key:
Admin,
Global Mod,
Mod
|
|
|
|
Joined: Apr 2012
Posts: 18
Scott Bonnar Enthusiast
|
Hi All, This is my first post here but reading this forum has inspired me to purchase an old SB 45 and have a go at restoring it. I purchased the unit sight unseen off ebay an immediately went to work on it. Here is a picture of the mower as purchased ![[Linked Image]](https://www.outdoorking-forum.com.au/forum/uploads/usergals/2012/04/full-5839-6137-img_1114.png) ![[Linked Image]](https://www.outdoorking-forum.com.au/forum/uploads/usergals/2012/04/full-5839-6138-img_1115.png) It was resprayed gold at some stage in it's life but there is some green hammertone under there too, It looks to me that the grass box is not original as it is a completely different colour to the rest of the mower (before it was turned to gold!), it also has a reasonable amount of denting on the front. The engine is a 3hp B&S, numbers, Model 91212, Type 1025e1 Code, 980630fa and runs quite well. It has also been resprayed black and there is paint everywhere, I am yet to start on it but I will simply be giving it a grease and oil change, a fresh coat of paint and some new stickers. So far I have stripped the body completely and sand blasted all of the old crappy paint off. Here are some progress shots ![[Linked Image]](https://www.outdoorking-forum.com.au/forum/uploads/usergals/2012/04/full-5839-6139-img_1116.jpg) ![[Linked Image]](https://www.outdoorking-forum.com.au/forum/uploads/usergals/2012/04/full-5839-6140-img_1117.jpg) ![[Linked Image]](https://www.outdoorking-forum.com.au/forum/uploads/usergals/2012/04/full-5839-6141-img_1119.jpg) I'm not sure about the condition of the blade but it looked like it had a hard life, there was some reasonable bends in it where it looked like it had hit something hard, there were also some cracks in some of the welds (IMO poorly made too) the reel was gently straightened and the cracks re-welded. The photo above is after repair and undercoated (you can just see the reel in the first shots above. The grass deflector had fallen off the mount and into the blade and had been bent and chewed a bit on the bottom, this was also repaired. This is after I gave the parts an undercoat. Whatever paint was on the catcher it was a bugger to get off, so bad in fact that I gave up with the sandblaster and had to use a stripping disc on the angle grinder. After a little bit of elbow grease I got it off eventually! During the stripping process. ![[Linked Image]](https://www.outdoorking-forum.com.au/forum/uploads/usergals/2012/04/full-5839-6144-img_1118.jpg) ![[Linked Image]](https://www.outdoorking-forum.com.au/forum/uploads/usergals/2012/04/full-5839-6145-img_1128.jpg) ![[Linked Image]](https://www.outdoorking-forum.com.au/forum/uploads/usergals/2012/04/full-5839-6146-img_1129.jpg) The shaft through the front roller was/is very worn and I am a little bit worried about it. When I was pulling down the mower this shaft was badly worn where the roller bushes contact the shaft, so bad in fact I reckon there was roughly 3-4mm worn away making the shaft almost oval in shape. I got the welder out and 'filled' it back up then I turned it in the lathe to get it back to the correct size. This fixed the roller shaft but I think there is more wear on the pivot where it sits in the mower frame and the mower frame bushes too, I will have to wait and see how bad it is before I take any more action. I have ordered a new sticker set and some new parts including a self aligning bearing for the drive shaft, a nut and bolt kit, and some stickers etc Here are some pictures of the painting process, the colour is Alpine Green Hammer and it is looking fantastic!! ![[Linked Image]](https://www.outdoorking-forum.com.au/forum/uploads/usergals/2012/04/full-5839-6147-img_1121.jpg) The reel ![[Linked Image]](https://www.outdoorking-forum.com.au/forum/uploads/usergals/2012/04/full-5839-6148-img_1126.jpg) ![[Linked Image]](https://www.outdoorking-forum.com.au/forum/uploads/usergals/2012/04/full-5839-6149-img_1127.jpg) The first photo is more like the colour, I'm not sure why the second photo is so light. I would like to get an I idea of the age of the machine if it is possible for someone to tell, looking at the motor I can see that it is reasonably modern but I think the mower might be older than the engine. I would also like to get some advice re preparing my lawn for this mower. I live in Sydney and have a QLD blue couch lawn that has done very well this season, It is approximately 30-50mm long and there is some light thatching/brownness underneath but nothing too bad, it has been mowed once per week with a normal rotary mower throughout summer and it is so healthy and thick that the mower struggles to cut it as it's like mowing thick carpet! Also if anyone can steer me in the right direction re somewhere to have the blades sharpened on the northern beaches of Sydney that would be appreciated too.
|
|
|
|
|
Joined: Jan 2009
Posts: 6,926 Likes: 11
Pushrod Honda preferrer
|
Welcome to Outdoorking, wilsoac. Your Briggs engine was made on 30 June 1998, which is as you said rather recent. Our resident SB guru, Deejay, will be able to talk about the implications of that.
Your restoration is going well. My only comment is that the reel still looks as if it could stand more work to be up to the standard you are working toward with the rest of the mower (the blades do not make perfect helixes), and of course there is no limit to the amount of panel beating you can do on the catcher, it is just a matter of time and practice. When you get the reel sharpened, you may find you can get the blade shapes corrected too. Meanwhile you have the opportunity to practise with the mower if you wish. I believe that if you do get the reel blades straightened, you will have to paint it again afterward, but painting has to be finalised before you get it sharpened, so you may have some decisions to make there.
|
|
|
|
|
Joined: Jun 2010
Posts: 124
Apprentice level 2
|
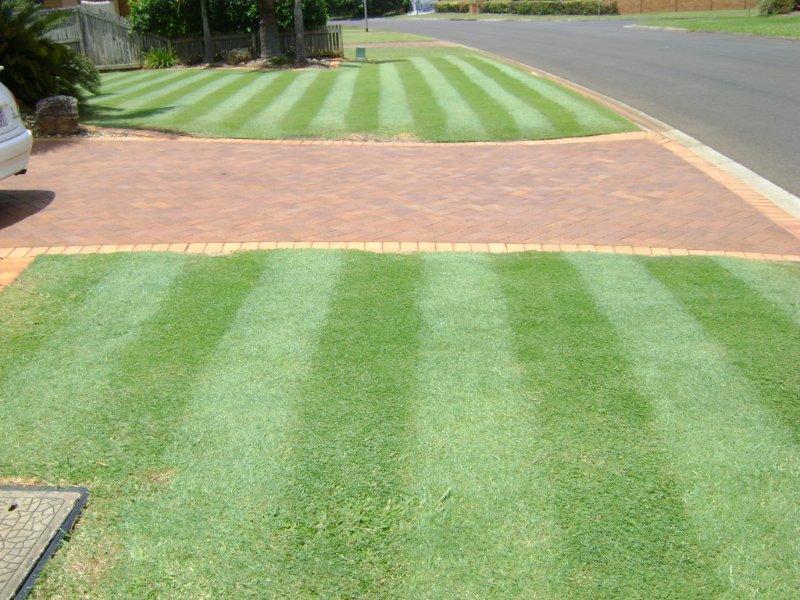
Looking good Wilsoac. What sort of results are you after with your grass? I have same & you will soon see the benefits as QLD blue & cylinder mowers are a match made in heaven. Check out pics of my grass in other posts.
Cheers Ross
|
|
|
|
|
Joined: Jul 2005
Posts: 6,362 Likes: 11
Administrator - Master Technician
|
Hi wilsoac, and a warm welcome to the forum. It's great to have another Scott Bonnar Model 45 owner on board. We hope you will feel right at home, because we all like to learn new things and tinker here.  Here are my observations; (based on your post that there was green hammertone under the gold). (1) The engine is not original to this machine but the chassis is a genuine late model Scotty, manufactured in Thebarton, Adelaide SA. This appears to be in approximately the date range 1976-79. It is a 17" cutting width. (2) The catcher is from a later Scotty 45, made after the Rover/Scott Bonnar merger. The handle on the top is not original. (3) The rubber handle-bar grips are from a later Rover/SB model also. From what you have said in your post re the front roller shaft, I would suggest you get some new roller end caps, as they would be worn as well. The reel appears to have plenty of life left in it (thanks to your repairs)....as grumpy has suggested, you could do further work on it to straighten the blades if you wish. I cannot see in your pics what the bottom blade looks like, but the soleplate complete with the bottom blade attached (ie. do not remove it) will need to go with the cylinder reel to the engineer for sharpening. You may consider purchasing some new reel bearings, as these are critical to achieve the fine clearances necessary when adjusting after re-installation on your machine. Can you please post some pics of the sprockets...we need to see the teeth...we will then be able to advise you on there condition and will give us some idea of what the chains are like. Once again wilsoac,  to OutdoorKing! 
Please do not PM me asking for support. Please post your questions in the appropriate forums, as the replies it may receive may help all members, not just the individual member. Kindest Regards, Darryl 
|
|
|
|
|
Joined: Apr 2012
Posts: 18
Scott Bonnar Enthusiast
|
|
|
|
|
|
|
Joined: Jan 2009
Posts: 6,926 Likes: 11
Pushrod Honda preferrer
|
wilsoac, we need to see them from directly in line with the axis of the bore, to be able to see the tooth form accurately. All of those sprockets appear to be goners, but it would be best if you show us the actual tooth form, so we can tell you what is wrong and how it probably happened.
|
|
|
|
|
Joined: Apr 2012
Posts: 18
Scott Bonnar Enthusiast
|
Thanks for the feedback guys. Ross, I have had a look at the photos of your lawn and that is exactly what I am after. I think that my lawn may be too thick (thatch) at the moment to achieve the rolled flat look and I am wondering how to remove it. Should I go all out and hire a scarifier to remove it, use the rotary and cut the grass nice and low to scalp it off or just use the newly restored mower and gradually lower the cutting height? Deejay and grumpy, I will take some new photographs tomorrow of the sprockets and bottom blade, but being an avid cyclist I can already predict the outcome of your observations and I am starting to feel the pain in my hip pocket of this restoration!! a new set of sprockets and chains is going to blow out the budget but I guess I will have a very nice mower when its all said and done!! Today I painted a few more things and the mower is really starting to look fantastic now, I pulled down the drive roller and inspected it for wear and I was pleasantly surprised that there was very little, I pulled out the bearings, degreased and repacked them with grease and they were nice and smooth again. The bushes seemed ok so I gave them a bit of grease too. I'm hoping to start putting this thing back together soon.... (before I forget where all of the bits go!!!) ![[Linked Image]](https://www.outdoorking-forum.com.au/forum/uploads/usergals/2012/04/full-5839-6158-img_1136.jpg)
|
|
|
|
|
Joined: Jun 2010
Posts: 124
Apprentice level 2
|
What I did was use the rotary to cut the height of the grass lower, then gradually lower the height of the cylinder mower until the grass was at the desired height. One thing is for sure, cylinder mowers do not like long grass particularly if it is wet. As far as a scarifier, I have never used one so I couldn't really offer any guidance on that one. I think if you take the gradual option as i did you will get there. When I cut mine I run the mower over the grass twice, once because I enjoy cutting it and also the second cut seems to keep the grass flatter and lower. Every now and then i cut lengthways as opposed to side to side, this keeps the lumps and bumps away. Ideally to keep the defined lines looking really nice it should be cut every 2 or 3 days, but i don't get the time during the week. Why dont you take a couple of pics of your grass so we can get an idea of where you are at and don't forget to have the reel and the bottom blade sharpened - there is plenty of info on how to adjust the reel correctly, just check out Deejays posts, especially the vids.
Hope the above info helps.
Cheers ,
Ross
|
|
|
|
|
Joined: Jun 2011
Posts: 21
Novice
|
is the booze on the floor in the last photo for consumption during the resto.
bloke could die of thirst without liquids.
|
|
|
|
|
Joined: Jul 2005
Posts: 6,362 Likes: 11
Administrator - Master Technician
|
Hi wilsoac, well done on the work thus far mate, It's going to come up a treat...the colour does look great....
Please do not PM me asking for support. Please post your questions in the appropriate forums, as the replies it may receive may help all members, not just the individual member. Kindest Regards, Darryl
|
|
|
|
|
Joined: Apr 2012
Posts: 41
Novice
|
It was a great thrill for me to find this Forum - I will shortly be restoring a SB 45058 with a Tecumseh engine. When I first bought it I was a bit despondent; thinking it was beyond help. However this thread and tezza98's restoration thread has filled me with hope. Good luck with your fun project, wilsoac and please keep the info and photos coming.
Last edited by DaveC; 15/04/12 10:30 AM.
Reel Mowers do it better.
|
|
|
|
|
Joined: Apr 2012
Posts: 18
Scott Bonnar Enthusiast
|
|
|
|
|
|
|
Joined: Jan 2009
Posts: 6,926 Likes: 11
Pushrod Honda preferrer
|
Thanks wilsoac, nice pictures. First, if you look at the small sprockets, you will notice that some of them have lost the tips of the teeth, and the others have angles formed on the tips of the teeth. This is caused by the chain having increased in pitch due to wear between pins and side-plates. The out of pitch chain then tries to modify the sprockets to match the increased pitch, with visible results.
Looking at the larger sprockets, you can see that the chain has increased the sprocket pitch by undercutting the teeth, so they have wide spaces between teeth, and very steep sides of the teeth. As that wear progresses, the teeth will fall off. This problem has been caused by a sequence of events:
1. The chains got dirty and were not cleaned.
2. The dirt acted as an abrasive and wore the pins and side plates.
3. The wear in the pins and side plates caused the chain to have greater pitch between rollers, than the sprockets had between teeth.
4. High localised pressures developed between sprocket teeth and chain rollers, since they had different pitches. Instead of the roller arriving precisely in the valley between sprocket teeth, it arrived on the far side of the valley.
If you remove your chains and hold them side-on, so their pins and rollers are vertical, you will see that there is a pronounced curve in them, due to the slack between pins and side plates.
At this point since all of your chains and sprockets are garbage, it will do no further harm to keep using them until the teeth fall off the sprockets and the chain jumps around them without driving them. The whole set will need to be replaced together, either now or when total failure occurs.
|
|
|
|
|
Joined: Jul 2005
Posts: 6,362 Likes: 11
Administrator - Master Technician
|
Thanks to wilsoac for posting the great pics; and to Grumpy for his excellent appraisal and diagnosis on the sprockets and chains. This will make a great archival reference for our many Scott Bonnar members and guests here at OutdoorKing. 
Please do not PM me asking for support. Please post your questions in the appropriate forums, as the replies it may receive may help all members, not just the individual member. Kindest Regards, Darryl
|
|
|
|
|
Joined: Apr 2012
Posts: 18
Scott Bonnar Enthusiast
|
Thanks for your help with the sprockets fellas, I was thinking the same thing about just letting them go completely and replacing the entire set at once. It also gives me a little more time to let the dust settle and make the purchase 'under the radar' later on!! I'm now waiting on my parts to arrive in the mail so I can get to work on putting it back together soon. I also added new roller end caps (as suggested) and a clutch leaver pivot to my order as the clutch leaver was held on with a bolt. Just so you guys know I am restoring this mower to be a reliable and functional mower to use every week, not one to admire in the shed/period correct so it may not be aesthetically perfect but it will be mechanically. Here are some pictures of the stickers I purchased off ebay Engine stickers ![[Linked Image]](https://www.outdoorking-forum.com.au/forum/uploads/usergals/2012/04/full-5839-6217-engine_1.jpg) Mower stickers This one is going on the chain cover ![[Linked Image]](https://www.outdoorking-forum.com.au/forum/uploads/usergals/2012/04/full-5839-6218-scott_1.jpg) And this one is going on the grass box and handle bar ![[Linked Image]](https://www.outdoorking-forum.com.au/forum/uploads/usergals/2012/04/full-5839-6219-scott_2.jpg)
|
|
|
|
|
Joined: Jul 2005
Posts: 6,362 Likes: 11
Administrator - Master Technician
|
Hi Wilsoac, great to see you've got it all sorted...hoping that all your parts will arrive on schedule...I'm sure with the attention that you are giving to this Scotty...it will give you hours of mowing pleasure...  mate, on your efforts so far...pics along the journey please!  Best wishes,
Please do not PM me asking for support. Please post your questions in the appropriate forums, as the replies it may receive may help all members, not just the individual member. Kindest Regards, Darryl
|
|
|
|
|
Joined: Nov 2011
Posts: 66
Trainee
|
Looking like a very good restoration. Im going through the same process at the moment. However I have bitten the bullet and ordered new sprockets, but waiting for them to arrive. I have been forced to use the old rotary for the last month and what a difference compared to the reel mower.
In regards to the sprockets and chain's. I have found most 2nd hand units to be in worn out condition. Because in all honestly I dont know anyone who pays particular attention to the maintaince of these items. (excluding members on this forum)
Mine is a later model SB, which is painted in Bright green and I can sypathise with you on how hard that paint is to remove and paint over. However I have not started my catcher yet. Dit you use a flap disc on the angle grinder?
|
|
|
|
|
Joined: Nov 2011
Posts: 66
Trainee
|
Thanks, Cant say I have used one of them, but I will have a look tomorrow when I go to Bunnings.
|
|
|
|
|
|
Joe Carroll
Unregistered
|
I used one of those discs on an old car panel once, it took the paint off like it was nothing, a great unit to use.
|
|
|
|
|
Joined: Jul 2005
Posts: 6,362 Likes: 11
Administrator - Master Technician
|
Hi to All, here's my two-bobs worth... A good mate of mine had a Rover/Scott Bonnar, finished in this solid coloured 'bright green' and wanted to paint his machine in a darker hammertone...(similar to Victa's 'Avocado Green') He just used Selleys 'Quick Strip' paint stripper...and he reckons the paint nearly fell off....a lot easier that sanding... and...a better finish to work with.
Please do not PM me asking for support. Please post your questions in the appropriate forums, as the replies it may receive may help all members, not just the individual member. Kindest Regards, Darryl
|
|
|
|
|
Joined: Apr 2012
Posts: 41
Novice
|
Hi wilsoac, your SB is looking good.
Would you please give me as much info as you can on the paint you used?
I am in the same situation as yourself and although I have searched this site (and the entire internet for that matter), I can't find complete information on the brand and colour of the green used on the SB's chassis and the orange on the reel.
I have tried to find Dulux Alpine Green but the Dulux site doesn't seem to recognise it when I search and the local paint shop tells me that the colour is for internal use only.
Thanks in advance and all the best with your project.
Regards, Dave
Reel Mowers do it better.
|
|
|
|
|
Joined: Jul 2005
Posts: 6,362 Likes: 11
Administrator - Master Technician
|
Hi Dave, the Alpine Green hammertone paint is produced in a spray can by "White Knight" You can get it from Supercheap, Bunnings etc, I believe. As far as the original green hammertone used on Scott Bonnars in the late 70's...the formula has gone into the mists of time and no longer known.... However, if you have a sample of the original paint; for example, behind the chain case cover, you could take it to an Automotive paint supplier and they can source a hammertone base and tint it for you... You would also have to purchase the correct thinners as well and have access to the correct spray gun, compressor etc, or have someone spray-paint it for you. I believe that a close match for the engine, reel etc. is called "Chevvy Orange" and is also available from Auto One, Supercheap etc... Hoping this helps...
Please do not PM me asking for support. Please post your questions in the appropriate forums, as the replies it may receive may help all members, not just the individual member. Kindest Regards, Darryl
|
|
|
|
|
Joined: Apr 2012
Posts: 41
Novice
|
Deejay, that helps enormously.
Thanks a bunch.
Regards,
Dave
Reel Mowers do it better.
|
|
|
|
|
Joined: Apr 2012
Posts: 18
Scott Bonnar Enthusiast
|
Dave C
I looked in Bunnings and everywhere else for that matter for the colour but it appears they no longer make it in that shade (I've been using spray cans) if you enquire with your local Bristol paint centre they may have some cans left.
|
|
|
|
|
Joined: Apr 2012
Posts: 41
Novice
|
Thanks wilsoac, there is a Bristol store in Capalaba which is close to us.
The colour is Alpine Green correct?
Dave
Reel Mowers do it better.
|
|
|
|
|
Joined: Apr 2012
Posts: 18
Scott Bonnar Enthusiast
|
Correct.
White knight 'rust guard' hammered finish alpine green
|
|
|
|
|
Joined: Apr 2012
Posts: 18
Scott Bonnar Enthusiast
|
|
|
|
|
|
|
Joined: Apr 2012
Posts: 41
Novice
|
|
Reel Mowers do it better.
|
|
|
|
|
Joined: Jul 2005
Posts: 6,362 Likes: 11
Administrator - Master Technician
|
It does look very stealthy doesn't it! I like it too.
Please do not PM me asking for support. Please post your questions in the appropriate forums, as the replies it may receive may help all members, not just the individual member. Kindest Regards, Darryl
|
|
|
|
M |
T |
W |
T |
F |
S |
S |
|
|
|
1
|
2
|
3
|
4
|
5
|
|
6
|
7
|
8
|
9
|
10
|
11
|
12
|
|
13
|
14
|
15
|
16
|
17
|
18
|
19
|
|
20
|
21
|
22
|
23
|
24
|
25
|
26
|
|
27
|
28
|
29
|
30
|
31
|
|
|
|
|
Forums144
Topics12,743
Posts106,755
Members18,042
| |
Most Online40,124
Apr 13th, 2026
|
|
|
|


![[Linked Image]](https://www.outdoorking-forum.com.au/forum/uploads/usergals/2012/04/full-5839-6154-img_1131.jpg)
![[Linked Image]](https://www.outdoorking-forum.com.au/forum/uploads/usergals/2012/04/full-5839-6155-img_1132.jpg)
![[Linked Image]](https://www.outdoorking-forum.com.au/forum/uploads/usergals/2012/04/full-5839-6156-img_1133.jpg)
![[Linked Image]](https://www.outdoorking-forum.com.au/forum/uploads/usergals/2012/04/full-5839-6157-img_1134.jpg)

![[Linked Image]](https://www.outdoorking-forum.com.au/forum/uploads/usergals/2012/04/full-5839-6197-fez_0007sc.jpg)
![[Linked Image]](https://www.outdoorking-forum.com.au/forum/uploads/usergals/2012/04/full-5839-6198-fez_0008sc.jpg)
![[Linked Image]](https://www.outdoorking-forum.com.au/forum/uploads/usergals/2012/04/full-5839-6200-fez_0009sc.jpg)
![[Linked Image]](https://www.outdoorking-forum.com.au/forum/uploads/usergals/2012/04/full-5839-6203-fez_0012sc.jpg)
![[Linked Image]](https://www.outdoorking-forum.com.au/forum/uploads/usergals/2012/04/full-5839-6204-fez_0013sc.jpg)
![[Linked Image]](https://www.outdoorking-forum.com.au/forum/uploads/usergals/2012/04/full-5839-6205-fez_0014sc.jpg)
![[Linked Image]](https://www.outdoorking-forum.com.au/forum/uploads/usergals/2012/04/full-5839-6206-fez_0007s.jpg)
![[Linked Image]](https://www.outdoorking-forum.com.au/forum/uploads/usergals/2012/04/full-5839-6207-fez_0009s.jpg)
![[Linked Image]](https://www.outdoorking-forum.com.au/forum/uploads/usergals/2012/04/full-5839-6208-fez_0010s.jpg)
![[Linked Image]](https://www.outdoorking-forum.com.au/forum/uploads/usergals/2012/04/full-5839-6209-fez_0011s.jpg)
![[Linked Image]](https://www.outdoorking-forum.com.au/forum/uploads/usergals/2012/04/full-5839-6210-fez_0008s.jpg)
![[Linked Image]](https://www.outdoorking-forum.com.au/forum/uploads/usergals/2012/04/full-5839-6295-img_1152.jpg)
![[Linked Image]](https://www.outdoorking-forum.com.au/forum/uploads/usergals/2012/04/full-5839-6296-img_1157.jpg)
![[Linked Image]](https://www.outdoorking-forum.com.au/forum/uploads/usergals/2012/04/full-5839-6297-img_1158.jpg)
![[Linked Image]](https://www.outdoorking-forum.com.au/forum/uploads/usergals/2012/04/full-5839-6298-img_1160.jpg)


