|
0 members (),
3,804
guests, and
285
robots. |
|
Key:
Admin,
Global Mod,
Mod
|
|
|
|
Joined: Nov 2011
Posts: 19
Novice
|
My Briggs is in need of some lovin...
Seems to pop or back fire through the carb when you bring up the revs...
Are there a few basic procedures i need to address to get it running back the way it should?
If valves need adjusting, how is it done?
Plug is a motorcraft A7NU which i am havin trouble finding. Is there an equivalent ?
Cheers....
Give a man a fish and he will eat for a day. Give a man a fishing rod and he will sit in a boat and drink cans all day!
|
|
|
|
|
Joined: Jan 2009
Posts: 6,926 Likes: 10
Pushrod Honda preferrer
|
Hi Shifty. First, the simplest one. The recommended spark plug is a CJ8 or equivalent. This is the usual spark plug for most mowers, leaf blowers, line trimmers, etc. It is almost universal.
Before we get seriously into your engine tune-up, please post the full string of numbers stamped on the air cowl. These are in three blocks. We need that information in this thread so it will make sense in the archives.
Your intake pipe popping problem is probably due to either lean mixture or a leaky intake valve. There is more than one possible cause of either of these problems, so we need to collect some basic diagnostic information.
I suggest you go through a proper diagnostic procedure, since your 60102 is new to you, and we therefore don't know its history. Look in the fuel tank for any signs of debris (sediment, grass etc.) If there are any such signs, it will need to be cleaned out - we can talk about how to do that if it is needed. Check that the spark is adequate - remove spark plug, hold plug lead about 3 mm from the cylinder head or cylinder, pull starter, and watch for a steady series of blue sparks. Reinstall spark plug but don't connect the plug lead, and pull the starter a few times to get the feel of the compression. Then remove spark plug, put a spoonful of engine oil in through the plug hole, reinstall the plug without the plug lead, and pull the starter a few more times. Is the compression resistance noticeably greater with the oil in there? If so, your piston rings are leaking and need to be replaced. Check that the governor is working: vary the speed control, which might be either a lever control, or a pull-push wire on top of the carburetor. Does the engine speed increase and decrease through a sensible range when you do this? If it seems to be going way too fast at any time, shut it down and we can do some diagnostics on the governor. (Of course there will be quite a lot of blue smoke when you fire it up after putting the oil into the cylinder: don't worry about it, the smoke will stop after a couple of minutes when all the oil is burned up.)
Having done all that, we should have enough information to move on to specific diagnoses. If you found debris in the fuel tank, we can't yet do the first diagnostic thing, which is to look at the mixture. If the tank is clean, run the engine at maximum governed speed, and use a screwdriver to adjust the mixture screw, which sticks out from the side of the carburetor and has a spring under its head. Turn it clockwise in small increments until the engine slows down a bit or you notice the throttle butterfly lever on top of the carburetor starting to move back and forth. This is the lean limit: it indicates the engine is now running too lean. Then turn the mixture screw anticlockwise in small increments until the engine slows down a bit. That is the rich limit. The correct mixture is halfway between the lean and rich limits. If this mixture adjustment procedure goes smoothly and gives a fairly clear answer, you have probably found the problem, and fixed it.
Next step is to measure the tappet clearances. To do that, remove the valve chest cover, held by 2 screws on the side of the cylinder, between the carburetor/muffler, and the crankcase. The valve chest cover is also the crankcase ventilation valve. When you have removed it you will see the valve springs behind it. At one end of each spring, the tappet pushes the valve up and down as the engine rotates. Rotate the engine until it is just a smidgeon (technical term) past top dead center on the compression stroke. At that point there will be clearance between each tappet and the end of the valve stem. Use feeler gauges slipped into the clearance gap to measure how much clearance there is. The required amount is 0.005-0.007" for the intake valve, and 0.009-0.011" for the exhaust valve. If clearance is outside this range, it will need to be adjusted. There is no way clearance can be reduced if it is excessive, except by replacing the valve (because its stem is too short). If there is not enough clearance, it is increased by removing the valve and grinding away the end of the stem. However, you never attempt to adjust clearance without first lapping the valve into its seat, because the clearance will change when you lap it. We can talk about how to lap the valves if you find the clearance is incorrect.
Note that it is possible you will find that the mixture adjustment does not really work properly because the engine gives symptoms of lean mixture even when the screw is turned a long way anticlockwise. If this happens it means the carburetor will have to be cleaned and inspected. Again, we can talk about how to do that if the results show it is necessary.
Please post results for this process and we can talk about next steps. If you aren't clear on something, let's talk about it until it is clear - you aren't likely to get useful results by working in the dark.
|
|
|
|
|
Joined: Nov 2011
Posts: 19
Novice
|
Wow! Thast a very insightful post Grumpy. Thanks for taking the time to do that.
These are the numbers i found on the engine cowl.
60102 0302 01 7004013
I will run through all the procedures you have listed ASAP.
Are things like Gaskets, Rings, Valves and Cams still available for this engine?
Thanks....
Shifty...
Give a man a fish and he will eat for a day. Give a man a fishing rod and he will sit in a boat and drink cans all day!
|
|
|
|
|
Joined: Jan 2009
Posts: 6,926 Likes: 10
Pushrod Honda preferrer
|
You shouldn't have any problems getting common spares for that engine, Shifty. I don't see a replacement camshaft as a common spare - they are seldom needed, and might cost more than you'd want to spend on a 1970 engine, considering that you could probably buy a second hand engine in good condition for not very much. However as a general rule, the parts are available both locally and from US suppliers. I think most Outdoorking members buy them from the on-line store.
|
|
|
|
|
|
Joe Carroll
Unregistered
|
I got the gasket set for 2 of these I have for $18 on ebay from the good ole country of the stripes and stars, they are not perfect gaskets but they are much better than I would have the patience to make with gasket paper and scissors.
Generally unless the valves are pitted badly I just lap them, then reset the clearance.
Rings should be easy to get, I am pretty lucky with mine both had good ring gap and replacement wasnt neccecery.
|
|
|
|
|
Joined: Nov 2011
Posts: 19
Novice
|
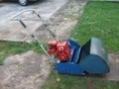
Ok, this is what i have done so far.. New spark plug. Drained tank and cleaned carby. Checked valve clearance. Intake and exhaust are bout the same. .011 thou... Checked for spark. Seems pretty strong.. Not too sure about the governor or springs as they have been bastardised by the last owner. I have no idea how they are supposed to be hooked up? I think this is part of my problem... When i get it running it needs part choke on to keep running. Also, i set the mixture as to the directions above... Im getting confused... ![[Linked Image]](https://www.outdoorking-forum.com.au/forum/uploads/usergals/2011/11/full-5384-4220-image.jpg)
Give a man a fish and he will eat for a day. Give a man a fishing rod and he will sit in a boat and drink cans all day!
|
|
|
|
|
Joined: Jan 2009
Posts: 6,926 Likes: 10
Pushrod Honda preferrer
|
Your governor is in sad shape, Shifty. First, the speed control cable is not attached to the governor at all. However let's leave that for later when the rest of it is sorted out. Second, the speed adjusting lever, which has one end of the governor spring attached to it, is mounted backwards on the carburetor. It needs to be flipped over so the two holes in the flat part are one above the other, on the right side. The spring should then be attached to the lower of the two holes. The other end of the spring is currently attached to the loop in the wire link, whereas it should be attached to the air vane. I can't see what the wire link is attached to in the picture.
This is how the governor works: the governor spring is stretched when the speed adjusting lever is pulled to the left by the speed control cable. That pulls the air vane to the left, and also pushes the wire link to the left, which opens the throttle butterfly. That makes the engine speed up. When it speeds up, more air is blown from the fan on the outside of the flywheel, which pushes the air vane to the right, pulling the wire link and reducing the throttle opening. Reducing the throttle opening stretches the spring, so it tries harder to open the throttle. When the spring force and the air pressure on the vane are in balance, the throttle stops moving and the engine runs at steady speed. If the speed adjusting lever is pulled further to the left, the spring is stretched more and the air vane will have to try harder to close the throttle, so the engine will run faster. If the speed adjusting lever is pushed further to the right, the spring will be less stretched, and will be more easily overcome by the air vane, so the engine will run slower. When you have the linkage correctly assembled, with the engine not running, if you move the speed adjusting lever to the left you should see the throttle open wide. When you push it to the right you should see the throttle close until the idle speed adjusting screw contacts the body of the carburetor.
When you cleaned the carburetor, how did you adjust the mixture screw? If you need choke to keep it running, the mixture is too lean. You fix this by turning the mixture screw anticlockwise a bit - say about an eighth of a turn. Usually the mixture screw needs to be turned anticlockwise about one and a half turns from fully clockwise - but be very gentle when you turn it clockwise to find out how far it goes, or you'll ruin the needle and the jet. Then follow the mixture adjustment procedure I posted earlier in this thread to get the right mixture.
|
|
|
|
|
Joined: Nov 2011
Posts: 19
Novice
|
Ok, this is where i am at Grumpy. This image below is the one that represents my carby best. ![[Linked Image]](https://www.outdoorking-forum.com.au/forum/uploads/usergals/2011/11/full-5384-4224-carby_shot.jpg) I have made the corrections you have suggested and matched the image above as best as i can. What you cant see in the image below is the wire from the butterfly is connected to the air vane right at the top. (seems to be other holes down the side of the air vane too) As you suggest, the spring should not be hooked to the loop in the wire, but it seems to be in the image above. It's running heaps better than it first was so im clearly on the right track. If i can get hold of the correct spring (this one has been cut and shortened) and work out where it needs to be connected on the air vane, i recon it'll run 100%... ![[Linked Image]](https://www.outdoorking-forum.com.au/forum/uploads/usergals/2011/11/full-5384-4227-image_1.jpg) Now to get hold of the correct spring........
Give a man a fish and he will eat for a day. Give a man a fishing rod and he will sit in a boat and drink cans all day!
|
|
|
|
|
Joined: Jan 2009
Posts: 6,926 Likes: 10
Pushrod Honda preferrer
|
Yes, you now have the speed adjust lever correctly assembled. Well done on blowing up that image so successfully, Shifty. You are quite right, the right hand end of the governor spring is shown connected to the loop in the wire link, so that is what you should do. Now as for the spring, Briggs has a number of different ones. Tezza's picture in the other thread shows a longer spring than yours: https://www.outdoorking-forum.com.au/forum/ubbthreads.php?ubb=showflat&Number=30991#Post30991Yours may or may not have been modified. The illustrated parts list for your engine shows 6 different governor springs fitted to 60102 engines, depending on the engine's type number. However your type number (0302-01) is not listed as using any of the alternative types and therefore in theory uses the "master" part number spring, which is 260041. I suspect you'd be flat out getting any of the alternative types anyway, so you may be lucky here. I do not know whether the short spring you currently have, is actually an unmodified 260041. If you are sure it has been modified, you need a new one. Tezza's wire link, in his picture in the other thread, looks as if it is in the second hole from the top of the air vane - but that will be selected to suit the governor spring that he is using. Most likely each of the different springs B&S prescribes for different type numbers of 60102 will attach to a different hole in the air vane. In effect the height of the link-hole above the vane's pivot determines the "gain", or sensitivity, of the governor. When you have the spring you want to use, and you have adjusted the length of the damaged wire link to put the vane in the correct position, you should attach the link to a vane-hole that makes the governor work well: not sluggish (which would mean you had used too low a hole, so the gain was too low), and not prone to "hunting" (which would mean too high a hole, so the gain was too high).
|
|
|
|
|
Joined: Nov 2011
Posts: 19
Novice
|
I have played around quite a bit today with the mower and have it running pretty well.
The only thing is it still needs a little choke to run at best. I tried the mixture screw but this wont help.
Im not sure that this problem is governor related. Seems more like a fuel problem to me.....
Give a man a fish and he will eat for a day. Give a man a fishing rod and he will sit in a boat and drink cans all day!
|
|
|
|
|
Joined: Jan 2009
Posts: 6,926 Likes: 10
Pushrod Honda preferrer
|
If it runs better with choke than without, there is little doubt it is running lean. There is a possibility that it has an intake valve leak which is puffing back through the carburetor and causing symptoms of lean mixture - you can check for this by running it without the air cleaner, and checking for a sort of puffing of fuel out of the carburetor's air intake. However it is rather more likely that the mixture really is lean, due to lack of fuel flow through the carburetor. If you can't make it rich by turning the mixture screw anticlockwise, then you almost certainly have a clogged carburetor and it needs to be cleaned out. The usual problem causing this outcome with your model is that it has accumulated debris in the fuel intake filter, which is a strainer on the bottom of the carburetor's fuel suction pipe. This is attached to the underside of the carburetor, hanging down into the fuel tank. There are two ways to access this strainer. You can undo the screws attaching the fuel tank to the carburetor, and lower the tank, leaving the fuel suction pipe projecting downward from the carburetor. The intake strainer is visible underneath the bottom of this pipe. You can clean the strainer in place, or on some models of Vacujet, the pipe is plastic and can be unscrewed with a spanner so you can clean it on the bench. The second way to access the filter, and the one I prefer, is to disconnect the speed control cable and then remove the carburetor and fuel tank as an assembly, by undoing the two screws attaching the carburetor to the cylinder's intake port. Carefully unhook the governor's wire link when you do this. Once the carburetor and fuel tank are on the bench, you can remove the tank, turn the carburetor upside down, and access the intake pipe more conveniently. You can also remove the mixture screw and clean the main jet.
|
|
|
|
|
Joined: Oct 2010
Posts: 1,819 Likes: 6
Junior Technician
|
I would start with removing the mixture screw and jet and cleaning them. Squirt some carb cleaner into the body of the carb and chase it with compressed air, easier to see whats going on with the carb off the motor, like Grumpy has suggested, clean everything all at once.
Check the end of the mixture screw for marks. Ive got a whole heap here that have been over tightened, they get a ring around the needle and it is then impossible to adjust the mixture as the needle is lean or rich with no in between.
Another possiblity would be a leak in the inlet tract, its a gasket on that motor i believe.
|
|
|
|
|
Joined: Jan 2009
Posts: 6,926 Likes: 10
Pushrod Honda preferrer
|
Yes, there is a gasket between the carburetor's mounting flange and the machined face of the cylinder, around the intake port. Make sure the gasket is not leaking (all four surfaces must be smooth: both sides of the gasket, the carburetor flange, and the cylinder's mounting surface). Ensure that the attaching screws are firm, too. I don't recommend putting gunk on the gasket, because it is so annoying having to replace it next time you take the carburetor off, when it delaminates and comes off with rough surfaces. If you want you can put gunk on one side only, so you only have one surface to clean in future.
|
|
|
|
|
Joined: Nov 2011
Posts: 19
Novice
|
Cheers for the reply's..
Unfortunately, i had already done all of the procedures mentioned above including stripping and cleaning the tank and carby (compressed air)...
Also, i sealed around that gasket...
I am chasing down an original spring (governer) so im kind of hoping this will help?
Also getting my cylinder sharpened now $50. Seemed like a good price...
Give a man a fish and he will eat for a day. Give a man a fishing rod and he will sit in a boat and drink cans all day!
|
|
|
|
|
Joined: Jan 2009
Posts: 6,926 Likes: 10
Pushrod Honda preferrer
|
Shifty, are you saying that the fuel suction pipe is clear, but you still can't get it to run rich by turning the mixture screw anticlockwise? Remember there is a non-return valve in that pipe, as well as the screen on the lower end. Be sure the valve is clear, in case someone has "cleaned" the filter at some point by pushing the crud through it into the non-return valve.
Compressed air will not clear the passages in a carburetor. You have to use solvent if you need to clear the passages (which is seldom necessary, because of the fine screen on the bottom of the suction tube). The compressed air is just to blow the solvent out, to get rid of it after it has done its job. On its own, the air will just blow the crud into the wrong places and pack it hard.
I think getting the cylinder and bedknife sharpened by a proper expert typically costs $50-70. However it is essential that the bedknife is included: you can't mow properly with a blunt or wavy bedknife.
When you have the governor working properly you can make a reasonable check of whether the mixture is actually lean by running the engine at maximum speed and putting a reasonable load on it. It is fairly sure to hunt (cycle in speed every second or two) if it is lean. It can be difficult to check by using the kind of choke you have. Also, remember that you can only test mixture with the air cleaner fitted, including its retaining screw in the center of the carburetor intake.
|
|
|
|
|
Joined: Nov 2011
Posts: 19
Novice
|
Thanks Grumpy.
I will re clean carb with carby cleaner and re try.
Also, i should have said $50 was for cylinder and i am getting new bed knife and screws.
Golf and Bowl in Melton have been really nice people...Great service and great prices....
Give a man a fish and he will eat for a day. Give a man a fishing rod and he will sit in a boat and drink cans all day!
|
|
|
|
|
Joined: Oct 2010
Posts: 1,819 Likes: 6
Junior Technician
|
I could probably chase you up a spring. I do have a small horizontal briggs here on a stuffed edger.
And one of the little bins on the wall is full of govenor springs.
|
|
|
|
|
Joined: Nov 2011
Posts: 19
Novice
|
Thanks for that Rodeobob..
I should get my cylinder and bed knife back today so I'm pretty keen!
Give a man a fish and he will eat for a day. Give a man a fishing rod and he will sit in a boat and drink cans all day!
|
|
|
|
|
Joined: Nov 2009
Posts: 134
Apprentice level 2
|
in that picture of yours the two springs are the wrong way round, the long one needs to go to the governer, and the spring with the long arm attaches to the top of the mower. the spring you see on mine isnt the correct one as the correct one broke.
|
|
|
|
|
Joined: Jul 2005
Posts: 6,362 Likes: 10
Administrator - Master Technician
|
Hi Shifty, what is the make and model of your cylinder mower? 
Please do not PM me asking for support. Please post your questions in the appropriate forums, as the replies it may receive may help all members, not just the individual member. Kindest Regards, Darryl 
|
|
|
|
These Outdoorking Forums have helped Thousands of people in finding answers to their equipment questions.
If you have received help, please consider making a donation to support the on-going running cost of these forums.
|
|
|
M |
T |
W |
T |
F |
S |
S |
|
1
|
2
|
3
|
4
|
5
|
6
|
7
|
|
8
|
9
|
10
|
11
|
12
|
13
|
14
|
|
15
|
16
|
17
|
18
|
19
|
20
|
21
|
|
22
|
23
|
24
|
25
|
26
|
27
|
28
|
|
29
|
30
|
|
|
|
|
|
|
|
Forums145
Topics12,999
Posts106,905
Members17,607
| |
Most Online16,069
Sep 18th, 2025
|
|
|
|