Initially I wasn't totally convinced with my colour choice so I sprayed a little on both sides of a sheet of paper and compared it... the colour appears to be a good match:
Although I was advised it would not be needed I decided to apply a white plastic primer, this was mainly to fill in some of the small scratches/imperfections before painting:
I let the primer harden for a while then 24hrs later.... on goes the green...
Amazing how different the colour looks under different lighting/flash..??
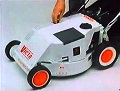
I decided to put the badge on it temporarily just to see how the (almost) finished product would look:
Well,
On the whole I am really pleased with the result, I like it and it's staying the way it is.
I'm a little sad to have to paint such a good white dress cowl but I'm also really pleased with the finish and hope it resembles what it would have been for this machine when it rolled off the production line, it matches the underside of the zip starter perfectly when I look at it so.... although the rest of the machine has some sunburn... this is the colour.
Ok, another question, I want to seal it now so should I put on a matt or gloss 2k finish to protect it from petrol?
Thanks again everyone for all your input and suggestions, I wouldn't have got this far without them.
Once I get this part finished.. it's on with the rest of it..!!
The only issue I can see with putting a gloss clear over base is that it will slightly change the colour a little, essentially a tad darker and deeper I'd say.
Cheers, BB.
I live a 24 Hour lifestyle, but every now and again I seem to fall asleep, well at least that's what my wife tells me.
Guys, Looks like photobucket have blocked the pictures..!!! Here's the post again with a different host: ........................................................................................................................................
Well, here goes then...
Initially I wasn't totally convinced with my colour choice so I sprayed a little on both sides of a sheet of paper and compared it... the colour appears to be a good match:
Although I was advised it would not be needed I decided to apply a white plastic primer, this was mainly to fill in some of the small scratches/imperfections before painting:
I let the primer harden for a while then 24hrs later.... on goes the green...
Amazing how different the colour looks under different lighting/flash..??
I decided to put the badge on it temporarily just to see how the (almost) finished product would look:
Well,
On the whole I am really pleased with the result, I like it and it's staying the way it is.
I'm a little sad to have to paint such a good white dress cowl but I'm also really pleased with the finish and hope it resembles what it would have been for this machine when it rolled off the production line, it matches the underside of the zip starter perfectly when I look at it so.... although the rest of the machine has some sunburn... this is the colour.
Ok, another question, I want to seal it now so should I put on a matt or gloss 2k finish to protect it from petrol?
Thanks again everyone for all your input and suggestions, I wouldn't have got this far without them.
Once I get this part finished.. it's on with the rest of it..!!
W W!! That looks professional!! As for which clear to use, go with gloss!
Thanks Mowerfreak, As luck would have it I got some 2k gloss when I bought the paint.
Originally Posted by Bonnar_Bloke
The only issue I can see with putting a gloss clear over base is that it will slightly change the colour a little, essentially a tad darker and deeper I'd say.
Cheers, BB.
That was my concern. I have read similar stuff from people that have used gloss on their diy paint jobs. Don't get me wrong, I'm not keen to go out and buy matt 2k, it's pretty expensive (about �20 a can)... I think this has cost me enough so far.
Wouldn't the original finish have been matt? I have never seen one in the flesh before, I've only seen a few pics so I cant really comment.
The cowl looks the right finish when comparing it to under the starter,I would paint a green test section on a plastic drink bottle then wait a few weeks for the paint to harden then wipe a fuel soaked rag on the test section and if the paint does not come off leave the cowl without a clear coat.
It�s been quite a while now since my last post. Many of you guys have shown an interest in my VC109 project (and gave me ,sound advice) I promised myself that I would keep you all updated with my progress. I now realise the importance of uploading pics directly to the site as apposed to the picture hosting sites as they quickly took the images away..... lesson learned..!
Well...on the whole, not too much progress to report really. I don�t know how far to go with this �semi restore� so for the time being I have just fettled and tidied it up a bit. I've added a few of the parts from the donor VC160 along with some other parts that I was lucky to find on ebay recently to try and make it more functional/original but that's about it,
�That Horrible Green Cowl�
The VC109, revered by many as "The Ugly Duckling". After the spray job, in the end I went with a really good quality 2k matt clear coat lacquer to finish it. I obviously wanted to avoid the extra expense of doing this but I tried a sample of the untreated spray paint on a ruffed up old plastic coke bottle (as kindly advised by Maxwestern) but even after it was left for a week to harden a petrol soaked rag wiped it off easily... Ouch..!! I recon it has cost me around �45+ to paint this originally white VC160 cowl (including the lacquer and special mix paint) I know some will disagree but I still think It was worth it.
Throttle Control Lever-
Had a bit of luck here, I managed to get hold of a NOS throttle control lever to replace the retro�fit one that was bastardised onto the handlebars (extra drill hole in the handlebar) I never thought I was going to find a brand new original control lever here in the UK so I was pretty chuffed when I did.!
Electrolysis �
A bit of research over the winter to get the engine cowl back to bare metal and recover the "70 Series� decal. I set up a tank to strip off all the old paint/rust, It worked a treat and I managed to recover the original decal although (rightly or wrongly) I decided not to stick it back on the now repainted cowl as it didn�t look too good. I finished the gloss black spray paint finish with some 1k petrol resistant lacquer. I got in touch with Silensemessor and bought a new set of decals from him on ebay. I�m really impressed with them, they are really good quality, I just need to decide if I should replace the cowl decal, as you can see I haven't done this yet.
Exhaust Muffler-
This was in good condition so a good rub down with a wire brush drill attachment and a few coats of 400*c matt black spray paint was applied. I managed to break the gasket up pretty badly when I removed it so I had to buy a replacement.
Well, apart from a few cowl screws (that I haven't got round to cleaning up yet) it's back together and I absolutely love it. I have cut my postage stamp size lawn with it a few times now and it is a bloody joy to use, it starts 1st pull every time but it's retirement for this one now. It has a reserved place in my garage and apart from the odd run up it won't be cutting any more grass in the future.
Mowerfreak also said that "This Victa collecting thing can get quickly our of hand" boy...he was right..!
Even though I am struggling for space the "Victa bug" has got a grip on me and I have recently bought a 85cc Lightweight/Compact (this is the machine that started my Victa obsession 20+yrs ago) a rough 1974 VC160 (for parts) and a 1966 V37 (model 548). I have never seen a V37 here in the UK since I took an interest in Victa mowers so at �35 I just had to buy it. It will take some time but I want to do a proper restore on this one when I can get it running properly.
The V37 starts 1st crank (on full revs with the 3Q carby fully primed) it has good compression, but it just dies out after that. I have thoroughly cleaned the carb, replaced the coil/condenser/plug/points but still no joy so I suspect it is a carb jet, crank seal or ring problem. The seals show no signs of leakage though so any suggestions are welcome with this as I don't know what to do next?
Hi Alan!, long time no see! How's the grass on your side of the globe? I see the disease has hit I have just got my18th and 19th mower recently, you are doomed lol! That 85cc will be perfect for your lawn and the VC 160 Auto Drive is looking as it should. Where did you source the catcher? Well done getting your hands on a green one. It seems stuff is easier to come by in the UK than here where the machines were born! We exported absolute ship loads to your area, so I am not totally surprised and your population base is far higher, so I wouldn't be surprised if at least as many Victas reached your shores as stayed behind. BTW that was Maxwestern who came up with the drink bottle test! Loved the photos.
Ahh, if only victa had kept producing the thumblatch catcher series, they would be in better shape today!
The grass is almost dead here, we have had no proper rain where I am in the south east since the end of May. Who would have thought it eh.. a heatwave in the UK..!!
The green catcher for the VC was the one that came with it. It has some fairly bad cracks though so not sure how long it will last. I don't see that many Victas here nowadays, not as many as there was when I first got interested in them.
The 85cc Lightweight is absolutely perfect for my needs, starts first pull and has all the power I need. It's a proper little workhorse and was used regularly when the grass was growing.
Crikey 19 mowers... where do you keep them all..?
From now on my last mower will be a Twin/500 (if I get the opportunity) and that will be the last and final piece in the jigsaw.
Sorry for mixing you up with Maxwestern, good advice all the same and it could have saved me a few quid had it paid off. What do you recon on the V37? any thoughts on the running problem? Looks like it has had an adaptation to the exhaust, must have been homemade as I cant see anything like it in my records.
Hi Alan, Nice to hear that the half twin 85cc is going well. I would love to add that to my collection for sure! As for my mowers, I am fortunate to have plenty of undercover space that is fast running out. I really have to concentrate on rationalisation. I want to have a core collection of around five in the long run, but I keep finding ones I like and want to get going. I recently found a powertorque from the late 80s, just like a neighbour used to have and I admired. I replaced the muffler, fitted a spare blade holder, sharpened the blades up and made up some metal shims to stop movement in the front axle bushings and now I have a fantastic workhorse I enjoy using. I so wish I had a big lawn again!! I hope someone else can help you with your 60s self propelled classic. Does it have a catcher? It would sure look nice with some re-chroming work on the engine cover. The base looks in really good shape.
Ahh, if only victa had kept producing the thumblatch catcher series, they would be in better shape today!
With the V37 this is what I would do,other people may have some other ideas as well.
I would make sure the spark timing is correct if it has not already been checked , when cleaning a carby I usually push a length of fuse wire from the house fuse box into the main jet in the carby just to clear any blockage because compressed air will not always dislodge a blocked jet. If I want to check that the starting problem is fuel related I remove the air filter and spray start ya bastard into the air intake and if the motor will run for 10 seconds when spraying the starter fluid it's most likely a fuel supply problem. click here for link starter fluid example
If I have problems starting a mower especially with the wind up starters I use a drill to start the engine or bolt a later zip starter on.
No catcher with this one unfortunately, I believe they would have been the metal type so probably didn't stand the test of time?
I don't think the timing is to blame as it will start once the engine has been primed up, it just wont continue running. I wasn't sure about poking wire down the jet as I thought it might damage/scratch the internal bore? I have to admit though I am sorely tempted to as I recon that's the problem although the jet hole on the 3Q carb is really tiny, not sure if even the finest fuse wire I have would fit. As there's no de-compressor valve on this engine I bet its a a kick-back nightmare with a zip starter or drill? Looks like you have already done it though Max, so It's just a case of fitting a zip cup and starter then?
Cheers for the link and pics, "Start Ya Bastard..!!"
Noooo! That's sacrilege removing the impact start, though it looks surprisingly good with that round zip starter tacked on top. I found a store brand once with the decomp port blocked off and had no real trouble starting it, but certainly appreciated what the valve did.
Ahh, if only victa had kept producing the thumblatch catcher series, they would be in better shape today!
I had the chance a few months ago to pick up one of those half twin mowers with a few Powertorques I had won on ebay ( bit annoyed with that win because my grandson bid over me) anyway I ended up with them for $16 each, then the bloke offered me the half twin for $25 but I knocked it back
I could see no future for it in my cost neutral hobby apart from it being another mower taking up space here and I have enough like that and I am on a mission to reduce the number I have here. That doesn't seem to be working too well at the moment either.
It will probably make more sense if I explain why I use fuse wire.
In the image below I rubbed the copper fuse wire around the brass gas fitting with some force for at least 20 seconds and it did not even polish the tarnish off the brass so the jets are undamaged with this method.
What materials are fuse elements made from?
Most Low Voltage fuse elements are made of copper (Cu). Fuse elements of fast acting fuses and High Voltage fuses are primarily made of silver (Ag). Silver plated copper is also commonly used. As a rule, fuse elements of time delay fuses contain low melting point materials, e.g. tin (Sn) or zinc (Zn) and alloys thereof. Formerly used alloys containing lead (Pb) and cadmium (Cd) have widely been eliminated.
What materials are jets made from? Jets are fuel and air metering orifices. At least in most carburettors I�ve worked on they are made of brass and are screwed into suitable holes machined into the carb body.
A lot of manuals say don't go poking around jets,it's mainly so people don't force wire into the jet making the jet hole larger than the standard jet but when you have a brass jet and a copper wire plated in silver, I have never scratched a jet hole larger than standard when cleaning one in this way.
I use different amp size fuse wire for different sized jets in the image below this 8 amp wire looks to be about 10 thousands of an inch and should fit a lot of the smaller jets.
No kick-back nightmare when using a zip starter or drill and once the engine is running well you can fit the impulse starter back on if you prefer it,I just change the starter because it's quicker starting an old motor with the zip starter when you have a problem with the motor.


![[Linked Image from i86.photobucket.com]](http://s86.photobucket.com/user/Alanuk1969/media/WP_20171001_001_zpsnmzvbwdd.jpg.html)
![[Linked Image from i86.photobucket.com]](http://s86.photobucket.com/user/Alanuk1969/media/WP_20171007_013_zpszfnk133m.jpg.html)
![[Linked Image from i86.photobucket.com]](http://s86.photobucket.com/user/Alanuk1969/media/WP_20171007_008_zpste4a3afw.jpg.html)
![[Linked Image from i86.photobucket.com]](http://s86.photobucket.com/user/Alanuk1969/media/WP_20171007_043_zpsna24m7e7.jpg.html)
![[Linked Image from i86.photobucket.com]](http://s86.photobucket.com/user/Alanuk1969/media/WP_20171007_061_zpskhbrkkl6.jpg.html)
![[Linked Image from i86.photobucket.com]](http://s86.photobucket.com/user/Alanuk1969/media/WP_20171007_058_zpsy5xptyn3.jpg.html)
![[Linked Image from i86.photobucket.com]](http://s86.photobucket.com/user/Alanuk1969/media/WP_20171008_011_zpsj9uw70es.jpg.html)
![[Linked Image from i86.photobucket.com]](http://s86.photobucket.com/user/Alanuk1969/media/WP_20171008_009_zpsiojgukjm.jpg.html)
![[Linked Image from i86.photobucket.com]](http://s86.photobucket.com/user/Alanuk1969/media/WP_20171008_008_zpssiuayedr.jpg.html)
![[Linked Image from i86.photobucket.com]](http://s86.photobucket.com/user/Alanuk1969/media/WP_20171008_003_zpscmbnycvo.jpg.html)
![[Linked Image from i86.photobucket.com]](http://s86.photobucket.com/user/Alanuk1969/media/WP_20171008_024_zps4pp3zeto.jpg.html)

![[Linked Image from s20.postimg.org]](https://s20.postimg.org/ge10ba6v1/WP_20171001_001.jpg)
![[Linked Image from s20.postimg.org]](https://s20.postimg.org/ulqozxjjx/WP_20171007_012.jpg)
![[Linked Image from s20.postimg.org]](https://s20.postimg.org/k06tnxd8d/WP_20171007_025.jpg)
![[Linked Image from s20.postimg.org]](https://s20.postimg.org/9reci3p6l/WP_20171007_027.jpg)
![[Linked Image from s20.postimg.org]](https://s20.postimg.org/uct4a06rh/WP_20171007_038.jpg)
![[Linked Image from s20.postimg.org]](https://s20.postimg.org/q8wqv9071/WP_20171007_062.jpg)
![[Linked Image from s20.postimg.org]](https://s20.postimg.org/dqbk0xdtp/WP_20171008_016.jpg)
![[Linked Image from s20.postimg.org]](https://s20.postimg.org/vhn6fdt8d/WP_20171008_011.jpg)
![[Linked Image from s20.postimg.org]](https://s20.postimg.org/ofp8t6pml/WP_20171008_008.jpg)


